Content Types
- Build Content – Create folders to organize files, images, external links, etc. You can also add media that is pulled from an external websites through the Mashup tool.
- Assessments – Create Tests, Surveys, Assignments, and SafeAssignments that link automatically to the Grade Center or Gradebook.
- Tools – Add a link to all Blackboard Tools. More info on Collaboration Tools can be found in our Quick Guides.
AI Design Assistant for Blackboard (Ultra) (NEW)
Visit this page to learn more about the new AI Design Assistant for Blackboard Ultra.
Add & Organize Various Content (Ultra)

Add Content
- Log in to learn.bu.edu using your BU login name and Kerberos password.
- Locate and select your course in the list.
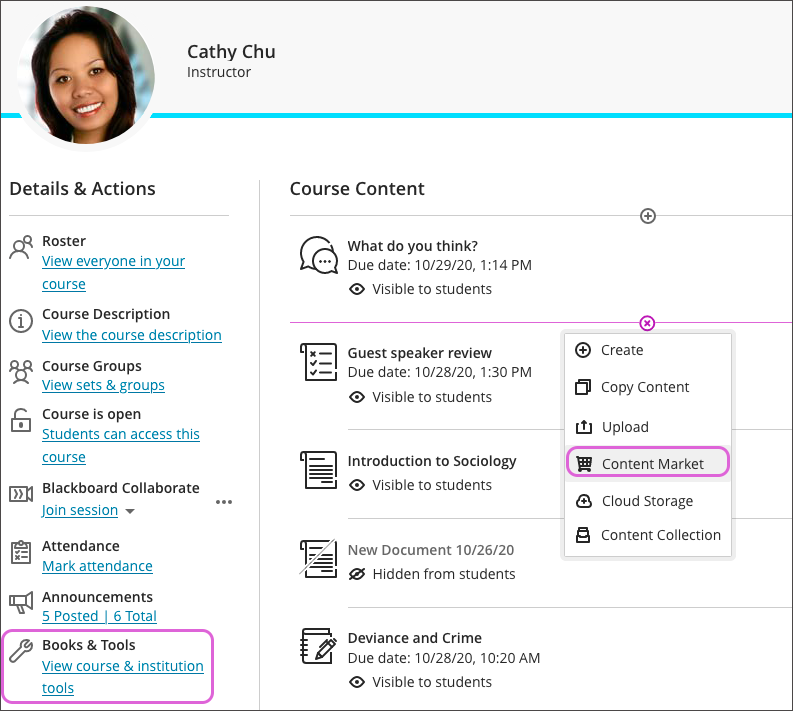
- Select the plus sign wherever you want to add content. You can also expand or create a folder or learning module and add content. Create new content, upload something you already have, or add content from external sources or from another course.
- Selecting Create allows you to add learning modules, documents, links, folders, assignments, tests, discussions, and journals. A panel opens and you can choose the content type you want to add.
- Selecting Copy Content allows you to copy an entire course or select items from the Ultra courses you teach. Want to copy an entire Original course or import a course package? Open the menu on the right side above the content list and select the Import Content option.
- Selecting Upload allows you to browse for files on your computer. They will appear in the content list. Students select a file title to download it. Supported file types include DOC, DOCX, HTM, HTML, MP3, MPG, PDF, PPT, PPTX, XLS, XLSX, RTF, TXT, ZIP, and most image types.
- Selecting Content Market allows you to discover and add content and tools from external sources. Access valuable learning materials that Boston University has provided, such as Zoom and Kaltura.
- Selecting Cloud Storage allows you to instantly connect to multiple web apps where you store files, such as OneDrive and Google Drive. You may choose multiple files from cloud storage to add to your Course Content page in one action. The files you add are copies. If you make a change to a file in cloud storage, you need to upload a new copy in your course.
- Selecting Content Collection allows you to add files from your Boston University’s shared repository. You can store and find content in personal, course, and institution folders in the Content Collection. If you stored files from other courses in the Content Collection, you’ll be able to easily find and add them.
Organize Content: Folders
- Creating folders to organize content can help keep your course in order. You can create three levels of folders to organize your content. Students can navigate easier when they don’t have to search for materials. Optionally, add folder descriptions to help students understand what content you’ve included in them. After you already have three levels of folders, you can’t create a fourth level or upload a folder into the third-level folder.
- On the Course Content page, folder titles appear as links students select to view the materials. Optionally, add descriptions to help students understand what content you’ve included in them.
- You can create four levels of folders to organize your content. Students won’t get lost looking for materials, and your content is easier to manage. Also, students can navigate easier on smaller screens when they don’t have to search for materials. After you already have three levels of folders, you can’t create a fourth level or upload a folder into the third-level folder.
- If you don’t add a title, New Folder and the date appear in the content list. If you add no content, an empty folder with the placeholder title appears on the Course Content page.
Organize Content: Learning Modules
- Similar to folders, learning modules can aid in creating a learning system. You can use learning modules in your course as containers for organized collections of content. Modules let students navigate from one content item to the next without distractions or extra clicks.
- If you use a textbook or other materials as the basis for your course curriculum, modules are an effective and logical way to group content to match the pace of these materials. To support this pace and logic, you can require students to access module materials in a chosen order. You can only set the Sequence condition if students haven’t started working in the module. You can remove the condition after students start working, but you can’t reapply it.
- Alternatively, you can allow students to explore the content in a learning module in any order and at their own pace. For example, use a learning module to present a series of images and descriptions of various animals in a genus. Students can view the images and descriptions in any order as no order is required for understanding the whole.
- When a module is visible, students can also view all visible content within the module, including due dates. Students can open and access the content in any order. If you force a content sequence, a message appears. Students are told that they need to open and complete the content in order, along with other conditions you set.

- Select the plus sign wherever you want to add a learning module. In the menu, select Create to open the Create Item panel. Select Learning module.

- Type a name, optional description, and select the module’s visibility.
- To select whether students will view the learning module’s content in sequence, select Conditional availability in the module’s visibility menu (this menu can also be accessed from the Course Content page).
- In the Define Conditions section, you can select Sequence to have this item appear as part of the learning sequence. You can only apply this option to learning modules. You can also make modules available for students based on date or performance.
- In addition to content items, files, and assessments, you can add activities and tools that promote interactive learning and collaboration.
- After creating a learning module, you can edit it and add content to it.

- Hover over the title or description and select to edit. Add an engaging description so students know what they’ll learn in this module.
- You can show or hide the module for students. You can also select conditional availability. You can set the module availability on a certain date, as students achieve a chosen grade, or in a content sequence.
- Drag content from the Course Content page into the module or create content directly within it.
- Documents
- Files
- Tests and assignments
- Multimedia
- Links to websites, discussions, and journals
- You can add folders to a learning module to organize content. Folders in learning modules can only contain content items, not other folders. Students navigate through content in folders the same as any other content in the module. However, you can force a content sequence. Students need to access and complete content within the folder before they move on to the next content item within the module.
- To view and organize content, select the arrow to expand the module and view all content. Reorder content in the order you want students to access it. Want to enforce the order? You can force a content sequence.
- You can select visibility for individual items within the learning module. You can also add conditions for when the content becomes available.
- If you delete a learning module with content, the content is also removed from the Course Content page.
- After students open a content item within the learning module, they can navigate through the module with the arrows at the top of the browser window. When students are required to access the content in order, a lock appears next to the arrow. Students can exit the module before completion. When students return, icons appear next to the module content if the sequence is enforced. The icons show which content is complete, in process, and not started, so students can pick up where they left off.
- A green circle with a check mark means that content is complete. A partially filled green circle means the content is in process. A lock icon means the content hasn’t been started.

- A green circle with a check mark means that content is complete. A partially filled green circle means the content is in process. A lock icon means the content hasn’t been started.
Editing and Removing Content
- Students can’t access your content until you decide to show it, but you can always see it. Select an item’s visibility to change it. You can also create rules to release content based on date, time, or how a student performs on other items in your course. When you create these rules, you can choose whether the item is visible to students before they have access.
- To move an item on your Course Content page, point to an item to reveal its management functions. Select the Move icon and drag the item to a new location in the list.
- Editing any item in your Course Content page can be done by hovering over that item to reveal its management functions. In an item’s row, open the menu to access the Edit and Delete functions. You can make changes or delete an item from your course. If you delete a folder or learning module that has content, the content is also removed from the Course Content page.
Types of Content (Ultra)
- Learning Module: A learning module helps immerse students in the lesson or concept you’re teaching. If you use a textbook or other materials as the basis for your course curriculum, modules are an effective and logical way to group content to match the pace of these materials. Read more about learning modules in the section above on organizing content.
- Folder: You can create three levels of folders to organize your content. After you already have three levels of folders, you can’t create a fourth level or upload a folder into the second-level folder. Use folders to reduce scrolling and help students find materials easily. Read more about learning modules in the section above on organizing content.
- Document: You can create a page called a document and add text, audio, video, files, and images.
- Link: You can link to an outside website or resource.
- Links will open in a new tab, including YouTube videos
- Teaching Tools and Content Market: You can include content with the Learning Tools Interoperability (LTI) functionality, providing functionality for external tools such as:
- Zoom – Video conferencing and recording
- Gradescope – Online assignment grading and feedback
- Kaltura Media Gallery – Compile video resources for students
- Kaltura Video – Create and post videos for students
- Kaltura Quiz – Develop interactive video quizzes
- Turnitin – Online paper assignment grading and feedback
- Digication – Compile digital multimedia resources
- PointSolutions – Conduct in-class surveys and feedback sessions
- SCORM package: SCORM packages are web-based content gathered together into a compressed ZIP file that can be unpackaged and played through a content player.
- Test: You can create tests to assess student knowledge. You can add question types, such as Essay, Fill in the Blank, Fill in Multiple Blanks, Matching, Multiple Choice, Multiple Answer, and True/False.
- Assignment: You can create graded coursework, and manage the grades and feedback for each student or group of students.
- Discussion: You can provide a link to a discussion near related content. For example, you can add a file for students to read. Then, if you want them to respond in discussions, add a link for easy discussion participation.
- Journal: You can provide a link to a journal near related content. Add a prompt to set expectations and guidelines to get students off to a good start.
- File: Select Upload to browse for files on your computer. They will appear in the content list. Students select a file title to download it. You can also expand or create a folder and upload files. Supported file types include DOC, DOCX, HTM, HTML, MP3, MPG, PDF, PPT, PPTX, XLS, XLSX, RTF, TXT, ZIP, and most image types.
Content Editor (Ultra)
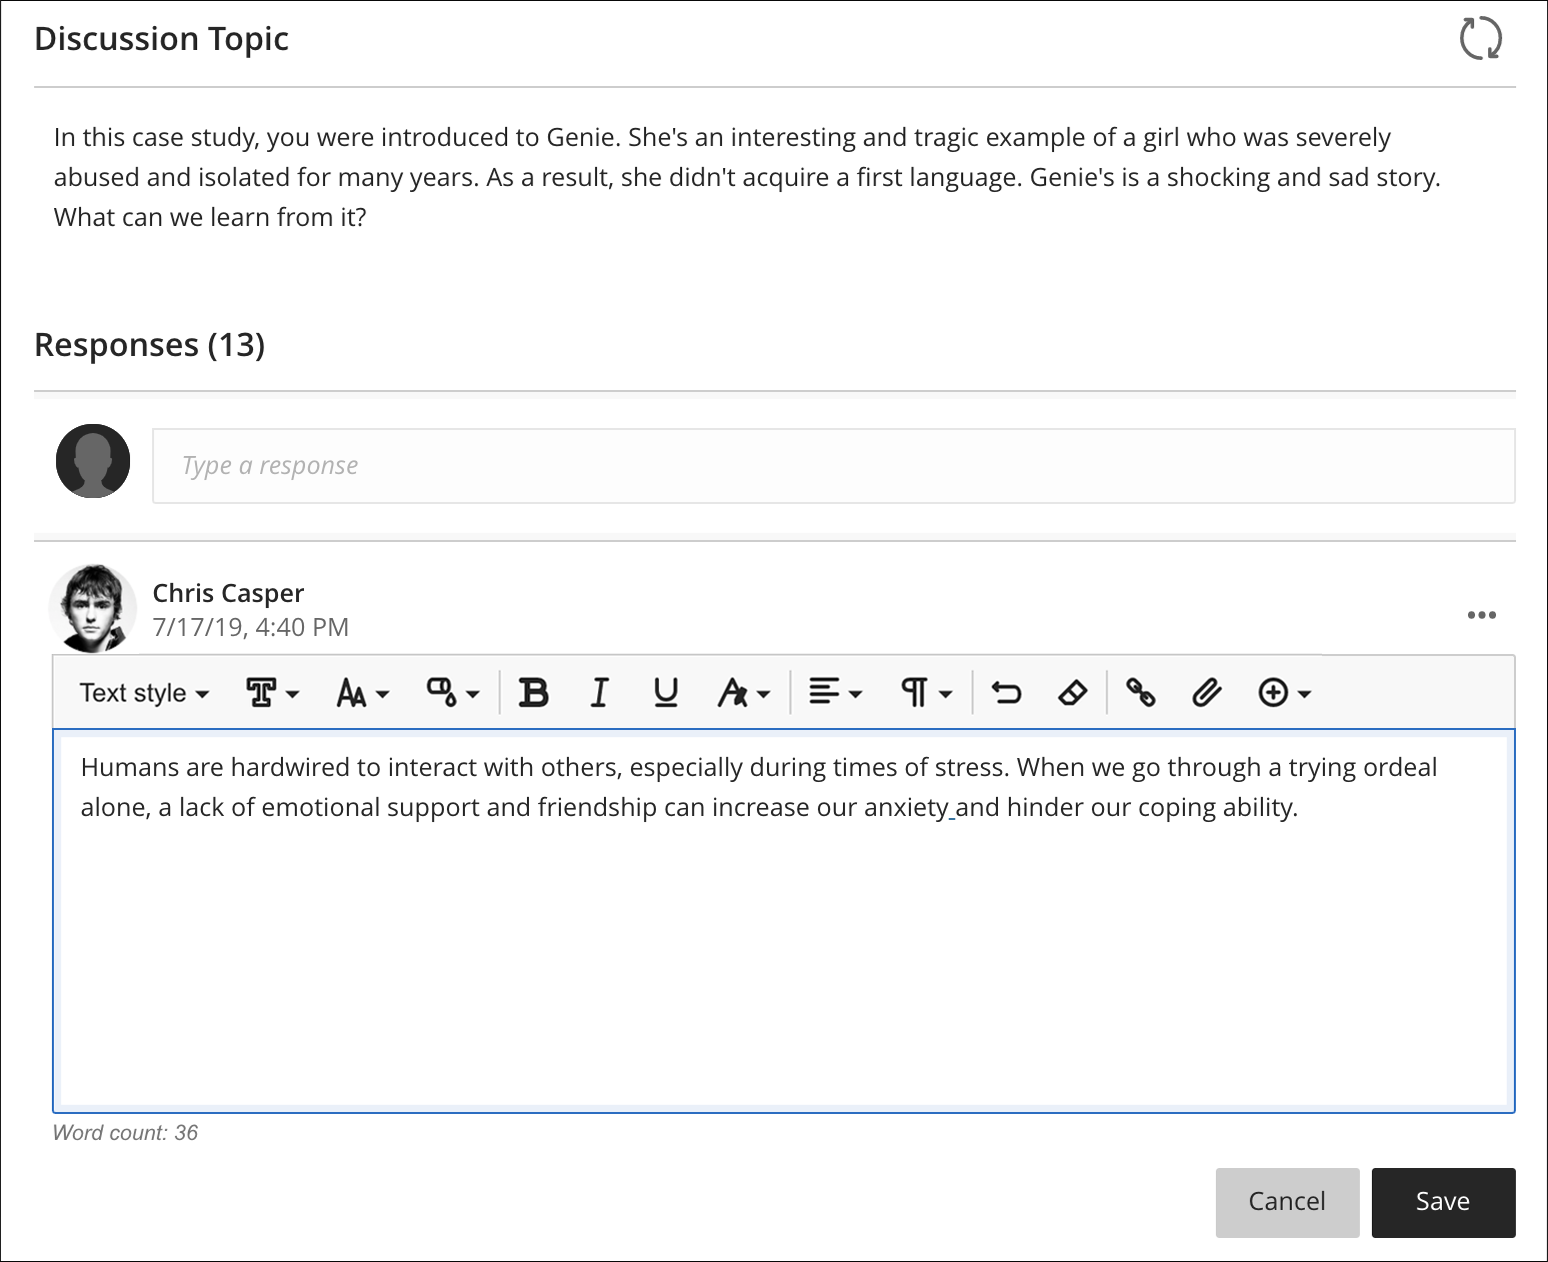
The editor appears in most places you can add text. You can use the editor to add and format text, embed images, attach files, and insert equations, links, and tables. Use the options in the editor when you work in assignments, tests, discussions, messages, conversations, journals, and more.
Adding and Editing Text
- You can add bullet and numbered lists, and bold and italicized text. Use the Text style menu to add headings.
- You can also launch the math editor to embed mathematical formulas in your text. The WIRIS editor opens in a new window.
Adding Links
You can add links to your text as you work in the editor. To add a link, select the Insert/Edit Link icon, represented by a chain symbol. Type or paste the Link URL and Link Text. You must use the http:// protocol. Select Insert to save the link.

You can also add a link to text you’ve already typed. Highlight the text and select the Insert/Edit Link icon. The Link Text is automatically added based on the text you’ve selected in the editor.
Inserting Content Market Files
The Content Market is your gateway to valuable learning materials from trusted content providers. You can also access tools and links your administrator has made available across your institution.
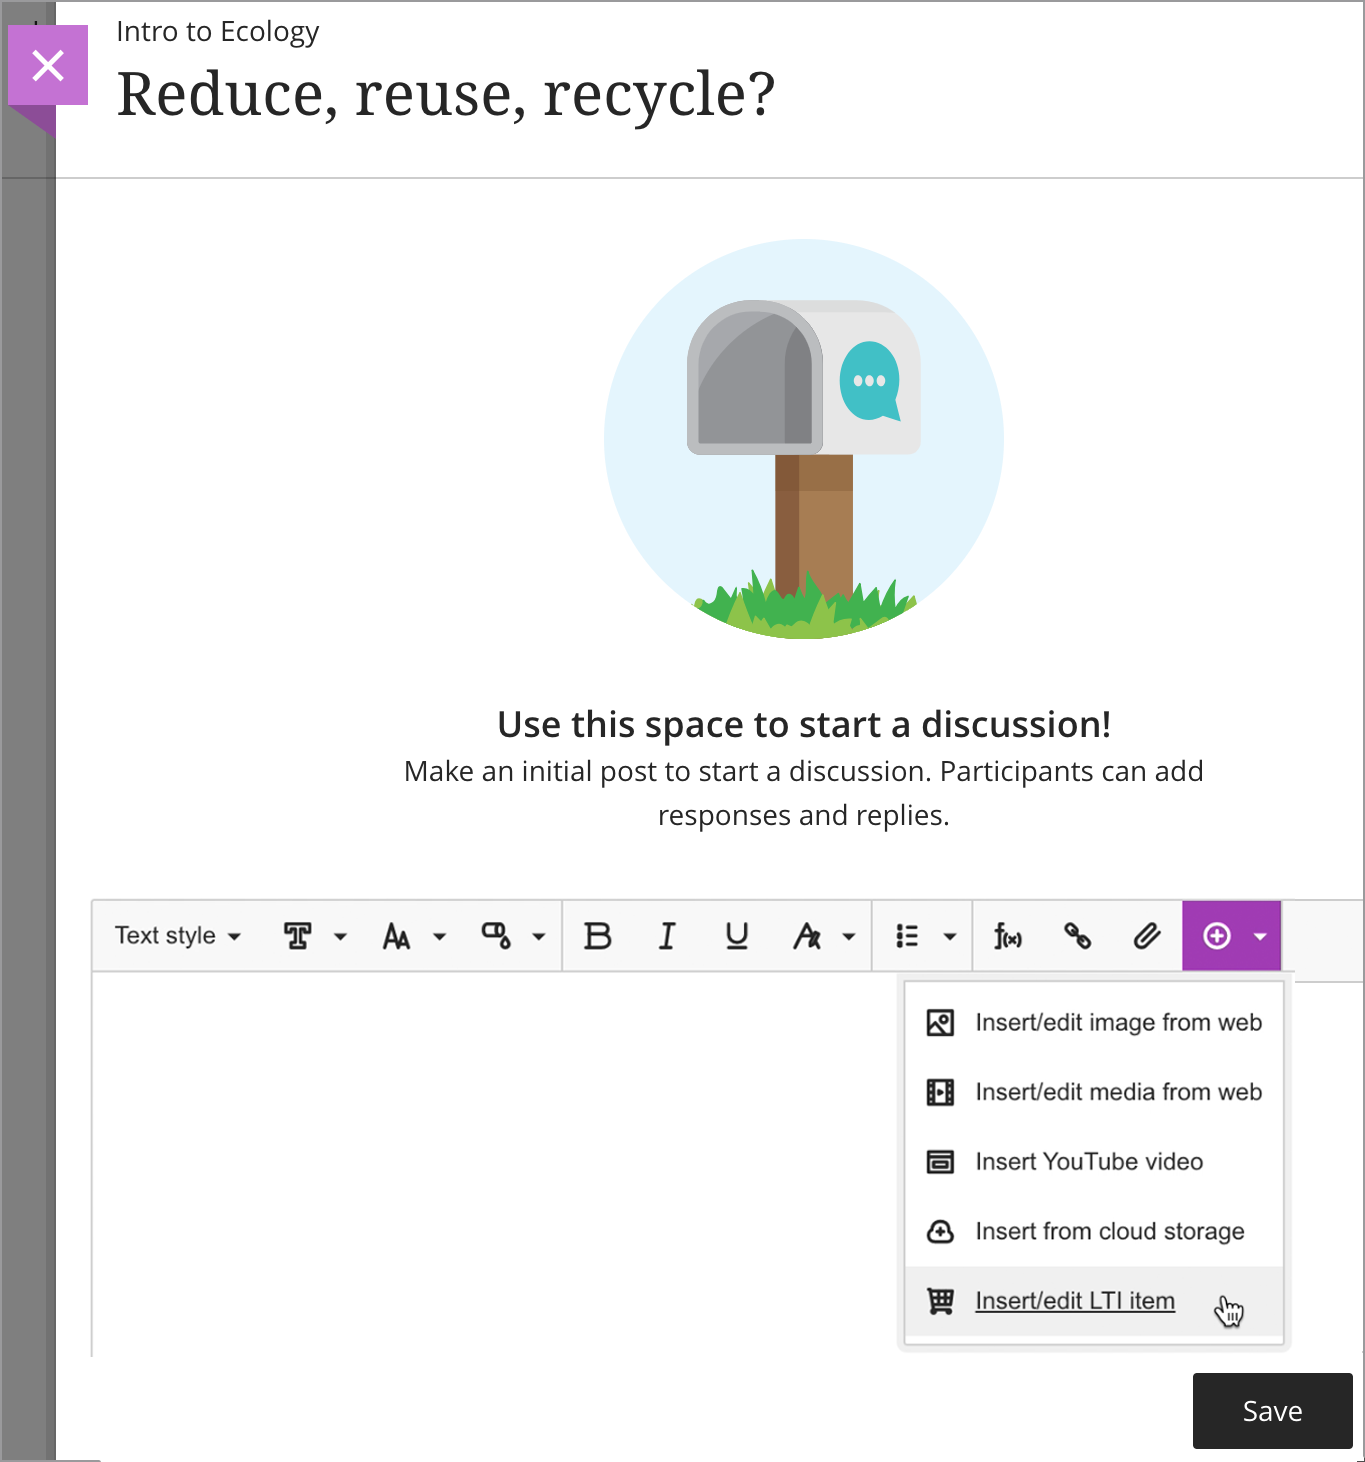
You can add content from the Content Market directly to the editor in your course’s assignments, tests, and documents. In the editor, select Insert/Edit LTI Item.
Select a tool to launch and browse for content to add. Or, select the plus sign on the Institution Tool’s card to add the entire tool in the editor. When you add a tool or a piece of content to the editor, it appears as a link.
Additional Controls
 |
Text style menu: Title Header Subheader Paragraph |
Select a preformatted paragraph style from the list for the selected text. |
| Font Style | Font type can be chosen between: Arial, Comic Sans MS, Courier New, Noto, Open Sans, Times New Roman and, Verdana. | |
| Font Size | Font size, it defaults to a specific chosen font type. | |
| Color Picker (Font color) | Font color can be chosen between: black (default), grey, purple, blue, green and, red. | |
 |
Bold | Bold or remove this style on the selected text. |
 |
Italic | Italicize or remove this style on the selected text. |
 |
Underline | Underline or remove this style on the selected text. |
| Text options menu | The text options selector will open a second line menu with the options for: superscript, subscript and, strikethrough text to choose from. | |
| Create or Edit Table menu | Create a table inline with text | |
 |
Format style: Strikethrough | Display text with a horizontal line through the letters. |
 |
Format style: Superscript | Make the selected text appear slightly above your regular text or remove this style on the selected text. |
 |
Format style: Subscript | Make the selected text appear slightly below your regular text or remove this style on the selected text. |
|
|
Alignment Options | The text options selector will open a dropdown menu with the options for: left-align, center, right-align and justify text to choose from. |
|
|
Left Align | Left-align for text. |
|
|
Center | Center alignment for text. |
 |
Right Align | Right-align for text. |
 |
Justify | Justified alignment for text. |
 |
List options menu | The list options selector will open a second line menu with the options for: numbered and bulleted lists to choose from. Also includes the line height space selector option. |
 |
List style: Bulleted List | Create a bulleted list. |
 |
List style: Numbered List | Create a numbered list. |
|
|
Line height options menu | The line heigh options selector will open a dropdown menu with the options for: Single, 1.15, 1.5 and Double space options to choose from. |
 |
Insert/Edit Math Formula | Open the visual math equation editor page or edit the selected equation. |
 |
Undo | Undoes the last action performed. |
|
|
Clear Format | Clears the existing format in any selected section of text. |
 |
Insert/Edit Link | Add or edit a URL link to a website, page, or file. |
 |
Insert Local Files | Upload a file from your computer or device to embed in the editor. You can display it as a file attachment or inline with other text, if the browser allows. |
| Insert Content menu | The content selector will allow you to choose from insert or edit: images from web, media from web, YouTube™ videos, Cloud Storage content and, LTI items. | |
 |
Insert/Edit Image from Web | Embed an image in the text box or edit an existing selected image. You can add images from a URL. |
 |
Insert/Edit Media from Web | Add or edit a URL for a video from a YouTube™ or Vimeo™ channel, embed enterprise Office365 files. |
 |
Insert YouTube Video | Browse and add content hosted on the external content provider YouTube. |
 |
Insert from Cloud Storage | Browse and add content from your cloud storage accounts. |
 |
Insert/Edit LTI Item | You can add files or tools your institution allows from the Content Market. |
 |
Insert/Edit Recording | Record and insert a file with your device camera and microphone. |
Content Availability (Ultra)
When creating any content in Blackboard Ultra, you can decide when your content is available to students. This includes setting a date and time of release, what students will be able to access the item, and changing settings for special accommodations.
- On the Course Content page, you can access the visibility setting for each item and folder in your content list. In the visibility menu, select Conditional availability to open the item’s panel.
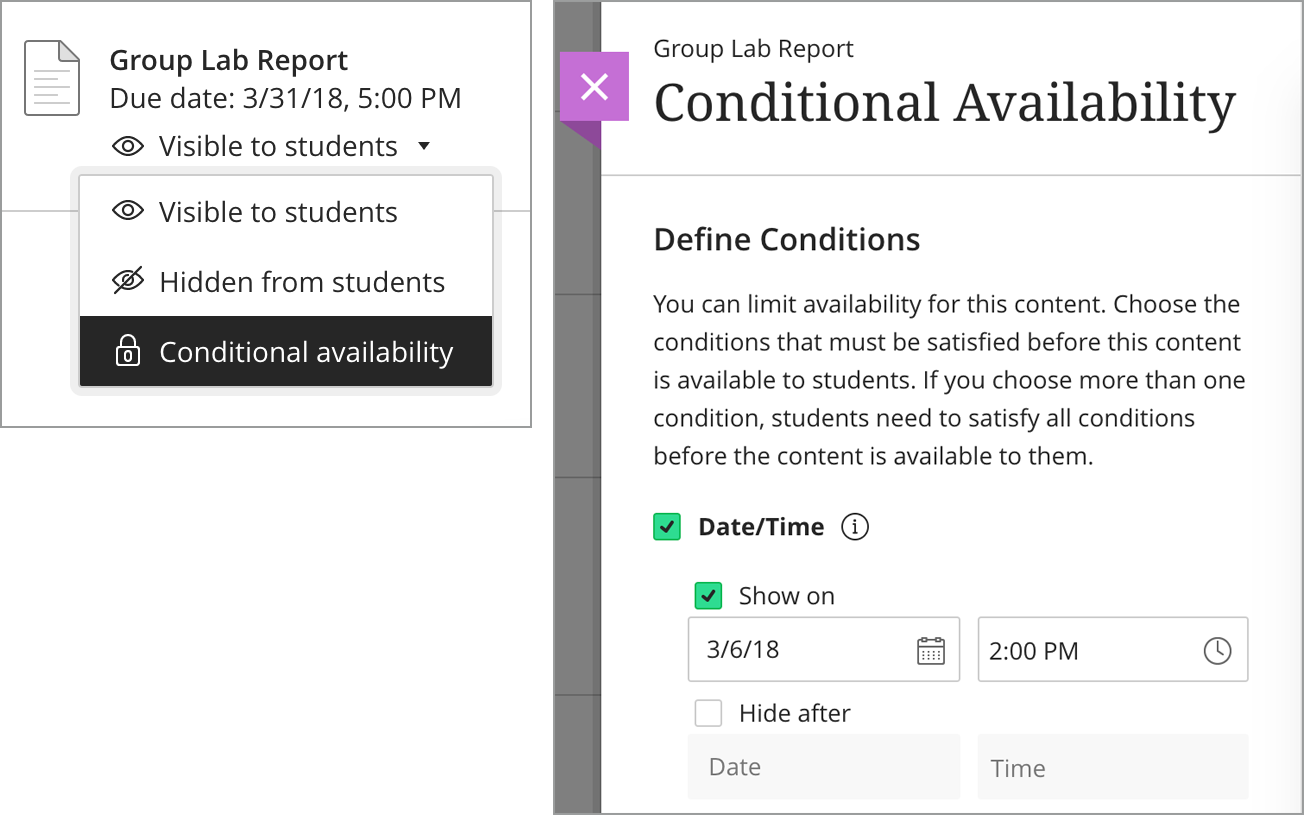
- You can show, hide, or use rules to release content to students.
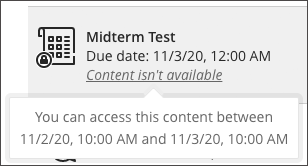
- You can release an item or folder on an exact date, until a certain date, or during a defined period of time.
- Example: Content is covered in a specific order. You want students to access content only after you’ve discussed it in class. You don’t want students to work ahead.
- After you choose dates and times, you can also show or hide the content for students before they have access.
- Visible to students. If you choose to show the content to students before they can access it, your date and time choices are shown with the item on the Course Content page. Students see the date and time the content will be released and when they can no longer access it. After students’ access ends, the content is still visible but they can’t access it.
- Hidden from students. If you choose to hide the content from students before they can access it, the content is only visible to students when they’re able to access it. Students don’t see the dates and times when they can no longer access the content. After students’ access ends, the content is hidden from their view.
- Visible to students. If you choose to show the content to students before they can access it, your date and time choices are shown with the item on the Course Content page. Students see the date and time the content will be released and when they can no longer access it. After students’ access ends, the content is still visible but they can’t access it.
- If you set a folder for release on a specific date, students can’t expand or view the contents in the folder until that date, even if you make the folder visible before students have access. After the release date, if all the contents have no date restrictions, students can view content in the folder.
Release Content Based on Performance
On the Course Content page, you can access the visibility setting for each item and folder in your content list. You can release an item or folder when a student achieves a certain score on an item or gradebook column in your course. You can also find visibility settings at the top of your screen when you open course content items.
Example: Students need to complete coursework in a specific order and after they’ve demonstrated understanding. You want students to progress to the next item only after they score a B or above.
- Identify the piece of content you want to release to students and select Conditional availability in the visibility menu.
- On the Conditional Availability panel, select Performance to release the content based on a student’s score on another item in your course.

- Select the graded item you want to base the rule on. The Grade requirement list appears with a range of scores, based on the item’s grade schema and maximum point value. Select the grade a student must achieve on the item, and click save the rule.
- If you don’t find a grade requirement that suits you, you can specify a custom grade range. Select Custom range and additional fields appear. When you use a custom range, you can base the rule on the item’s grade schema and maximum score, or you can use score percentage.

- If you don’t find a grade requirement that suits you, you can specify a custom grade range. Select Custom range and additional fields appear. When you use a custom range, you can base the rule on the item’s grade schema and maximum score, or you can use score percentage.
Visibility Settings
- As you create conditional availability rules, you can choose whether the item appears in the Course Content list when students don’t have access.

- Select Visible to students to show the content to students before they can access it. Students see the conditions they need to satisfy before they can access the content.
- Select Hidden from students to hide the content when students don’t have access. When you select this setting, the conditions don’t appear to students. The content appears only when they can open it, just as other pieces of content in your course that are set to Visible to students.
Special Accommodations and Exceptions (Ultra)
Special Accommodations
You can set accommodations for individual students. You can exempt students from assessment due dates or time limits. Use accommodations to help students progress in the course even though they may have difficulty with some requirements.
You can also give an individual student an exception on a specific test or assignment. An exception includes additional attempts or extended access, even if the assessment is hidden from other students. An exception overrides the two settings applied to everyone else for only that specific assessment.
Student Accommodations Panel
- On the Roster page of your course, open a student’s menu and select Accommodations.

- In the panel, select the accommodations for this student:
- Due date accommodation: Students with this accommodation will never have their work marked late.
- Time limit accommodation: Students with a time limit accommodation have more time to finish their work during timed assessments. After you select this accommodation, choose the amount of extra time:
- + 50% extra time
- + 100% extra time
- Unlimited time
- A student with the Unlimited time accommodation never sees the time limit for the assessment. No time limit may reduce the pressure or anxiety that comes with coursework.
- Students with accommodations appear with an icon next to their names. The icon appears in the gradebook and roster. Students don’t see the accommodations you’ve added.
- When you choose to grade with student names hidden, no indication of students with accommodations is shown.
The number of accommodations you’ve made appears in the settings for graded course items such as assignments and tests.
- Select the link to view the accommodations.
- Select View Roster to make changes.

Add or Delete Time Limit Accommodation
After students have started their submissions and you add or delete a time limit accommodation, you’ll receive a warning. Time limits for previously submitted work will update.
When you delete a time limit accommodation, previously submitted work for timed assessments may then be marked late by the system.
Add or Delete Due Date Accommodation
In the gradebook, students with a due date accommodation may submit work any time after the due date for no penalty. After the due date, you won’t see late labels in the gradebook student list.

If you delete the due date accommodation for a student and the due date has passed for an assessment, the late label is applied
Time Limit Accommodation + Time Limit
If students have a time limit accommodation and you allow more time to complete an assessment in the settings, the times are combined.
Example: You add a time limit of 10 minutes to an assessment. You allow 50% extra time to complete the assessment. Each student has 15 minutes total time. Student A has a time limit accommodation of 50% extra time.
Student A:
- 15 minutes to complete the test based on the time limit offered to the whole class
- Then, 50% more time based on the accommodation: 8 minutes
- Total: 23 minutes to complete the assessment
Though this student receives a message when the final 8 minutes begins, this work is NOT marked as received after the time limit.

If you delete Student A’s time limit accommodation after the student submits work, the work may be marked late by the system.
Accommodations and Groups
If students with accommodations are in a group, all students in that group inherit the accommodation for that item. For example, you create a group assignment and one group member has a due date accommodation. That group’s work isn’t marked late if they submit after the due date.

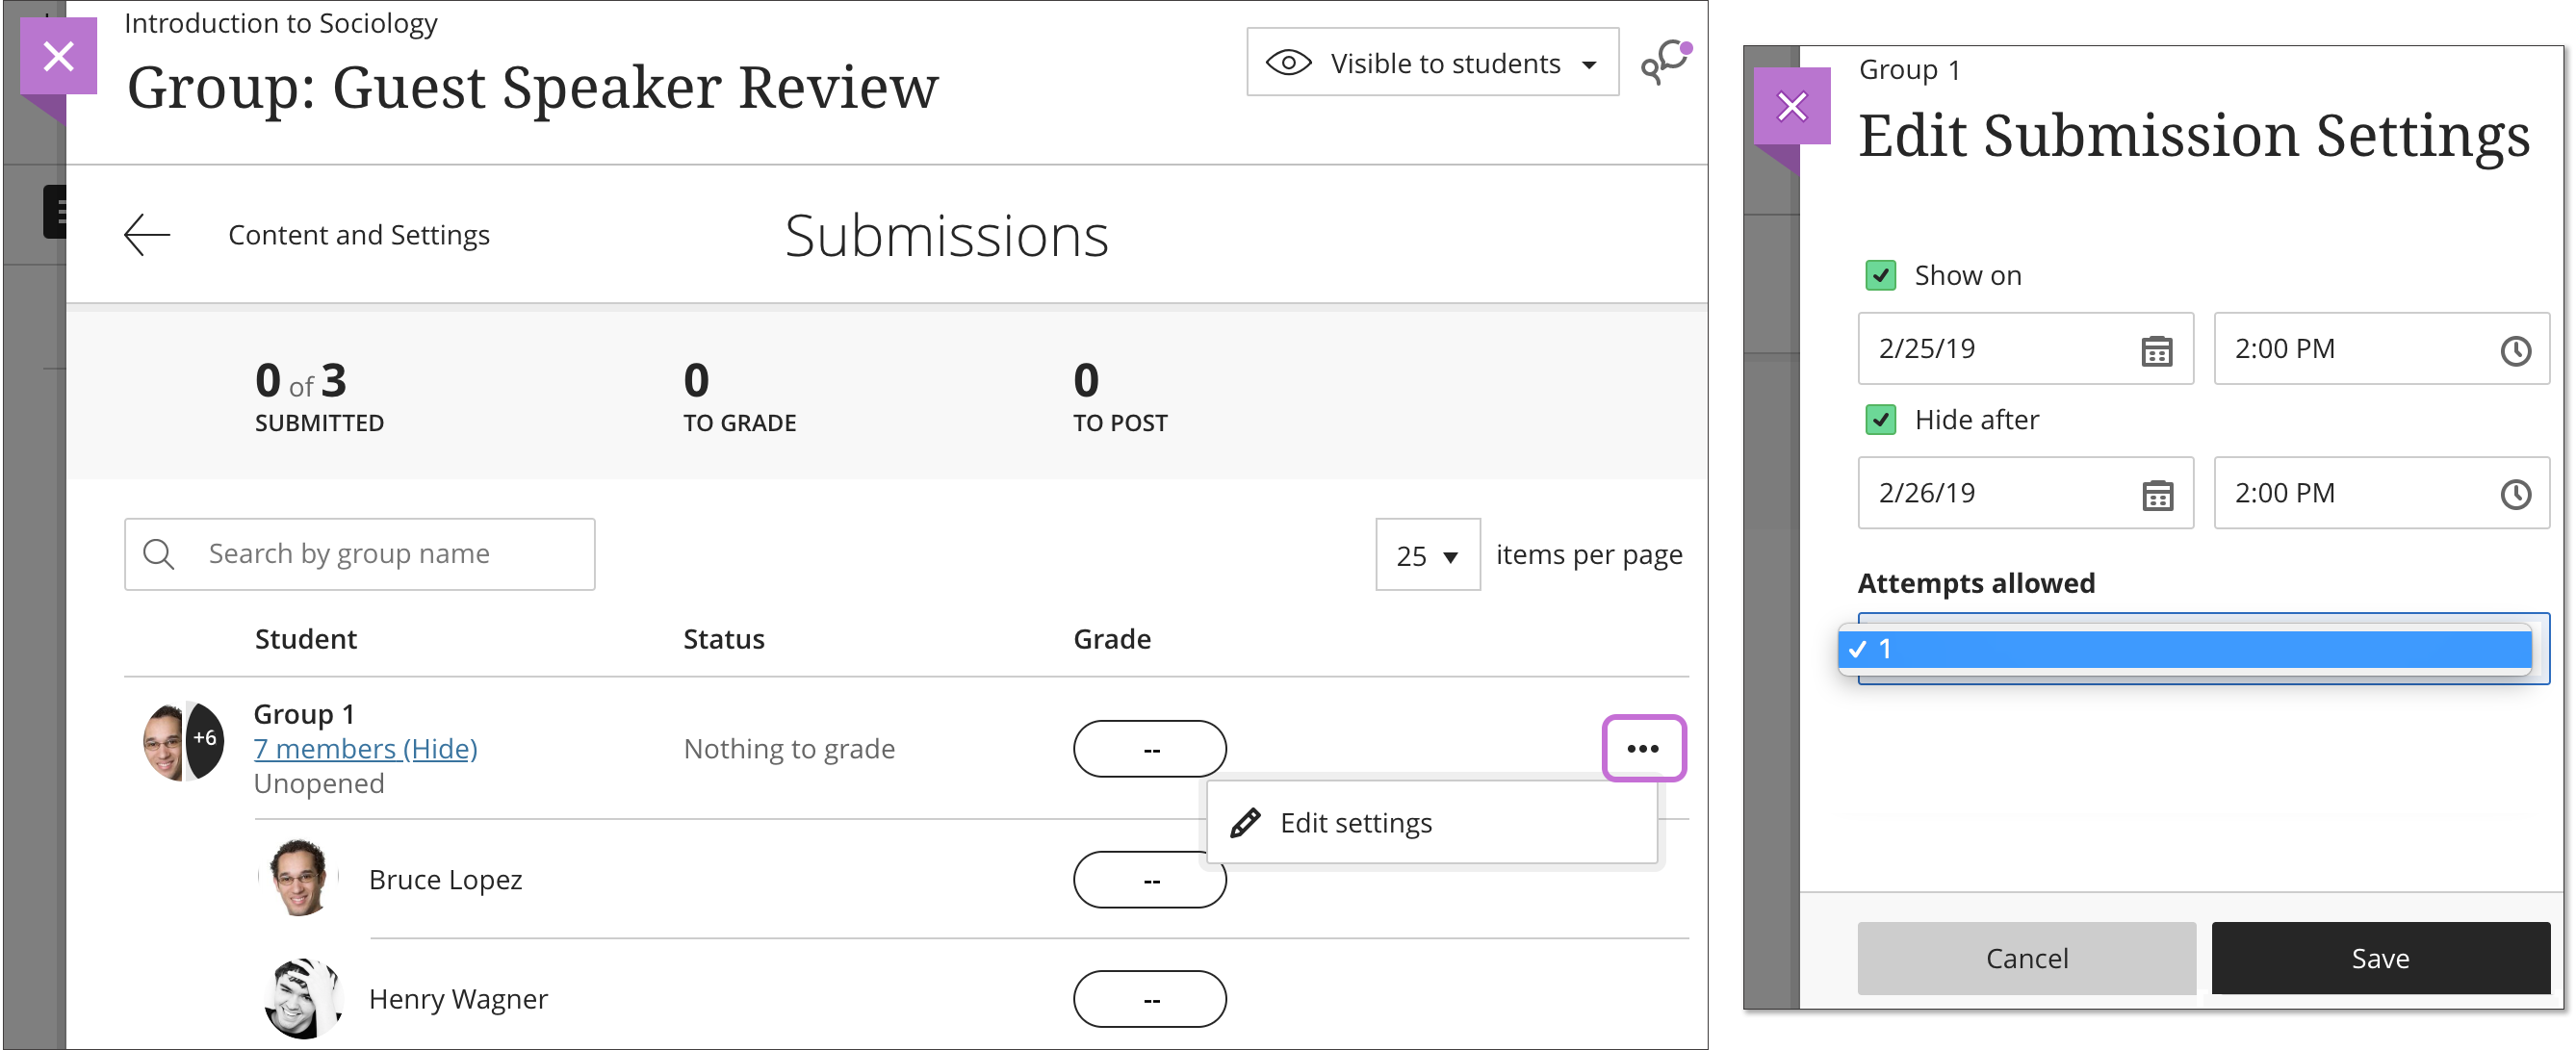
When special circumstances arise, you can give an individual student an exception on a specific test or assignment. An exception includes additional attempts or extended access, even if the assessment is hidden from other students. You can extend access with the show on and hide after dates which is different from the due date.
- You need to set conditional availability—show on and hide after dates—before you set an individual exception for extended access.
- An exception overrides the two settings applied to everyone else for only that specific assessment. Students don’t see the exceptions you’ve added.
- You set test and assignment exceptions from the assessment’s Submissions page or an individual submission. You might use exceptions for students who have internet issues, disabilities, or technology and language differences.
Examples:
- Test with one attempt: Allow more attempts for a student who is blind and wants to use screen reader technology for the first time.
- Assignment with the conditional availability of Hide after date and time: Extend the access to an assignment for a student with internet issues. However, if the due date and time are the same as the original Hide after time, the submission is still marked late in the gradebook.
For a group assignment or group test, you can give an individual group an exception for extended access only.
Exceptions vs. Accommodations
Exceptions are different from accommodations you set in the course roster. An accommodation applies to all due dates or time limits in your course for an individual student. Exceptions aren’t allowed for due dates and time limits for an individual student or group at this time. Exceptions are only allowed for the show on and hide after dates and additional attempts.
From an assessment’s Submissions page, you can add exceptions for students individually. You can also add exceptions from a student or group’s individual submission page. You can’t add an exception for an anonymously graded assessment.
From an Assessment’s Submissions Page
- From an assessment’s Submissions page, open the menu in a student’s row and select Edit settings. The Edit Submission Settings panel opens.
- You can change the Show on and Hide after dates and times and allow additional attempts.
- You can’t save until you make a change to the settings. If you don’t want to make any changes, select Cancel to close the panel.

From an Individual Submission
From a student or group’s submission page, open the menu next to the grade pill and select Exceptions. The Edit Submission Settings panel opens.

In the activity stream, the student is notified about available assignments and assessments, but any extended access periods aren’t listed in the stream or with the test. You’ll need to inform the student about the length of the extended access period. You’ll also need to notify students individually when you allow additional attempts.
Exception Icon Appears
After you allow an exception for a student’s assessment, you’ll see an icon next to the student’s name. The assessment exception icon is the same icon that appears for accommodations. If a student has an accommodation and an exception for an assessment, only one icon appears.
If you copy an assessment from one course to another, the exceptions don’t carry over. Content is set to Hidden from students if you copy individual items into your course. If you copy one course into another course, student-specific data isn’t copied.
You can offer a student an exception for an assessment you’ve already graded and posted. For example, if you want a student to redo an automatically graded test that has no more attempts, you can add an additional attempt. You’ll need to inform the student of the additional attempt as the system doesn’t send a notification.

Automatic Zeros Setting
If you’ve applied automatic zeros for unsubmitted work in your course, the student has a zero even after you add an exception. The automatic zero is replaced after you grade the submission.
Only one type of exception is allowed for group assessments. You can give an individual group an extended access exception on a specific group test or group assignment. Because multiple attempts aren’t allowed for group assessments at this time, you can’t change the attempts allowed.
- From a group assessment’s Submissions page, you can add exceptions for groups individually. You can also add exceptions from a group’s individual submission page.
- On a group assessment’s Submissions page, the same icon appears for group exceptions and accommodations. The assessment exception icon appears with a group’s name.
- If a group has members with accommodations, the same icon appears with the group’s name.
- Open the menu for each group’s name with an icon to view the exceptions you’ve added.
- If a group has members with accommodations and an exception for a group assessment, only one icon appears.

When you access groups from an assessment’s settings panel, groups with exceptions appear with the icon next to the group name. Group members who have accommodations appear with the same icon next to their names.

You can remove a student or group’s exception to an assessment.
- From an assessment’s Submissions page > student or group’s menu > Edit settings > Reset settings
- The exception settings are removed. The student or group now has the original assessment settings for the attempts allowed and the access time period.
- Select Save to confirm. The icon for the exception is removed unless the student or group also has an accommodation.
You can’t reduce the number of attempts after students have started their submissions.

Add & Organize Basic Content (Original)
Add Content
- Select a Content Area from your Course Menu (Content, for instance.)
- Click or hover over Build Content.
- Select Item.
- Type the Name of the file.
- Choose either Browse My Computer or Browse Content Collection to add a file from your computer or Blackboard Learn’s content collection respectively.
- Set any of the Standard Options you’d like.
- Click Submit when you’ve finished.
When you save a file, DO NOT use any special characters (#, !, &, etc). The filename of any file you submit must include only letters, numbers, hyphens, and underscores and it must end with a file extension.
Create a Folder
- Select a Content Area from your Course Menu (Content, for instance.)
- Click or hover over Build Content.
- Select Content Folder.
- Type the Name of the folder.
- Add a description of the folder in the Text field.
- Choose any of the desired Options.
- Click Submit.
Add Content to a Folder
- Navigate to the folder you’d like to add content to and click the title to open it.
- Add the desired content using the drop-down menus (Build Content, Assessments, or Tools) in the Action Bar.
Delete Content
- With Edit Mode set to ON, click on the down-pointing arrow to the right of the item name.
- Choose Delete from the list and confirm.
Add Additional Content Types (Original)
Add a Web Link
-
- Select a Content Area from your Course Menu (Content, for instance.)
- Click or hover over Build Content.
- Select Web Link.
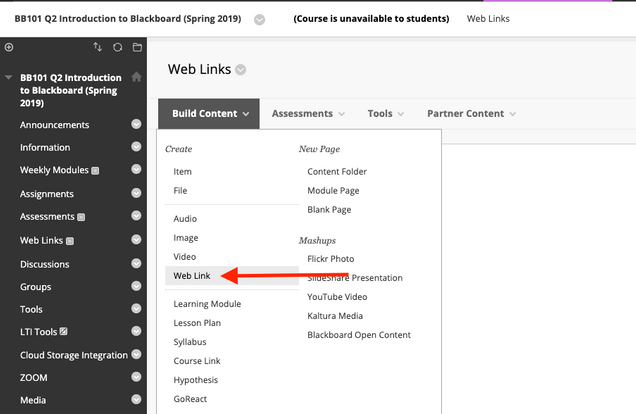
- Add a Name and a fully-qualified (including the http://) URL.
The safest way to get the exact address of a site is to navigate to it and copy the URL from your browser’s address bar. - Add a description if desired.
- Click Submit.
Create a Learning Module
- Select a Content Area from your Course Menu (Content, for instance.)
- Click or hover over Build Content.
- Select Learning Module.
- Type in the Name of the module.
- If desired, add a description of the module in the Text field.
- Select any Options you’d like.
- Click Submit.
- Add content to this new module using the Action Bar items (Build Content, Assessments, or Tools).
Create an Assignment
- Select a Content Area from your Course Menu (Content, for instance.)
- Click or hover over Assessments.
- Select Assignment.
- Type in the Name of your new assignment.
- If desired, add a description of the module in the Text field.
- Set your assignment’s Points Possible (included in your Grade Center automatically).
- Set any additional Options you’d like.
- Click Submit.
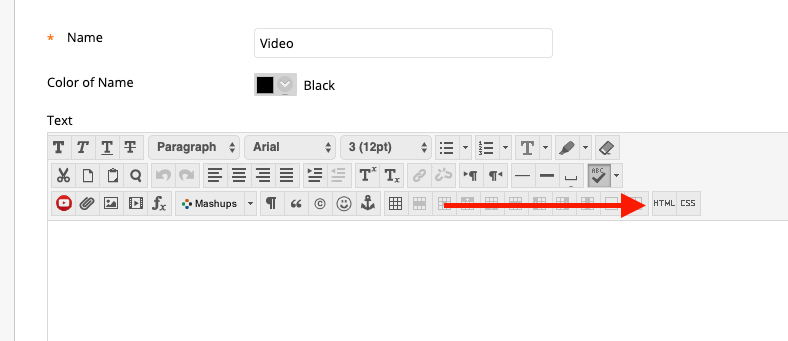
Embedding a YouTube Video (Original Only)
If your video is not able to be embedded because there is no embed code you can link to it by grabbing the url and create a Web Link to the video’s address online.
- Locate the video on YouTube.
- Click the Share button below the video.
- Click the Embed button on the sharing menu.
- Copy the embed video code by clicking the copy button in the lower right of the window.
- Log into your course and navigate to the course area where you’d like to embed the video.
- Hover your cursor over the Build Content button in the upper-left to display a drop-down menu.
- Select Item
- Give your video a name
- Click on the HTML Code Button in the Text editor.

- Paste the embed code into the HTML code box
- Click the Update button in the lower right.
- Click the Submit button to add the video to your course.
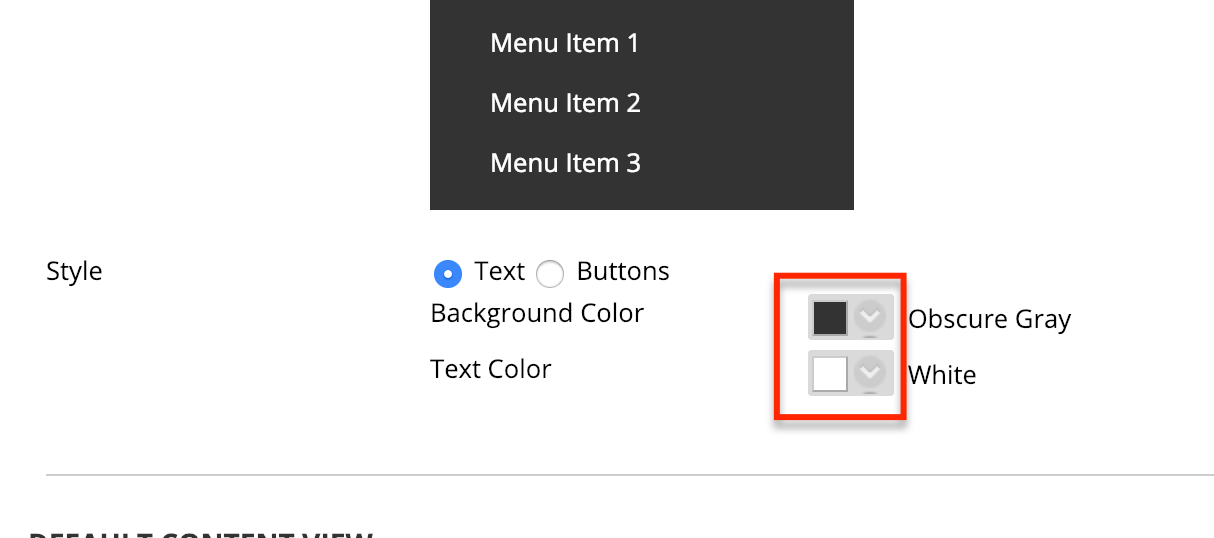
Customizing your course theme (Original Only)
Teaching Style
-
- From your course Control Panel, expand the Customization menu and select Teaching Style.
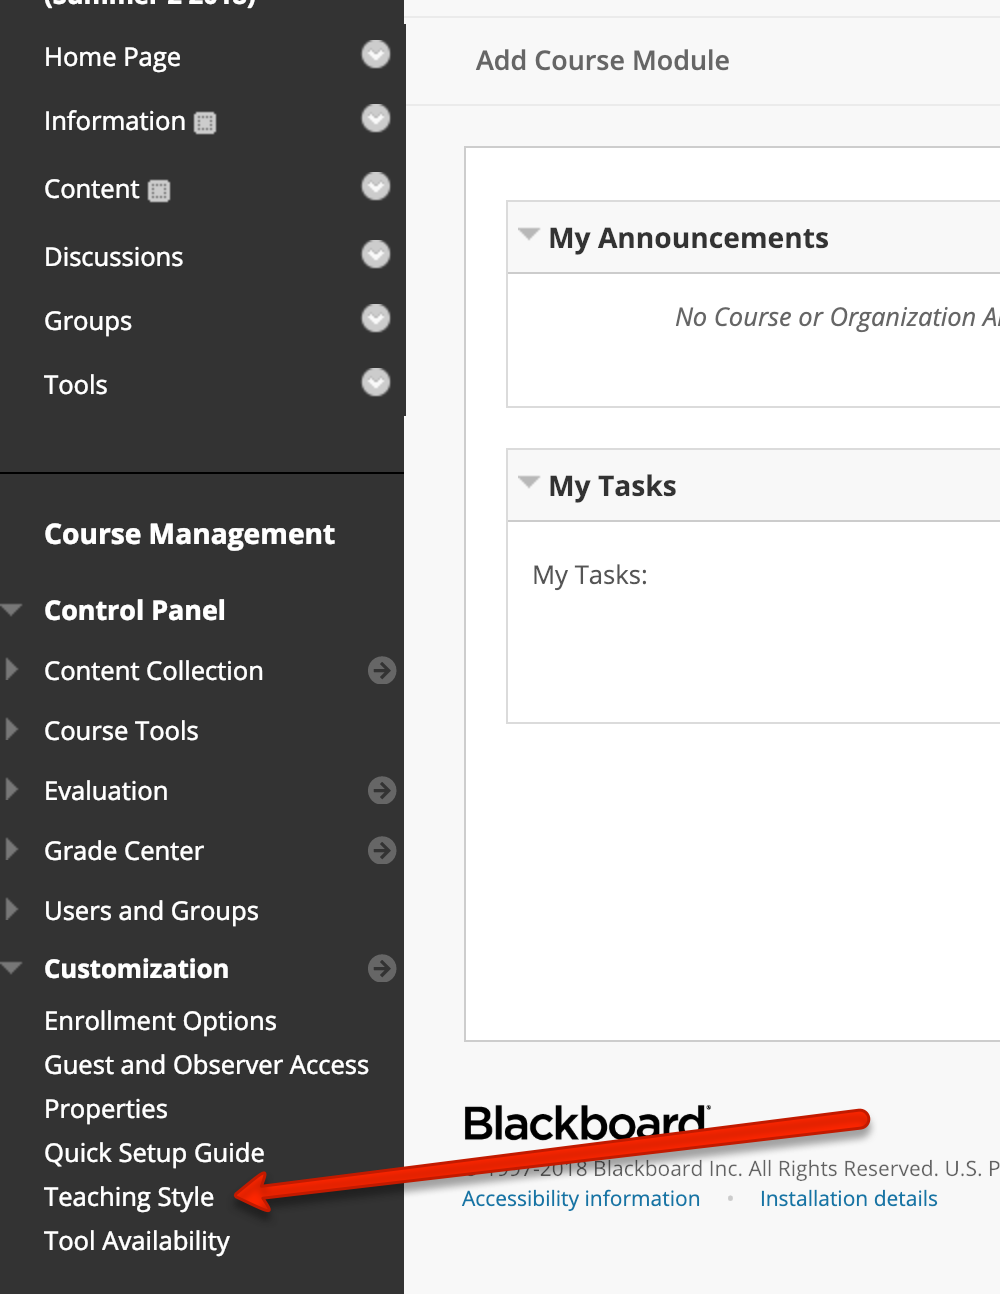
- In the Menu Style section, you can change the menu colors. A background color of Obscure Gray and text color of White match with the default Blackboard theme at https://learn.bu.edu