These collaboration tools provide many avenues for instructor and student interaction. Learn how to add other types of content with our tutorials on developing your course content.
Discussion Boards
Just as it’s critical to plan and structure your course content, you need to provide structure for online discussions.
The main discussion board page displays a list of forums. A forum is where participants discuss a topic or a group of related topics. Within each forum, users can create multiple threads. A thread includes the initial post and all replies to it. You can create forums and threads to organize discussions into units or topics relevant to your course.
Working with Your Course’s Discussion Board
The Discussion Board page contains a list of all the forums you’ve created. You must first create one or more forums before users can start message threads. You can also search for discussion content. By default, the search field appears collapsed to save screen space.
The discussion board is commonly accessed from the course menu, although you can provide a link to it in another course area, such as in a content area. As an instructor, on the Control Panel, expand the Course Tools section and select Discussion Board. From this link, access the course discussion board and the group discussion boards for the groups in your course.
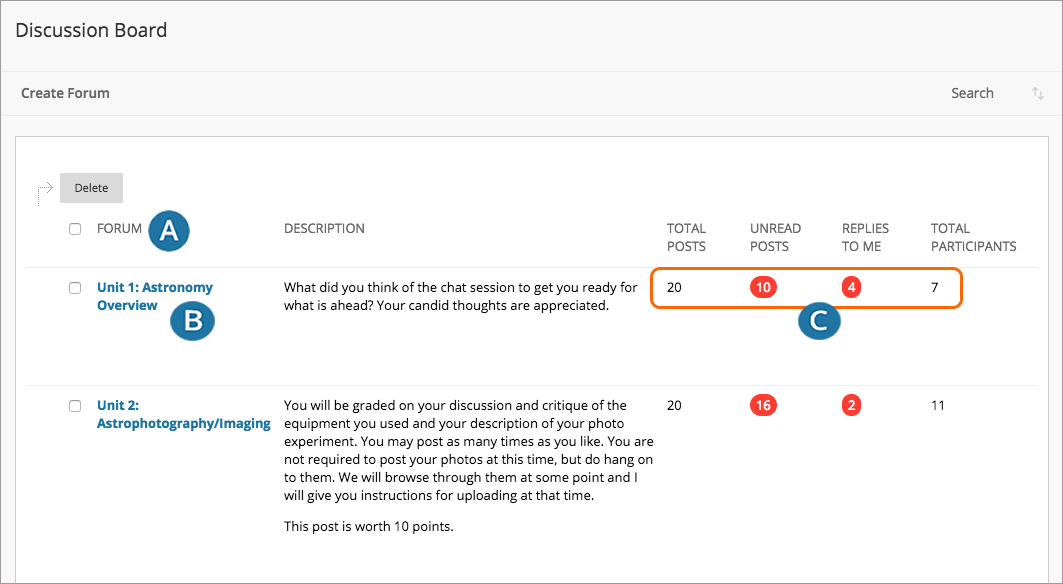
- In section A of the graphic above, there will be an array of headings across the top of the board. To sort the list of forums based on a column, select the column heading.
- To view the posts in a forum, select the forum title, as shown in section B. Forum titles in bold contain unread posts.
- For each forum, view the total number of posts, the number of unread posts, the number of replies to you, and the number of participants, as shown in section C. For quick access to the forum’s unread messages, select the link in the Unread Posts column.
Creating a Forum
- Access your course page, and then navigate to Control Panel > Course Tools > Discussion Board > Create Forum
- Select the discussion board where you want to create a forum, and the Create Forum option appears.
- Forum settings allow you to use discussions in different ways. For example, to fully control a forum, you create all threads, moderate, and grade the posts. For a student-led discussion, allow students to create new threads and posts anonymously.
- Type a name and optional instructions or a description. On the main discussion board page, the description appears after the forum name.
- The forum description appears when students create a thread and when they encounter a thread with the post first setting. Forum descriptions are often used as prompts and are visible where students post.
- In the Forum Availability section, select Yes.
- You can create forums ahead of time and set the availability to No until you want the discussion to start.
- Select the Display After and Display Until check boxes to enable the date and time selections. Display restrictions affect when the forum appears.
- Select the Forum Settings based on your specific needs.
- To promote originality, creativity, and a variety of responses, you can choose Participants must create a thread to view other threads in this forum, which is the post first setting. Students must respond before they can read their classmates’ posts. In Standard View, everyone can see all previously created threads in the forum.

- You can create a graded forum or thread and a column is created automatically in the Grade Center.
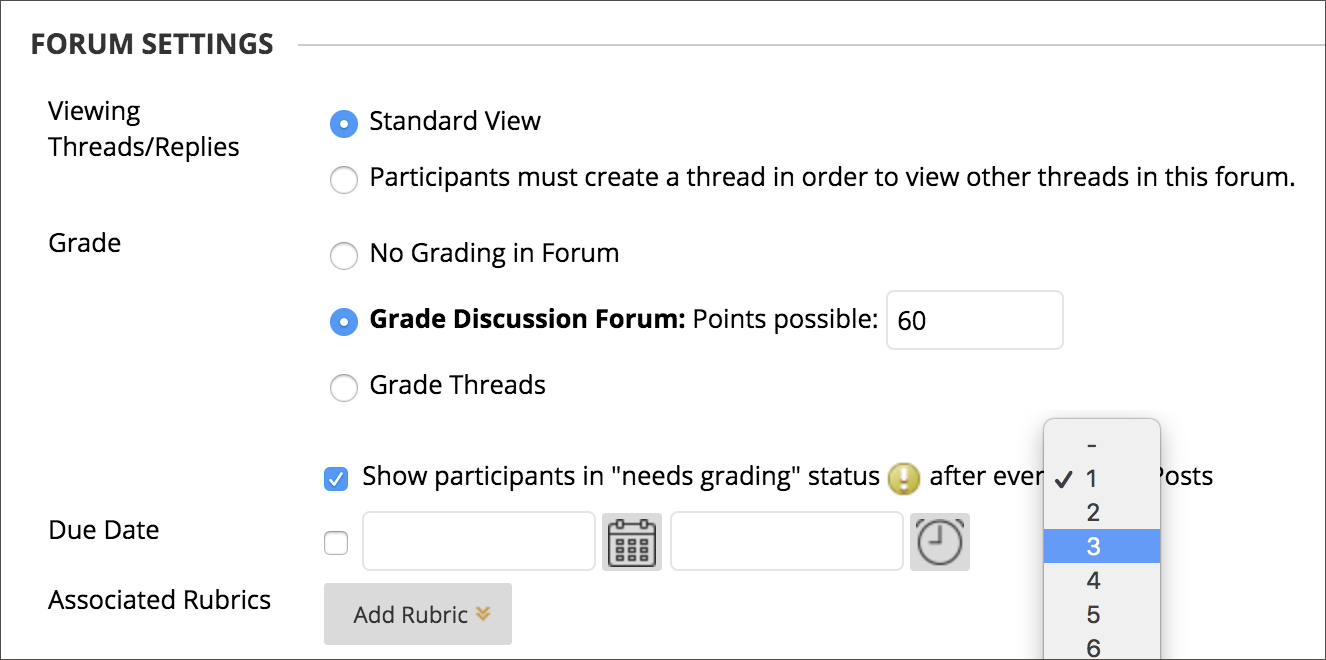
- Select Grade Discussion Forum and type a point value to evaluate participants on performance throughout a forum.
- Select Grade Threads to evaluate participants on performance in each thread.
- If you’re grading posts and want to retain the posts asthey were at the time of grading, clear the check box for Allow Author to Edit Own Published Posts in the Create and Edit settings.
- If you enable grading for the forum, select the check box for Show participants in needs grading status and select the number of posts from the menu. Applying this setting displays the Needs Grading icon in the Grade Center and places the posts in the queue on the Needs Grading page after students make the specified number of posts. If you select a grading option and do not select the check box, the Needs Grading icon doesn’t appear in the Grade Center and posts don’t appear on the Needs Grading page.
- When you enable grading, you can provide a Due Date. Due dates are used to organize and assign gradable items to grading periods in the Grade Center. Graded posts made after the due date aremarked LATE on the Grade Details page in the Grade Center and on the Needs Grading page.

- Point to Add Rubric to open the menu and associate a rubric to use for grading.
- You can allow students to subscribe to this forum or threads within the forum. Students who subscribe to a forum or thread receive notifications when activity occurs.
- In the Create and Edit section, you can choose the student’s ability to create and edit within the forum.
- To promote originality, creativity, and a variety of responses, you can choose Participants must create a thread to view other threads in this forum, which is the post first setting. Students must respond before they can read their classmates’ posts. In Standard View, everyone can see all previously created threads in the forum.
- Select Submit. On the Discussion Board page, the new forum appears at the bottom of the list.
Viewing and Monitoring Forums
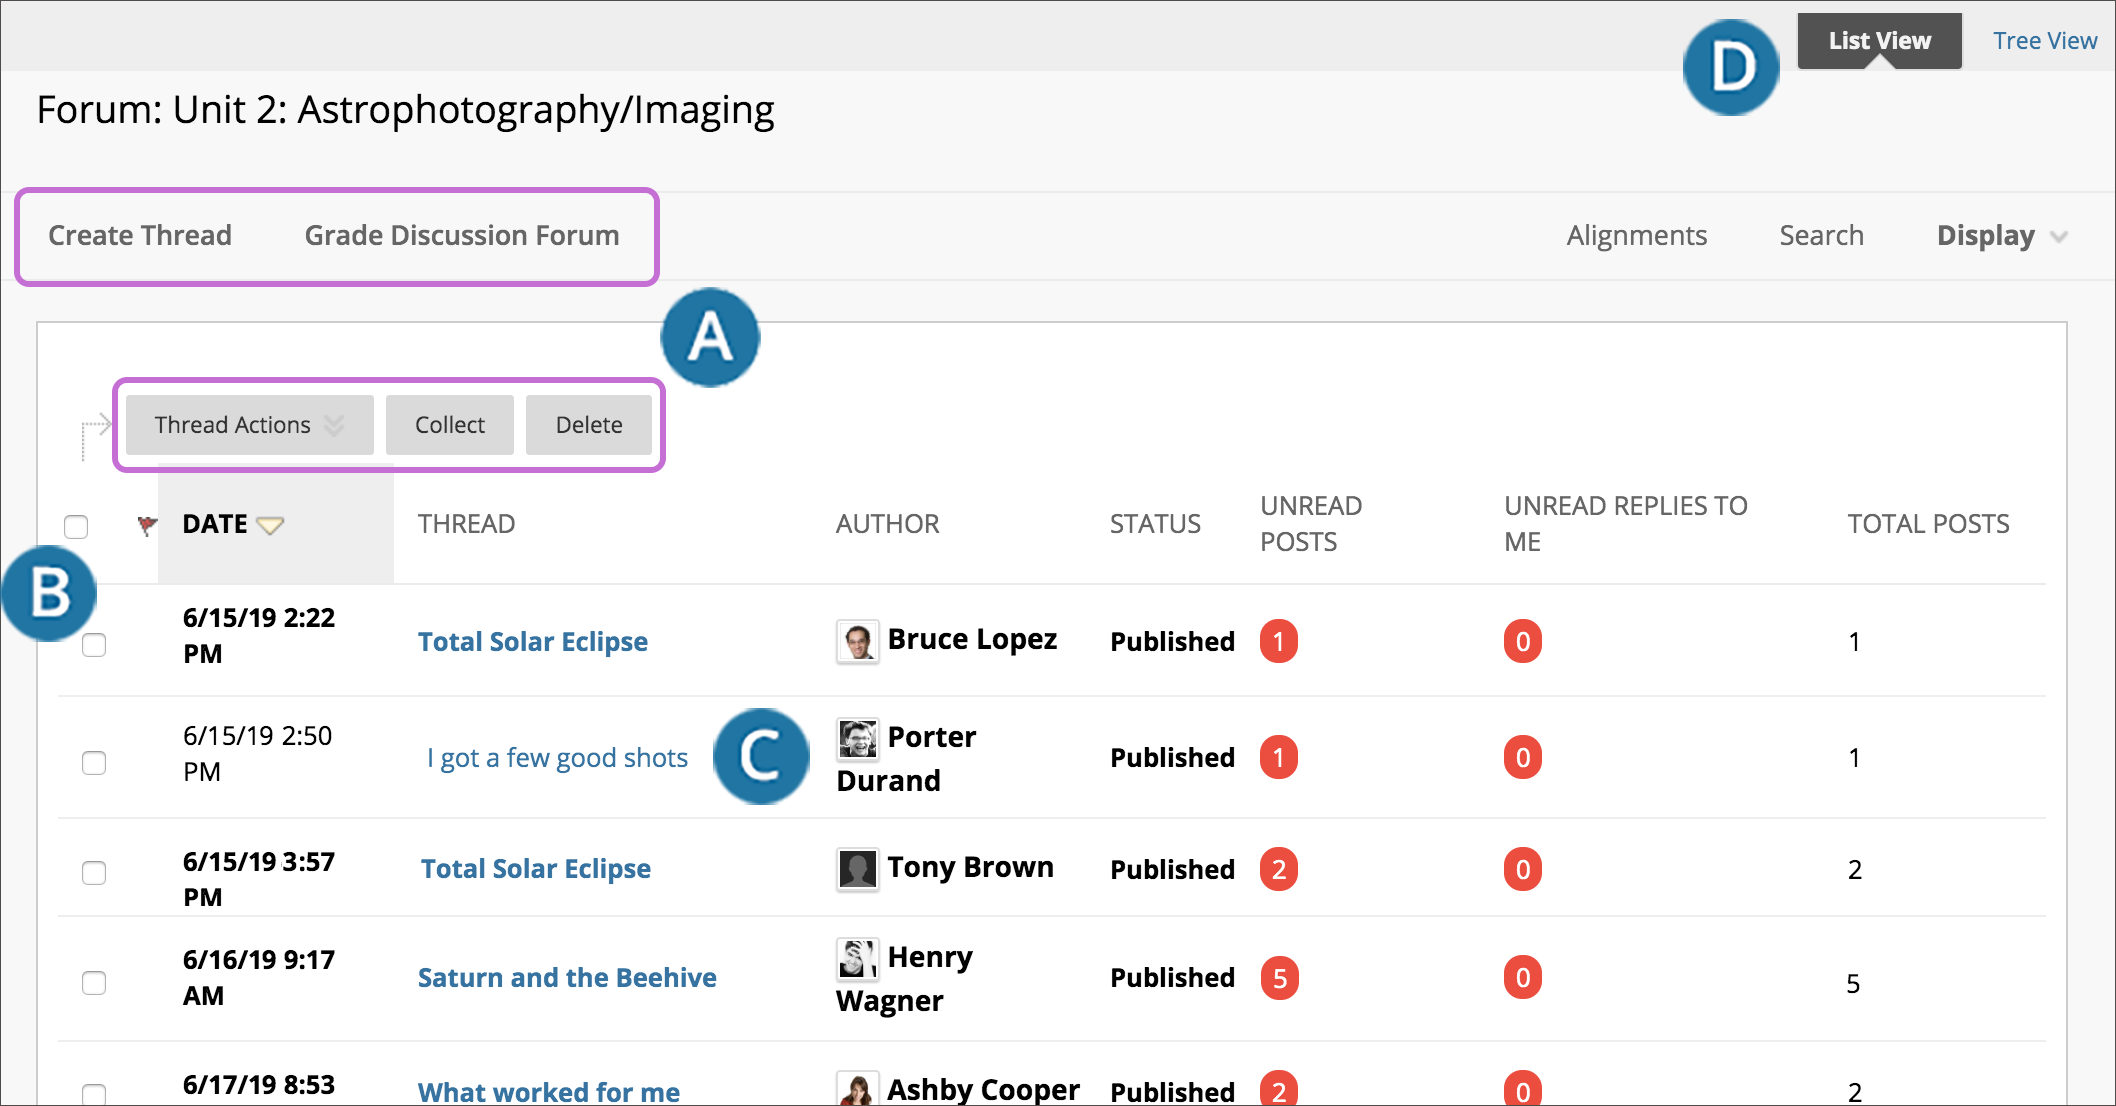
- As shown in section A on the figure above, within a forum you can create threads, grade forum contributions, collect threads, and search content.
- Shown in section B, you can use the check boxes to select one or more thread and perform actions such as Collect or Delete.
- To read a post, select a thread title as shown with section C. Titles in bold contain unread posts.
- Shown in section B, you can view a forum’s threads in a list view or in a tree view, with all posts listed after each thread title.
- To view a forum and the threads within it, select the forum’s name on the Discussion Board. You can view the forum contents in either list view or tree view. This choice remains in effect until you change it. You may change it at any time. Change the view on the forum page, in the upper-right corner.
Managing and Editing Forums and Threads
When you create a forum, it appears at the bottom of the list. You can move the current forum to the top or delete forums that are no longer relevant.
- Open the discussion board and point to the forum you want to move. Select and hold the arrows next to a forum you want to move. The item is highlighted.
- Drag the forum into a new location in the list.
- Release the forum to place it in its new location.
As a discussion progresses, you can edit forum settings to solve any issues. For example, if students are posting to the wrong topic, you can fine-tune the forum name or description to clarify the forum’s purpose. You can also choose to create all forums at the beginning of the term and make them unavailable. When you need a forum, edit the forum to make it available.
- On the Discussion Board page, open a forum’s menu and select Edit.
- On the Edit Forum page, change the forum’s name, description, availability, or settings.
- Select Submit.
You can also edit posts in any thread. If a student added inappropriate or inaccurate content, you can edit the post. When you create or edit a forum, you control if students may edit their published posts.
- Open a forum and select a thread.
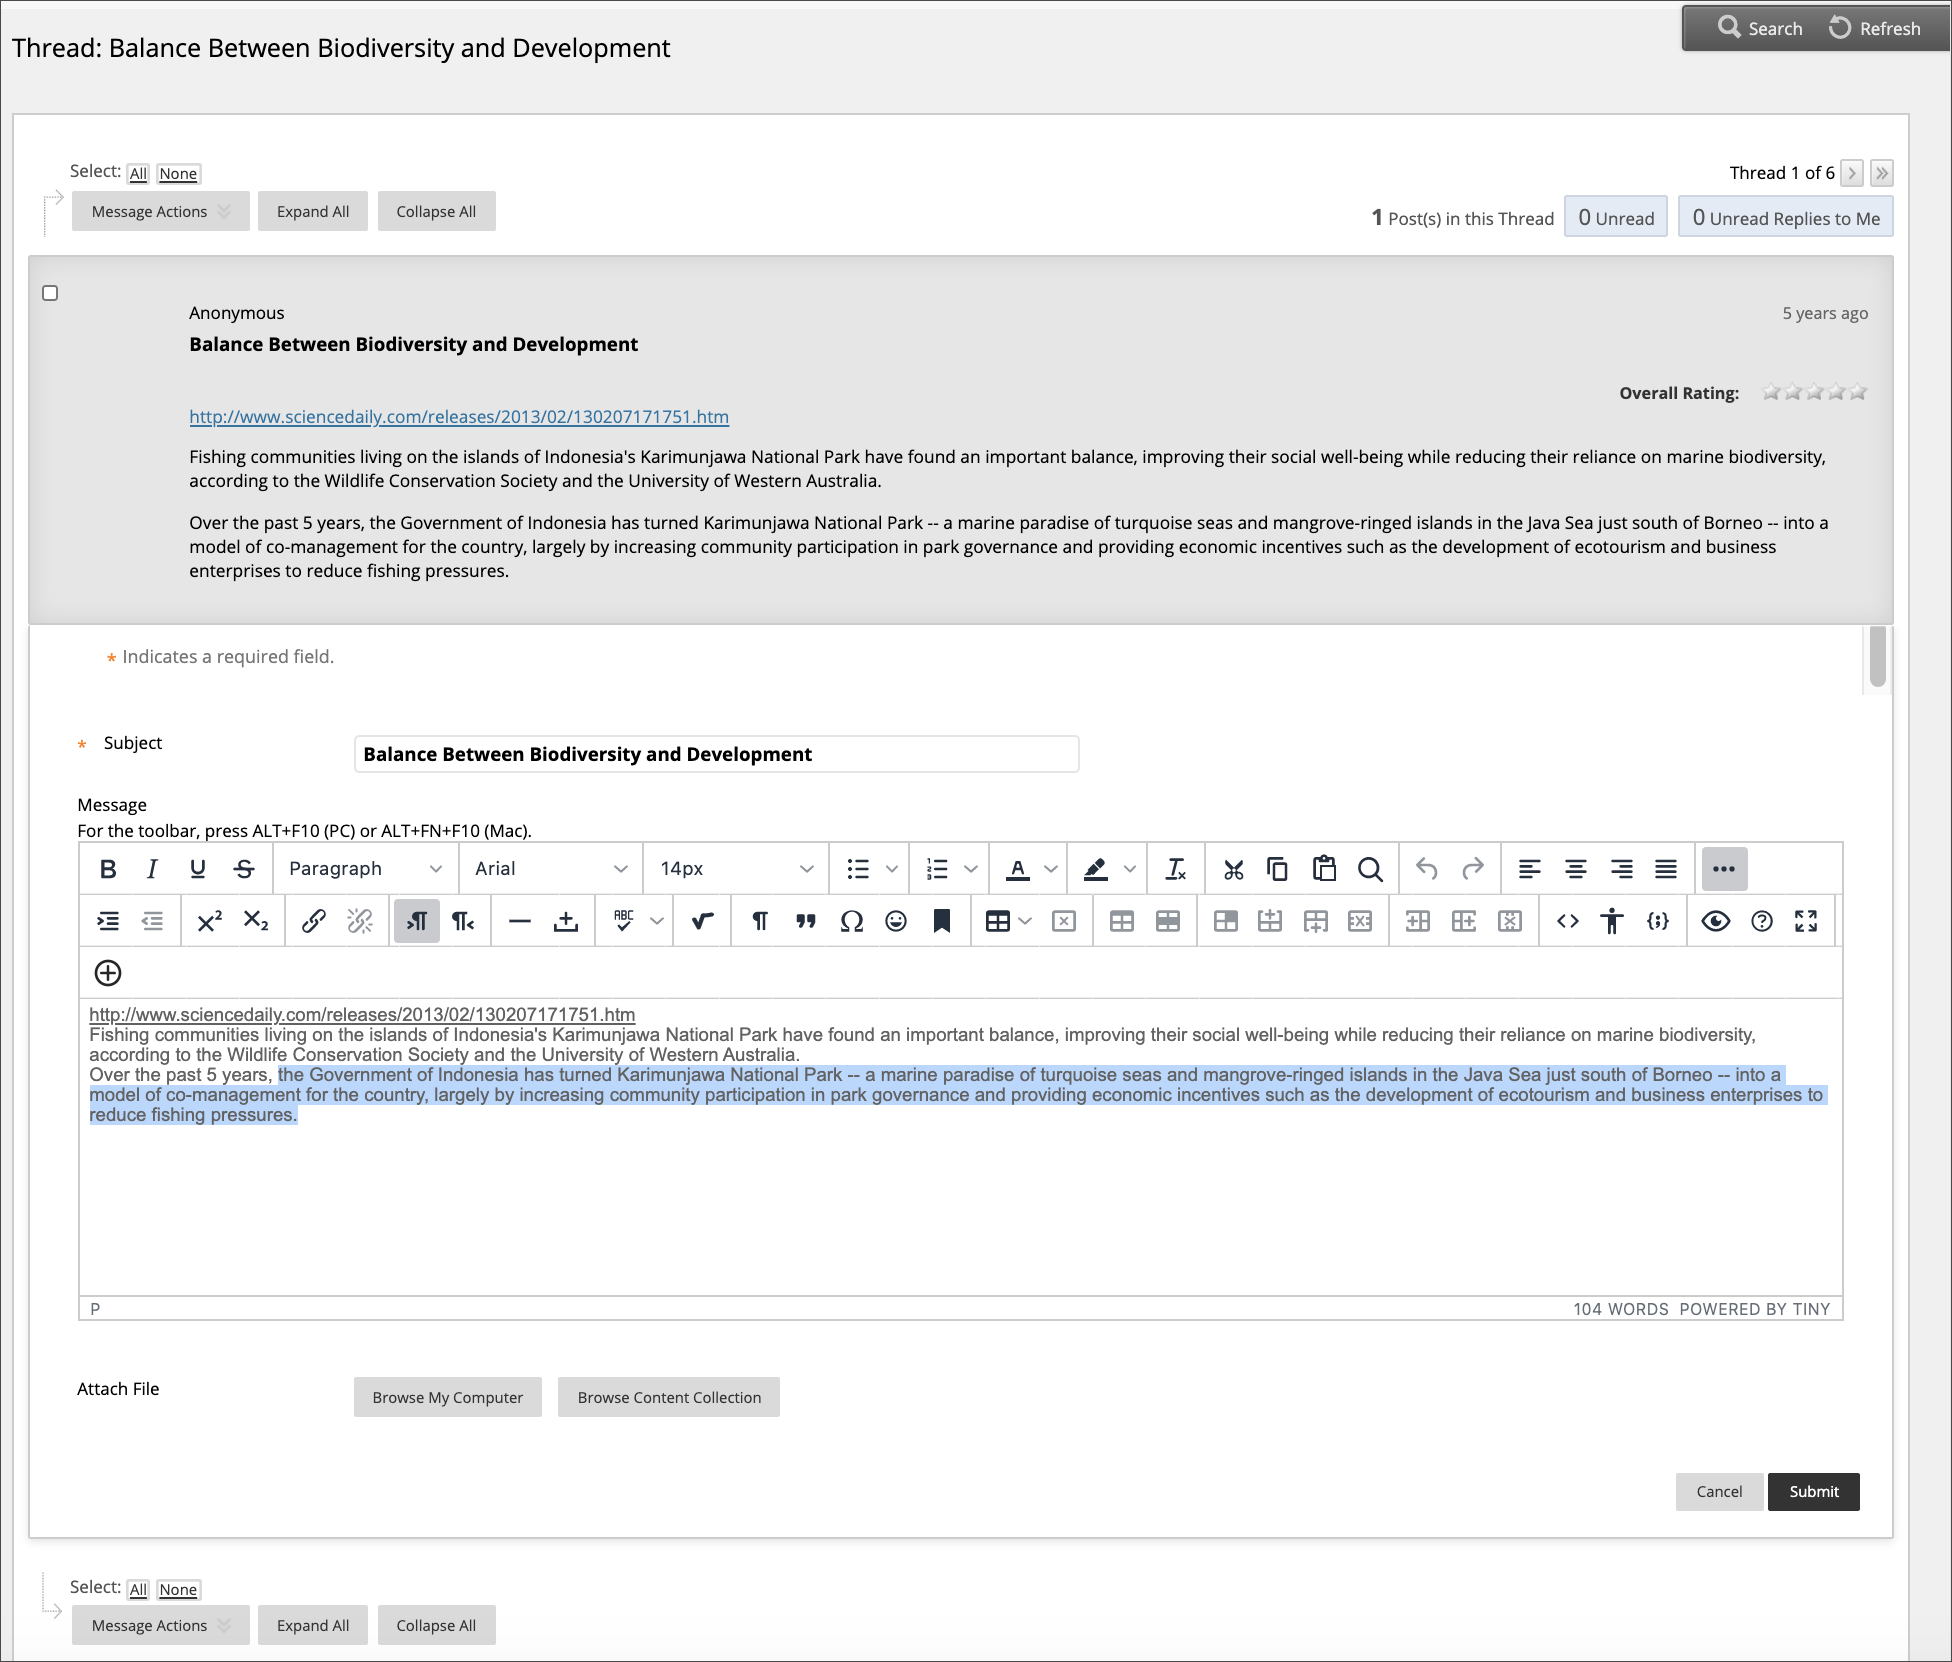
- On the thread’s page, point to a post so that all of the functions appear and select Edit.
- The editor appears. Make edits while you view the original post.
- Select Submit. Your edits appear in the post.
When you delete a forum or thread, all content is permanently deleted. You won’t be able to refer to the posts if a student wants to dispute a grade. For a less permanent solution, you can make a forum unavailable. When you delete graded discussion content, you control if the Grade Center column and scores are also deleted.

- Open a forum or thread’s menu and select Delete.
- Select OK in the pop-up window.
- On the Delete Confirmation page, you have two options:
- Retain Grade Center columns (don’t select check boxes): If you select this option, the graded forum or thread is deleted, but the Grade Center column and scores you assigned remain. Choose this option if want to keep the Grade Center column for the final grade calculations. If you delete the forum or thread, but retain the Grade Center column, you can delete that column from the Grade Center at any time.
- Delete Grade Center columns (select check boxes): The grade column in the Grade Center and the forum or thread are deleted. If you don’t want to include the grade column for the discussion posts in the final grade, you can safely delete both.
- Select Remove.
- To delete individual posts, point to the post on the thread’s page and select Delete. This action is permanent. Any replies to the post you delete are also permanently deleted.
Blogs
Set Up a Blog
- Make sure Edit Mode is set to ON.
- Select Tools from the Course Menu.
- Click Blogs.
- Click the Create Blog button.
- Enter a Name for the blog and any specific Instructions in the text box.
- Click Yes to make the blog available to users.
- Determine the Blog Participation by clicking Individual to All Students or Course.
- Choose between Monthly or Weekly index entries.
- Select the boxes to Allow Users to Edit and Delete Entries or Allow Users to Delete Comments if desired.
- Determine how the blog will be graded by clicking No grading or Grade: Points Possible. (When the blog assignment is gradable, it will automatically add a column to the Grade Center.)
- Click Submit.
Make a Blog Post
- Select Tools from the Course Menu.
- Click Blogs.
- Select the blog you’d like to post to.
- Click the Create Blog Entry button.
- Enter a Title.
- Add the post content in the Entry Message text box.
- Attach a file if desired and enter a descriptive Link Title.
- Click Post Entry or Save Entry as Draft for later posting. Drafts may be viewed by clicking View Drafts from the main Blog page.
Comment on a Blog Post
- Select Tools from the Course Menu.
- Click Blogs.
- Open the blog you’d like to review.
- Click Comment for the post on which you’d like to comment.
- Enter a comment in the text field.
- Click Add.
Journals
Set Up a Journal
- Make sure Edit Mode is set to ON.
- Select Tools from the Course Menu.
- Click Journals.
- Click the Create Journal button.
- Enter a Name for the Journal and any specific Instructions in the text box.
- Click Yes to make the Journal available to users.
- Use the Display After and Display Until date along with the time fields to Limit Availability of the Journal.
- Choose any additional Journal Settings.
- Click Submit to make the Journal available.
Create a Journal Entry
- Select Tools from the Course Menu.
- Click Journals.
- Select the Journal in which you’d like to create an entry.
- Click the Create Journal Entry button.
- Enter an Entry Title.
- Type your content in the Entry Message text box.
- Attach a file if desired. File Name is used as a title by default. Type a descriptive name in the Link Title field if desired.
- Click Post Entry or Save Entry as Draft for later posting. Drafts may be viewed by clicking View Drafts on the main Journal page.
Comment on a Journal Entry
- Select Tools from the Course Menu.
- Click Journals.
- Open the desired Journal.
- Click Comment for the entry on which you’d like to comment.
- Enter your Comment in the appropriate field.
- Click Add.
Wikis
Start a Wiki
- Make sure Edit Mode is set to ON.
- Select Tools from the Course Menu.
- Click Wikis.
- Click the Create Wiki button.
- Enter a Name for the Wiki and add any specific Instructions.
- Click Yes to make the Wiki available to users.
- Determine the Wiki Participation by choosing the desired student access options.
- Set the grading option by clicking No grading or Grade. Enter the Points Possible if you choose the Grade option. When the Wiki assignment is gradable, it will automatically add a column to the Grade Center .
- Click Submit.
Create a Wiki Page
- Select Tools from the Course Menu.
- Click Wikis.
- Open the desired Wiki by clicking its name.
- Click the Create Wiki Page button.
- Enter a Name for the Wiki page.
- Enter the page content using the Content text box.
- Click Submit to publish your page.
Edit Wiki Content
- Select Tools from the Course Menu.
- Click Wikis.
- Open the desired Wiki by clicking its name.
- Click Edit Wiki Content.
- Modify the page as you’d like.
- Click Submit to save your changes.
Zoom
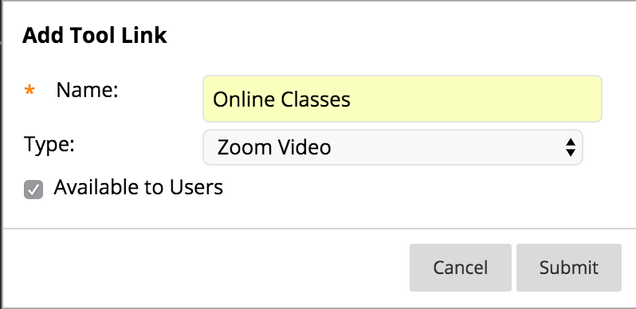
Integrating Zoom with Blackboard will easily allow you to connect with your class online.
- Open the Blackboard course where you would like to add Zoom.
- Hover over + in the navigation menu and choose Tool Link.
- Complete the Tool Link options:
- Name: Enter the title you would like displayed for the Zoom link in your course navigation.
- Type: Select Zoom Meeting.
- Available to users: Check this option so that students can see the link to the Zoom meetings as well.
- Click Submit.
Microsoft Teams
As of now this is a feature exclusive to Learn Original Courses.
-
- On the Course Control Panel, select Course Tools.
- Select Microsoft Teams.
- When the Microsoft Teams Meeting Scheduler application opens, select Sign In.
- Sign in with your Microsoft Office365 Active Directory credentials. The first time you sign in, you may have to grant permissions.
- Select Accept to continue.
- Select Create meeting link.
- Type a name for your meeting.
- Choose a Start Date, Start Time, End Date, and End Time.
- Select Create.
- Select Add to Calendar to add the meeting to your calendar and course content. The meeting gets added to your calendar automatically and the URL copies to your clipboard.
- Optionally, select Join Microsoft Teams Meeting to launch the meeting.
- Optionally, select Learn more about Teams to view related support documents from Microsoft. (May be available in English only)
- Optionally, select Meeting options to configure additional settings for your meeting.
- Select your course name in the breadcrumb to return to your course. Your meeting appears in the first Content Area of your course based on the Course Menu sequence and in your Calendar.
Your Microsoft Teams meeting defaults to Adaptive release timing. The meeting displays for your students one hour before the meeting start time.

