Blackboard Profile and Personal Settings
Your profile is the place to edit the information attached to your persona. Your profile appears with some information, and you can’t delete your profile. There are several fields within this profile page that you can edit, listed below.
One of the latest updates to the Blackboard profile page is the ability to specify your pronouns and the pronunciation of your name. Instructions for both of these are listed in the sections below.
View Your Profile
In the left side navigation bar where your name appears, select your name to access your profile.
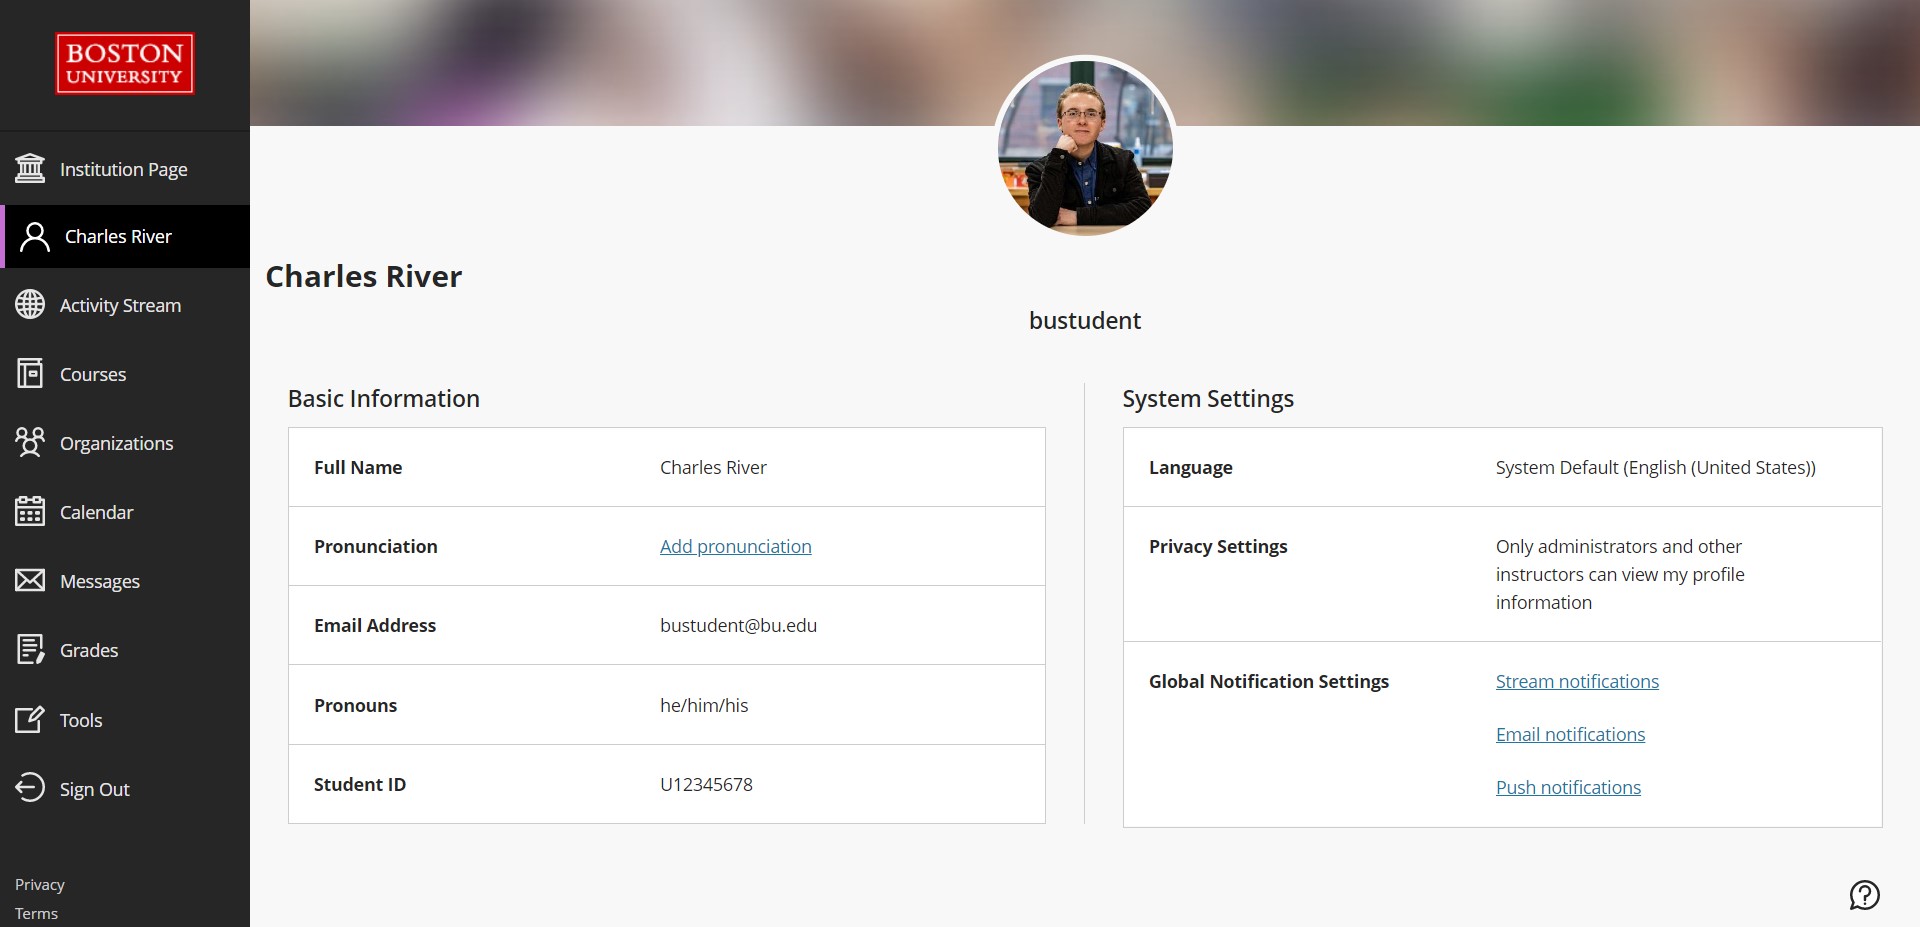
- Profile picture: Upload a picture to replace the generic silhouette.
- Basic Information: Update your personal information.
- Global Notification Settings: Set up notifications for course activities.
Updating Your Profile Picture
Upload your picture
You can store one image file in your profile.
- Point to the generic silhouette or your picture and select the pencil icon to upload, change, or remove an image.

- In the panel, select Upload new profile picture to browse for your picture on your computer. Or, you can drag a file to the Upload area.

- Your image is saved automatically. Close the panel to return to your profile.
Remove or replace your image: Upload or drag in another image. To return to the generic silhouette, select the Delete this picture icon to delete your existing image file.
Where does your picture appear: Your profile picture appears on course content pages, course cards, rosters, discussions, conversations, and messages next to your activity. You see student profile pictures throughout your courses in the same areas and in the gradebook.

Updating Your Basic Information
Changing Basic Information

- In the list where your name appears, select your name to access your profile.
- Point to a detail such as Full Name and select the pencil icon.
- In the panel, make changes.
- Select Done when you’re finished.
Note: You cannot change the Last Name, Email Address, Middle Name, or Student ID fields. If any of the information listed in these fields is incorrect, contact the Office of the University Registrar.
Choose Your Pronouns
Choose your pronouns
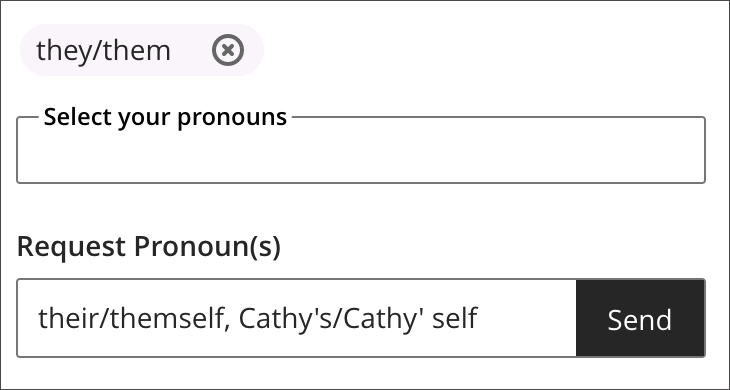
You can select your pronoun values in the profile page. The Pronouns field is empty by default, and you can change that by clicking the Add Pronouns. If you already have pronouns listed, you would click on that field to open the menu to edit them.
Once you’ve selected the Pronouns field, a menu will open to add or edit your pronouns. You can select from the drop-down menu or provide a search element and filter the list. You can add multiple values. The selection order is maintained in the display to other users, so you can prioritize them by your preference. You can also remove any selected pronouns.
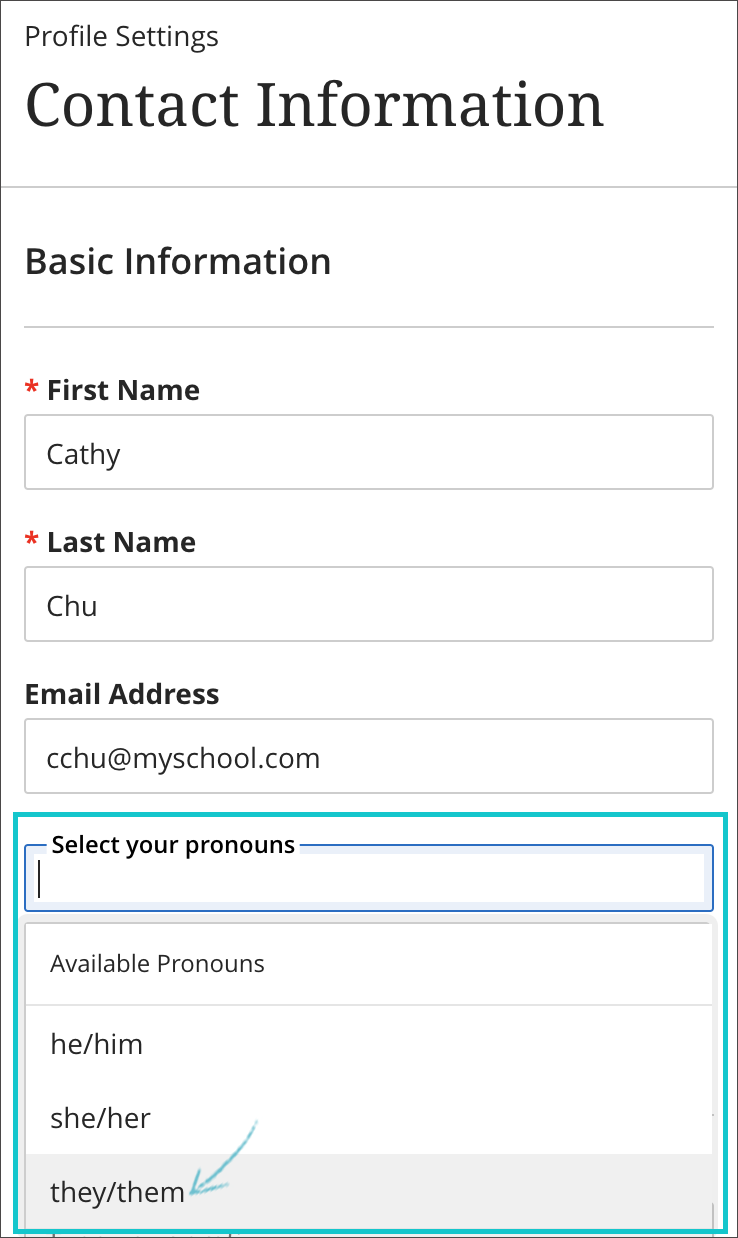
If you don’t see the pronoun options best suited to your needs, you can make a request. Requests are sent to the administrator for review and approval.
Your pronouns will appear to other users. In your courses, they will display in various locations of interactive tools, group activities, and name lists. If you do not want others to see your pronouns, you should remove them.
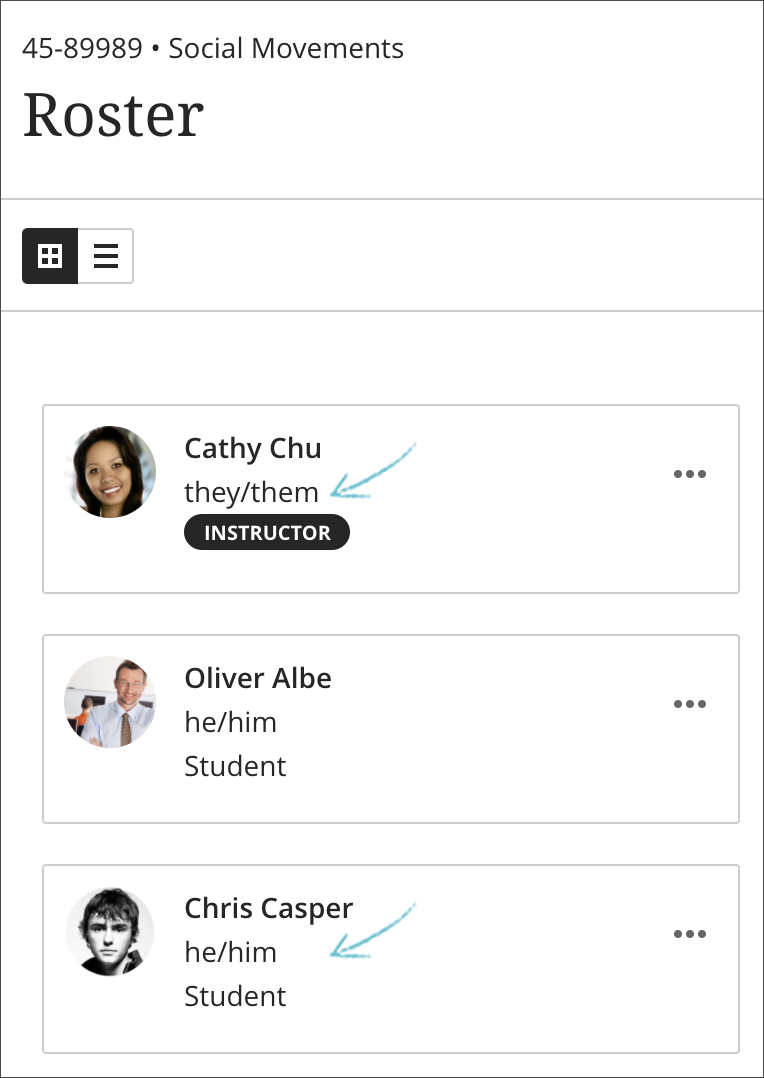
Where your pronouns will be visible:
| Section | Location |
|---|---|
| Group Assessments | A user can see group members’ pronouns in the overview panel A user can see group members’ pronouns while taking the assessment |
| Peer Review | A user entitled to see peer reviewers’ names can see their pronouns above their feedback when viewing a student’s attempt |
| Roster | Users can see other users’ pronouns in the course roster view |
| User Management | A user can see users’ pronouns when searching for users to enroll in the course a user can see A user’s pronouns when editing them in the course roster A user can see a user’s pronouns when editing their accommodations |
| Discussions | Users can see other users’ pronouns with their responses |
| Messages | Users can see other users’ pronouns when searching for message recipients Users can see other users’ pronouns in the message panel |
| Gradebook | Instructors and graders can see users’ pronouns in the grid view Students can see their own pronouns when viewing their own grades |
| Groups | A user can see the pronouns of users in a group Instructors can see the pronouns of students in the group management view |
| User Profile | A user can see their own pronouns in their profile page A user can see their own pronouns when editing their profile in the profile settings panel |
Adding Your Name's Pronunciation
Add the pronunciation for your name
You can add a phonetic spelling of your name to show others how to pronounce your name correctly. You can also add a recording of the pronunciation if you would like to do that as well.
You’re able to set the pronunciation of your name in the profile page. The Pronunciation field is empty by default, and you can change that by clicking the Add pronunciation. If you already have a pronunciation set, you would click on that field to open the menu to edit, replace, or remove it.

Once you’ve selected the Pronunciation field, a menu will open to add or edit the spelled-out pronunciation of your name. You can type out the phonetic spelling of your name in the Pronunciation section.
If you’d like to add an audio recording of you saying your name for others to listen to, click the Record name pronunciation button. This may prompt your browser to allow access to your microphone, which you should click “Allow” to start recording. The recording tool counts down to when the recording begins. The recording may be up to 20 seconds long.
Where your name’s pronunciation will be visible:
| Section | Location |
|---|---|
| Group Assessments | A user can see group members’ name pronunciation in the overview panel A user can see group members’ name pronunciation while taking the assessment |
| Peer Review | A user entitled to see peer reviewers’ names can see their name pronunciation above their feedback when viewing a student’s attempt |
| Roster | Users can see other users’ name pronunciation in the course roster view |
| User Management | A user can see users’ name pronunciation when searching for users to enroll in the course a user can see A user’s name pronunciation when editing them in the course roster A user can see a user’s name pronunciation when editing their accommodations |
| Discussions | Users can see other users’ name pronunciation with their responses |
| Messages | Users can see other users’ name pronunciation when searching for message recipients Users can see other users’ name pronunciation in the message panel |
| Gradebook | Instructors and graders can see users’ name pronunciation in the grid view Students can see their own name pronunciation when viewing their own grades |
| Groups | A user can see the name pronunciation of users in a group Instructors can see the name pronunciation of students in the group management view |
| User Profile | A user can see their own name pronunciation in their profile page A user can see their own name pronunciation when editing their profile in the profile settings panel |
Changing Your Notification Settings
Global Notification Settings
You can choose the types of notifications you receive and how they’re delivered to you.
On your profile page, go to the Global Notifications section and choose which notification settings you want to adjust. Clicking the pencil icon will open the Notification Settings panel. You can also update your notifications from the Activity Stream page (where you can select the Stream Settings icon to open the Notification Settings panel).
On your activity stream’s Notification Settings panel, you can choose which notifications you receive about activity in all your Original and Ultra courses:
- Activity stream: Choose which activities appear on your Stream page.
- Email: If you want to receive email notifications, add an email address to your profile page. Then, choose how often and which activities you want to receive notifications for.
- Push notifications: Messages pop up on your mobile device if you have the Blackboard app for students installed. You can select which notifications are sent to your device.
Stream notifications
You can control which activity appears in your stream. Select the Stream Notification Settings tab to open the panel.
Notifications for due dates, grades, and feedback always appear in your stream.

Choose which notifications you receive about activity in all your Original and Ultra courses:
- Institution announcements
- Course announcements
- Graded items due
- Graded item due soon
- Graded item past due
- New content
- Assessment added
- Content added
- Grades posted
- New discussion
- My grades and activity
- No recent activity
- Grade low or at risk
- Grade dropped
- Low course activity
- Grade increased
- Course activity in top 10%
- Grade in top 10%
- New calendar event
- New course or organization
- Blog activity
- Blog entry posted
- Blog entry edited
- Journal activity
- Journal entry posted
- Journal entry edited
- Wiki activity
- Wiki page created
- Wiki page edited
- Wiki comment posted
You can choose to receive all or some notifications of a certain type. A checkmark appears when you select all notifications. A dash appears when you select some notifications.
Email notifications
You can control which activity you get emailed about. Select the Email Notification Settings tab to open the panel.
If you haven’t added an email address to your profile page, you won’t see any options in the Email Notification Settings tab.
Organization activities won’t trigger email notifications.
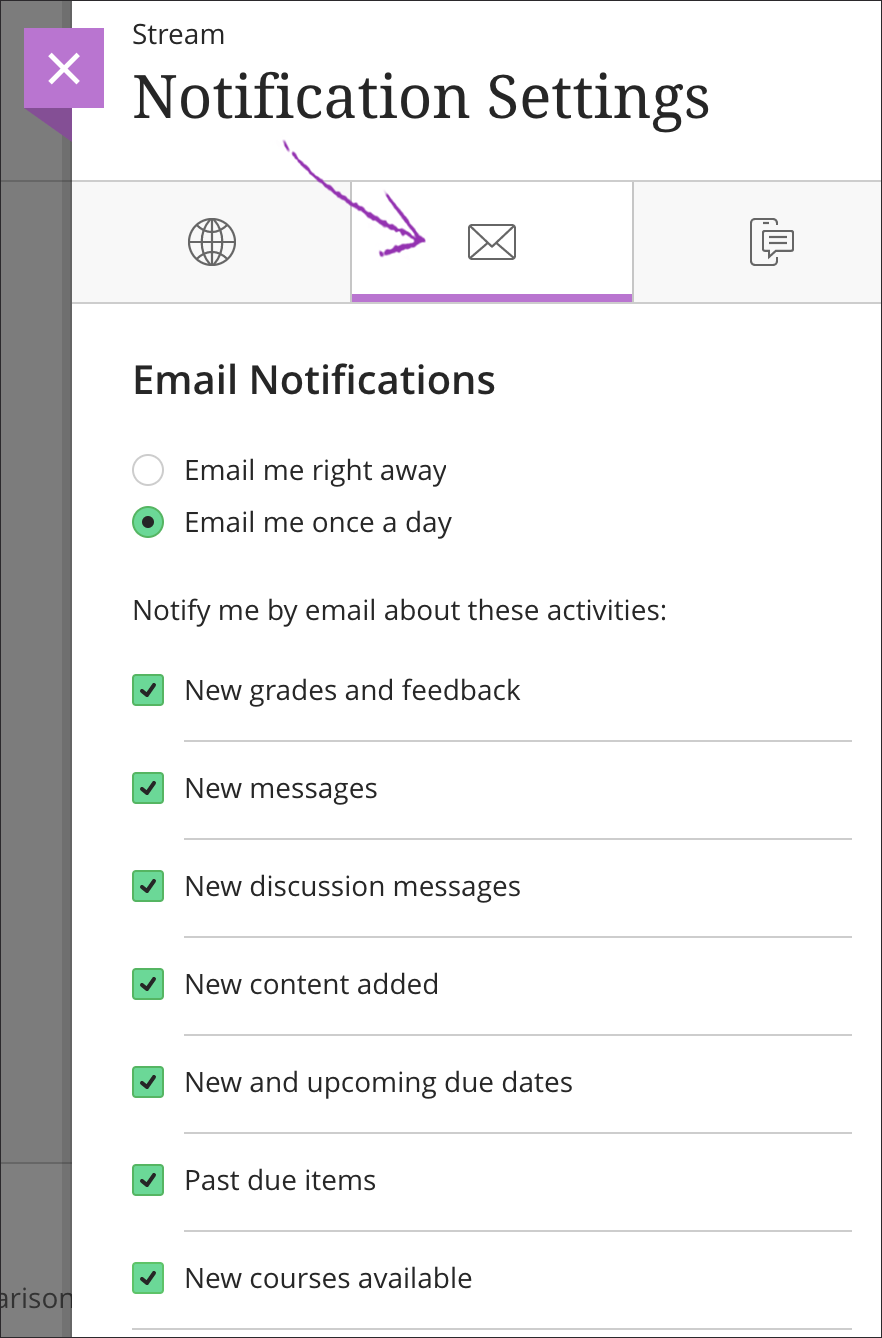
Choose how often you want to receive emails for activities in all your Original and Ultra courses:
- Email me right away: Receive individual notifications for each activity you choose from the list.
- Email me once a day: All notifications are collected and sent once a day at a time set by your institution.
In the Notify me by email about these activities list, choose which notifications you want to receive:
- New gradable items
- New messages
- New discussion messages
- New content added
- New and upcoming due dates
- Past due items
- New courses available
Clear all the check boxes if you don’t want to receive emails about the activities in the list.
Push notifications
If you have the Blackboard mobile app installed, you can receive push notifications on your mobile device. You can manage which push notifications are sent in these ways:
- Blackboard on the web: Log in to Blackboard on a web browser and navigate to your Activity Stream. Select the Stream Settings icon. From the Notification Settings panel, select the Push Notification Settings tab.
- Blackboard app: In the app’s main menu, tap Settings.
Choose which push notifications you want to receive for activity in all your Original and Ultra courses:
- New content
- Discussion posts and replies by your instructor
- Discussion replies in a thread you authored
- New grades and feedback
- Due dates for these content types only
- Tests
- Assignments
- Discussions
- Manual grade columns
- Additional due date reminders – you can set up more reminders for a specific number of days prior to due dates
Due date push notifications always appear one day before the due date and can’t be turned off like other push notification types.
When an instructor changes a due date, a new Test Due push notification is generated. The push notification doesn’t state that it’s a changed due date.