You can use the Test tool to measure student knowledge, gauge progress, and gather information from students. This page provides direction on both Blackboard Ultra and Original courses.
Creating a Test (Ultra)
Create a New Test
Watch a video about creating tests
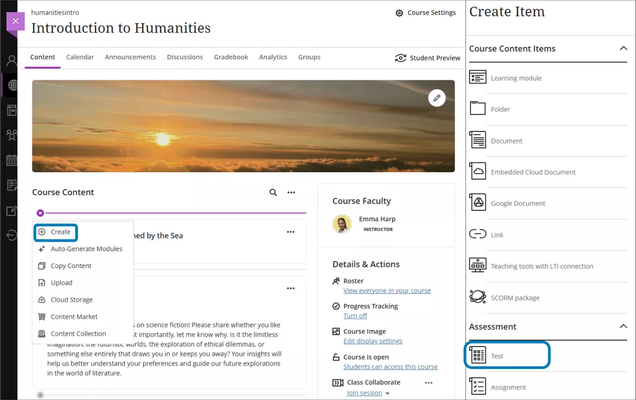
- To create a test, start from your course’s Course Content page and select the plus sign above or below other content.
- Choose “Create” and under the Assessment section, select “Test”.
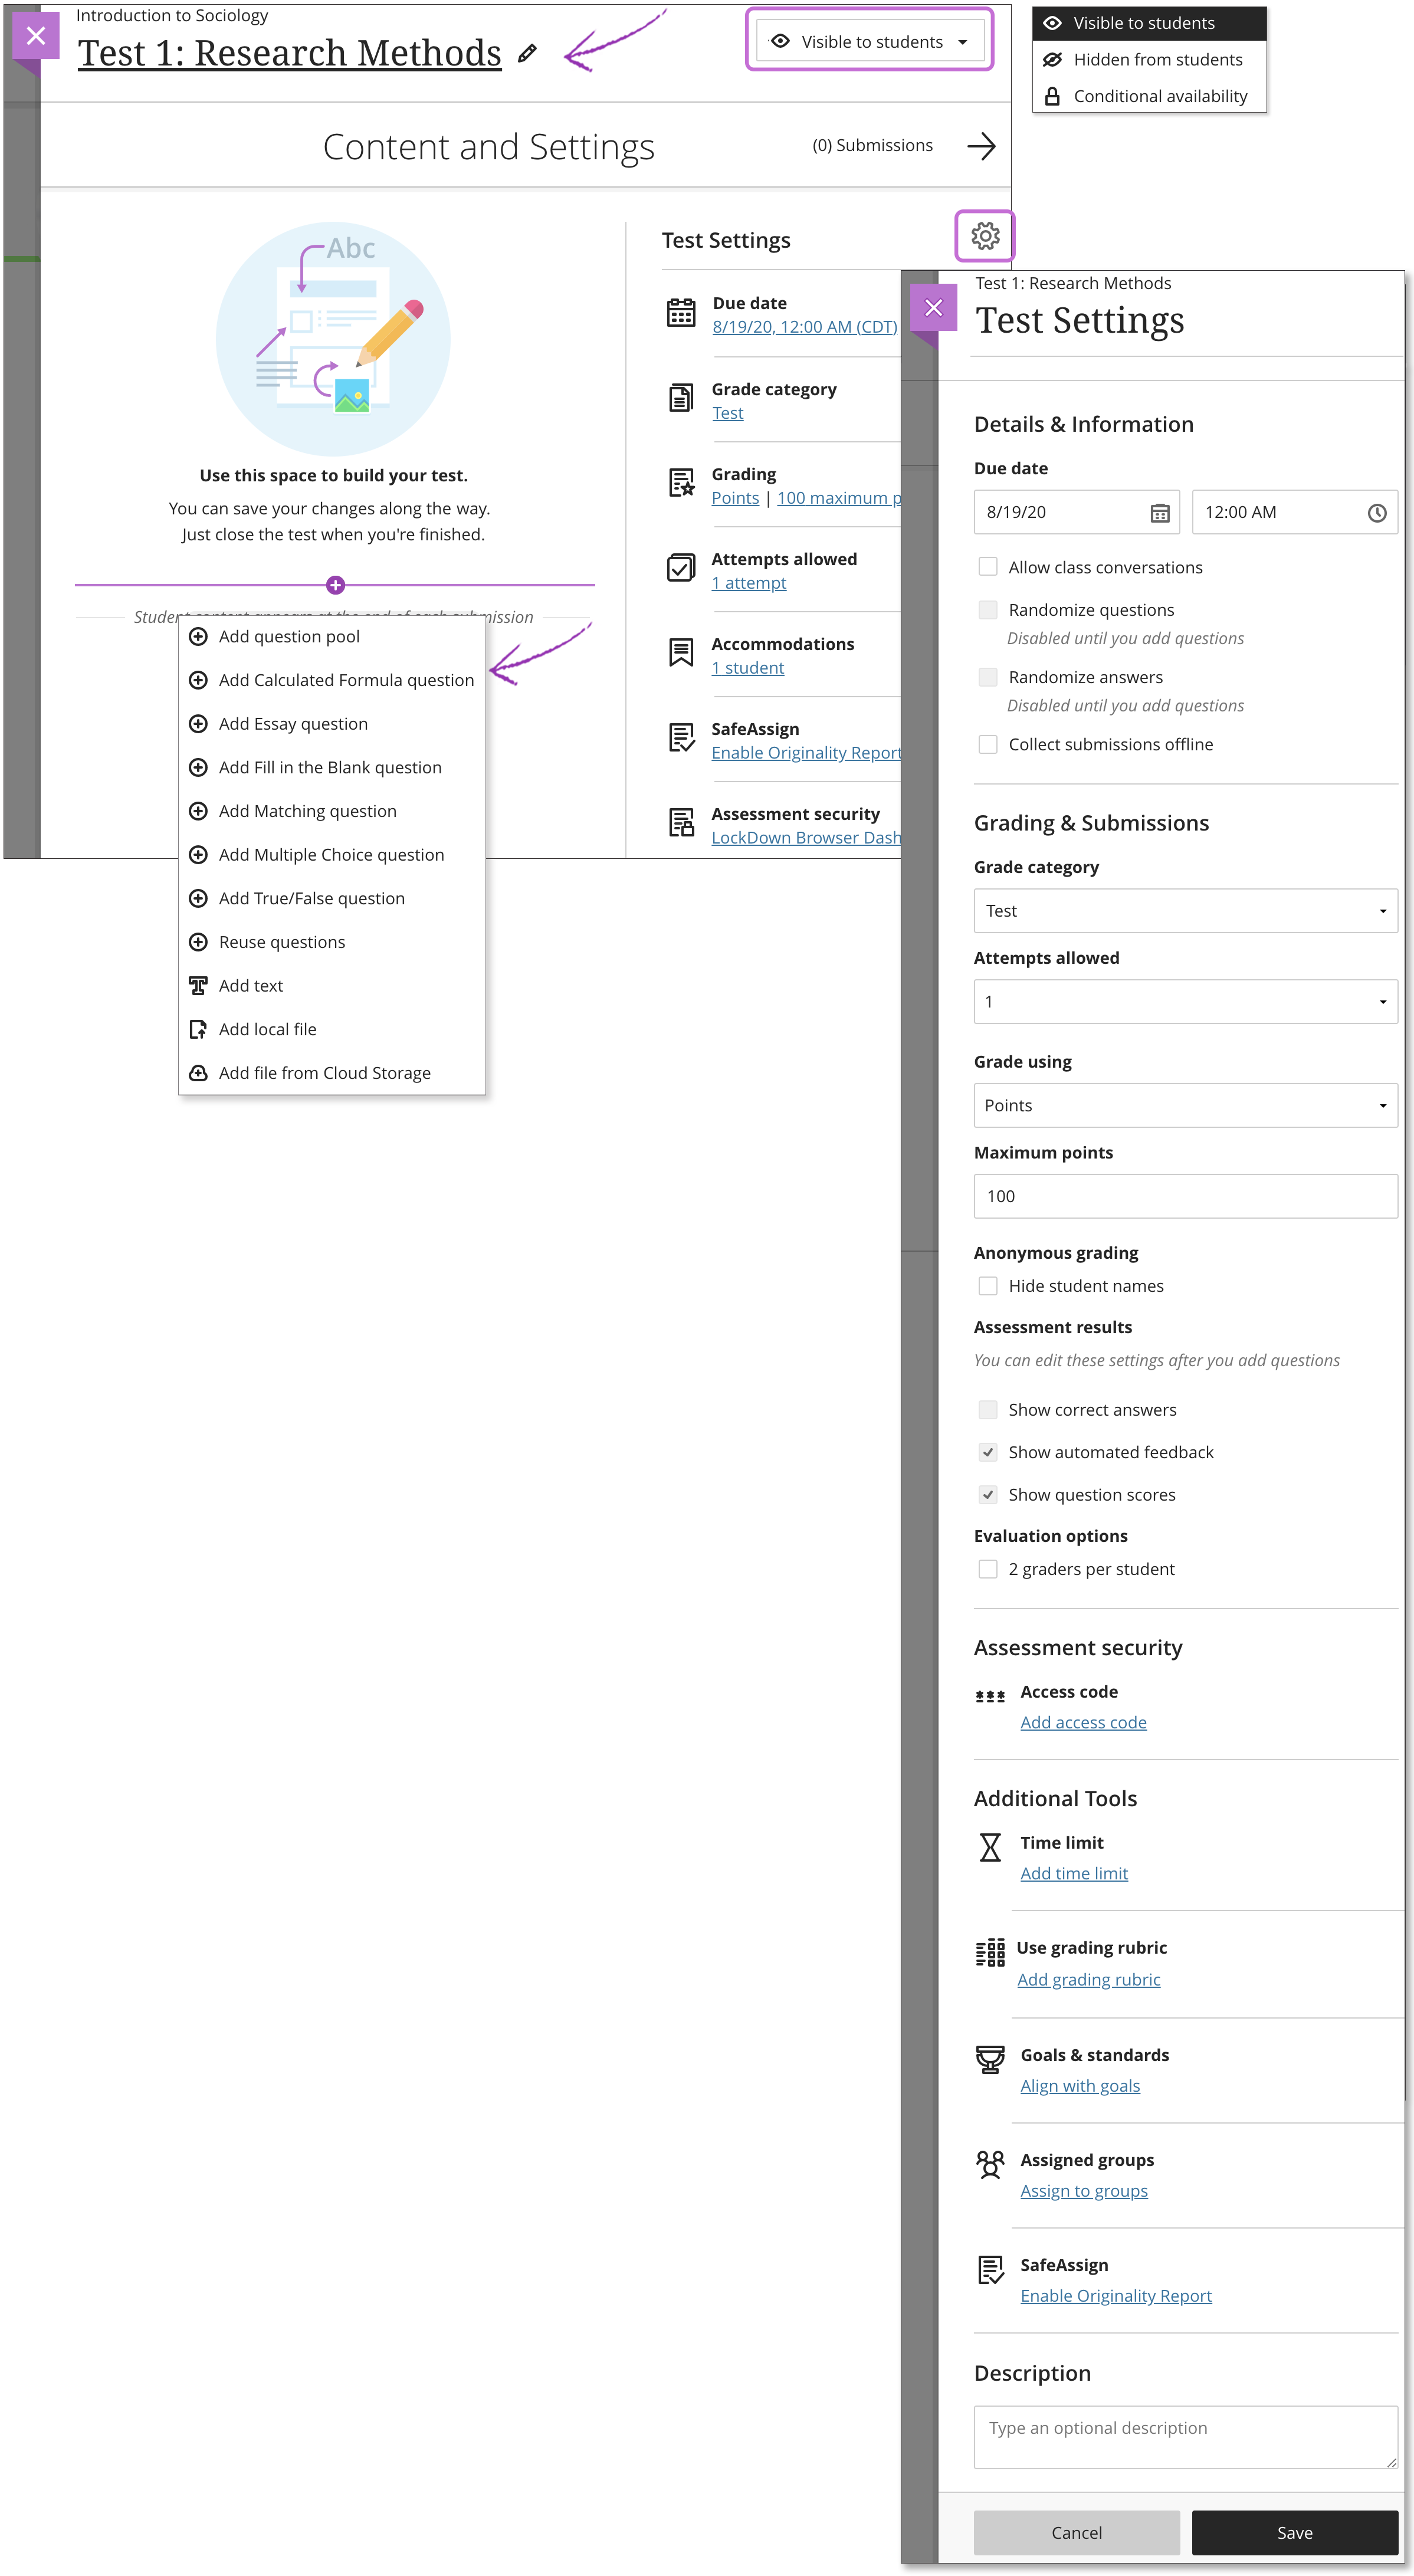
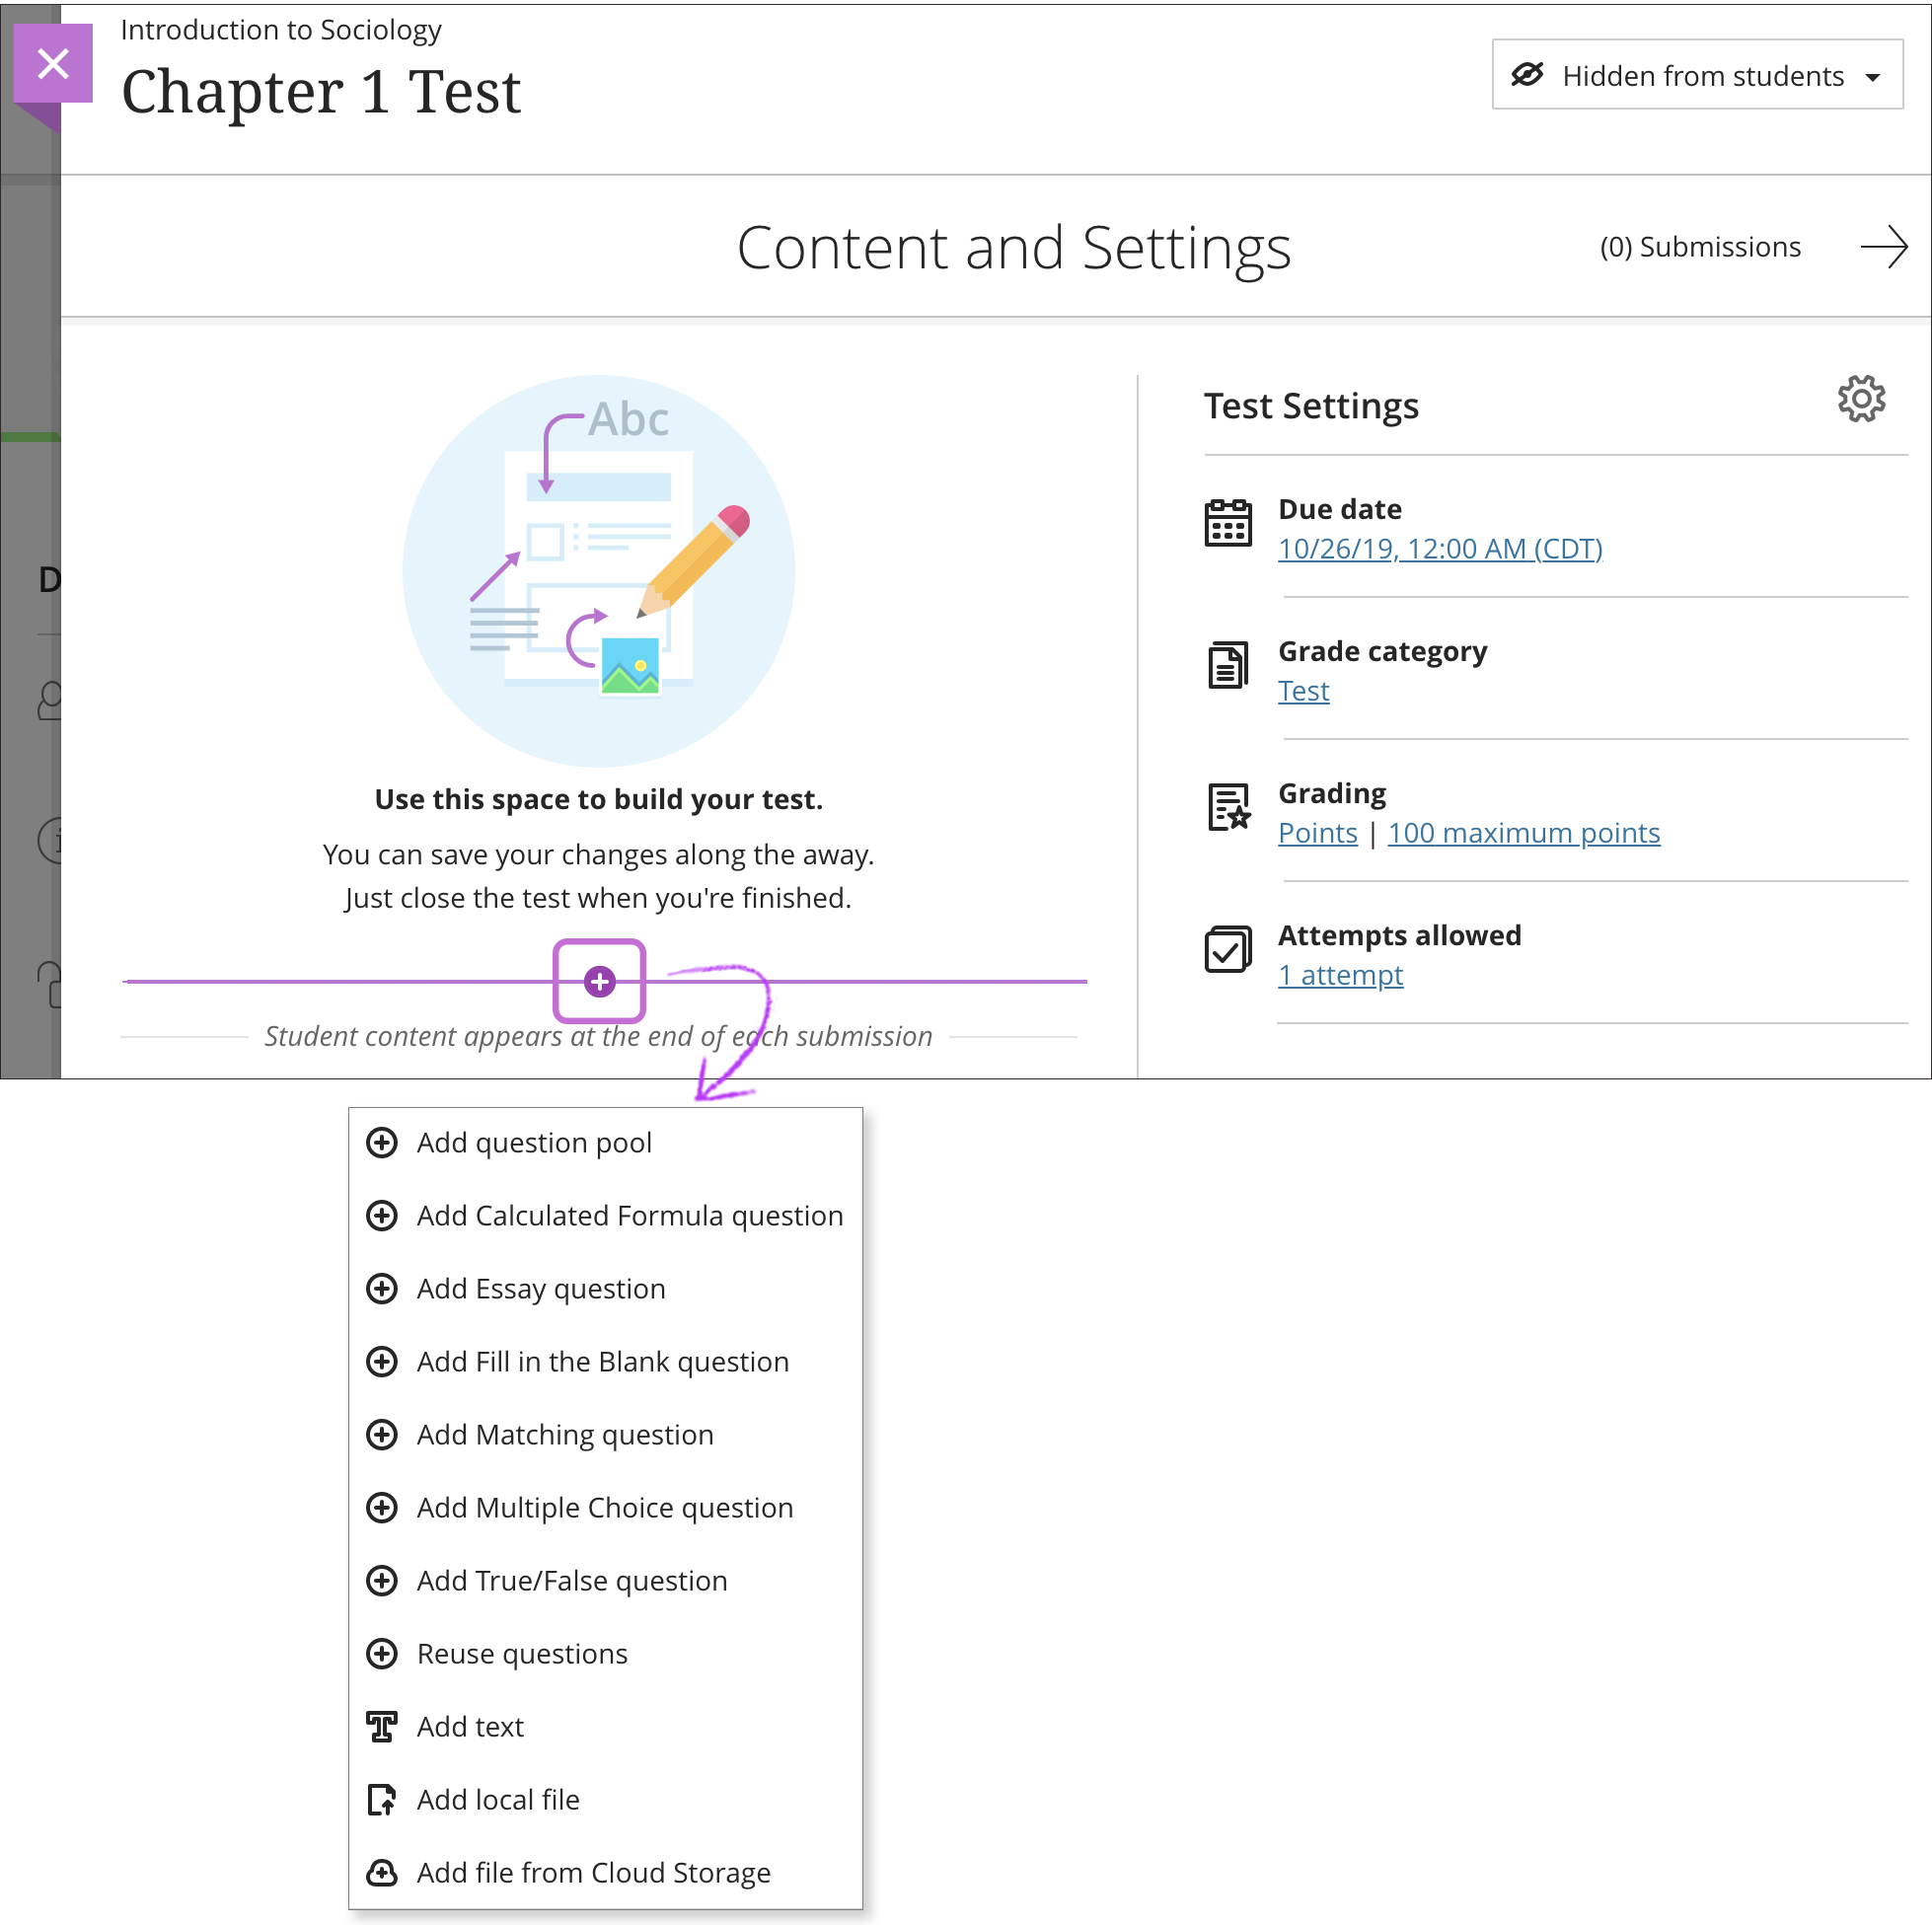
- Your blank test will open up, and you can start by typing a name for it at the top. On the Course Content page, the title appears as the link students select to view the materials. Note: If you don’t add a title, “New Test” and the date appear in the content list. If you don’t add content, the test won’t appear on the Course Content page.
- Select the plus sign in the body of the test to open the content menu and make a selection. You can choose a question type, add a question pool, or reuse questions and content from existing assessments. You can also add files and text, such as instructions for the test. You can also add files from cloud storage, such as OneDrive and Google Drive.
- From the Course Content page, you can make changes to existing tests and change where they appear on the page. Be aware that if you change an existing test that students can access, some students may have started their submissions.
- Also from the Course Content page, you can change the test’s due date and grade unit at any time, even after students have made submissions (students’ statuses, scores, and grade units will update also). Do this by hovering over the test and selecting the three dots on the right side, then clicking “Edit”.
- You can delete a test from your course and if no student submissions exist, the gradebook item is also deleted. For tests with submissions, you must confirm that you want to permanently remove the test, all submissions, and grades from your course.
Adding & Reordering questions
Adding Questions and Content
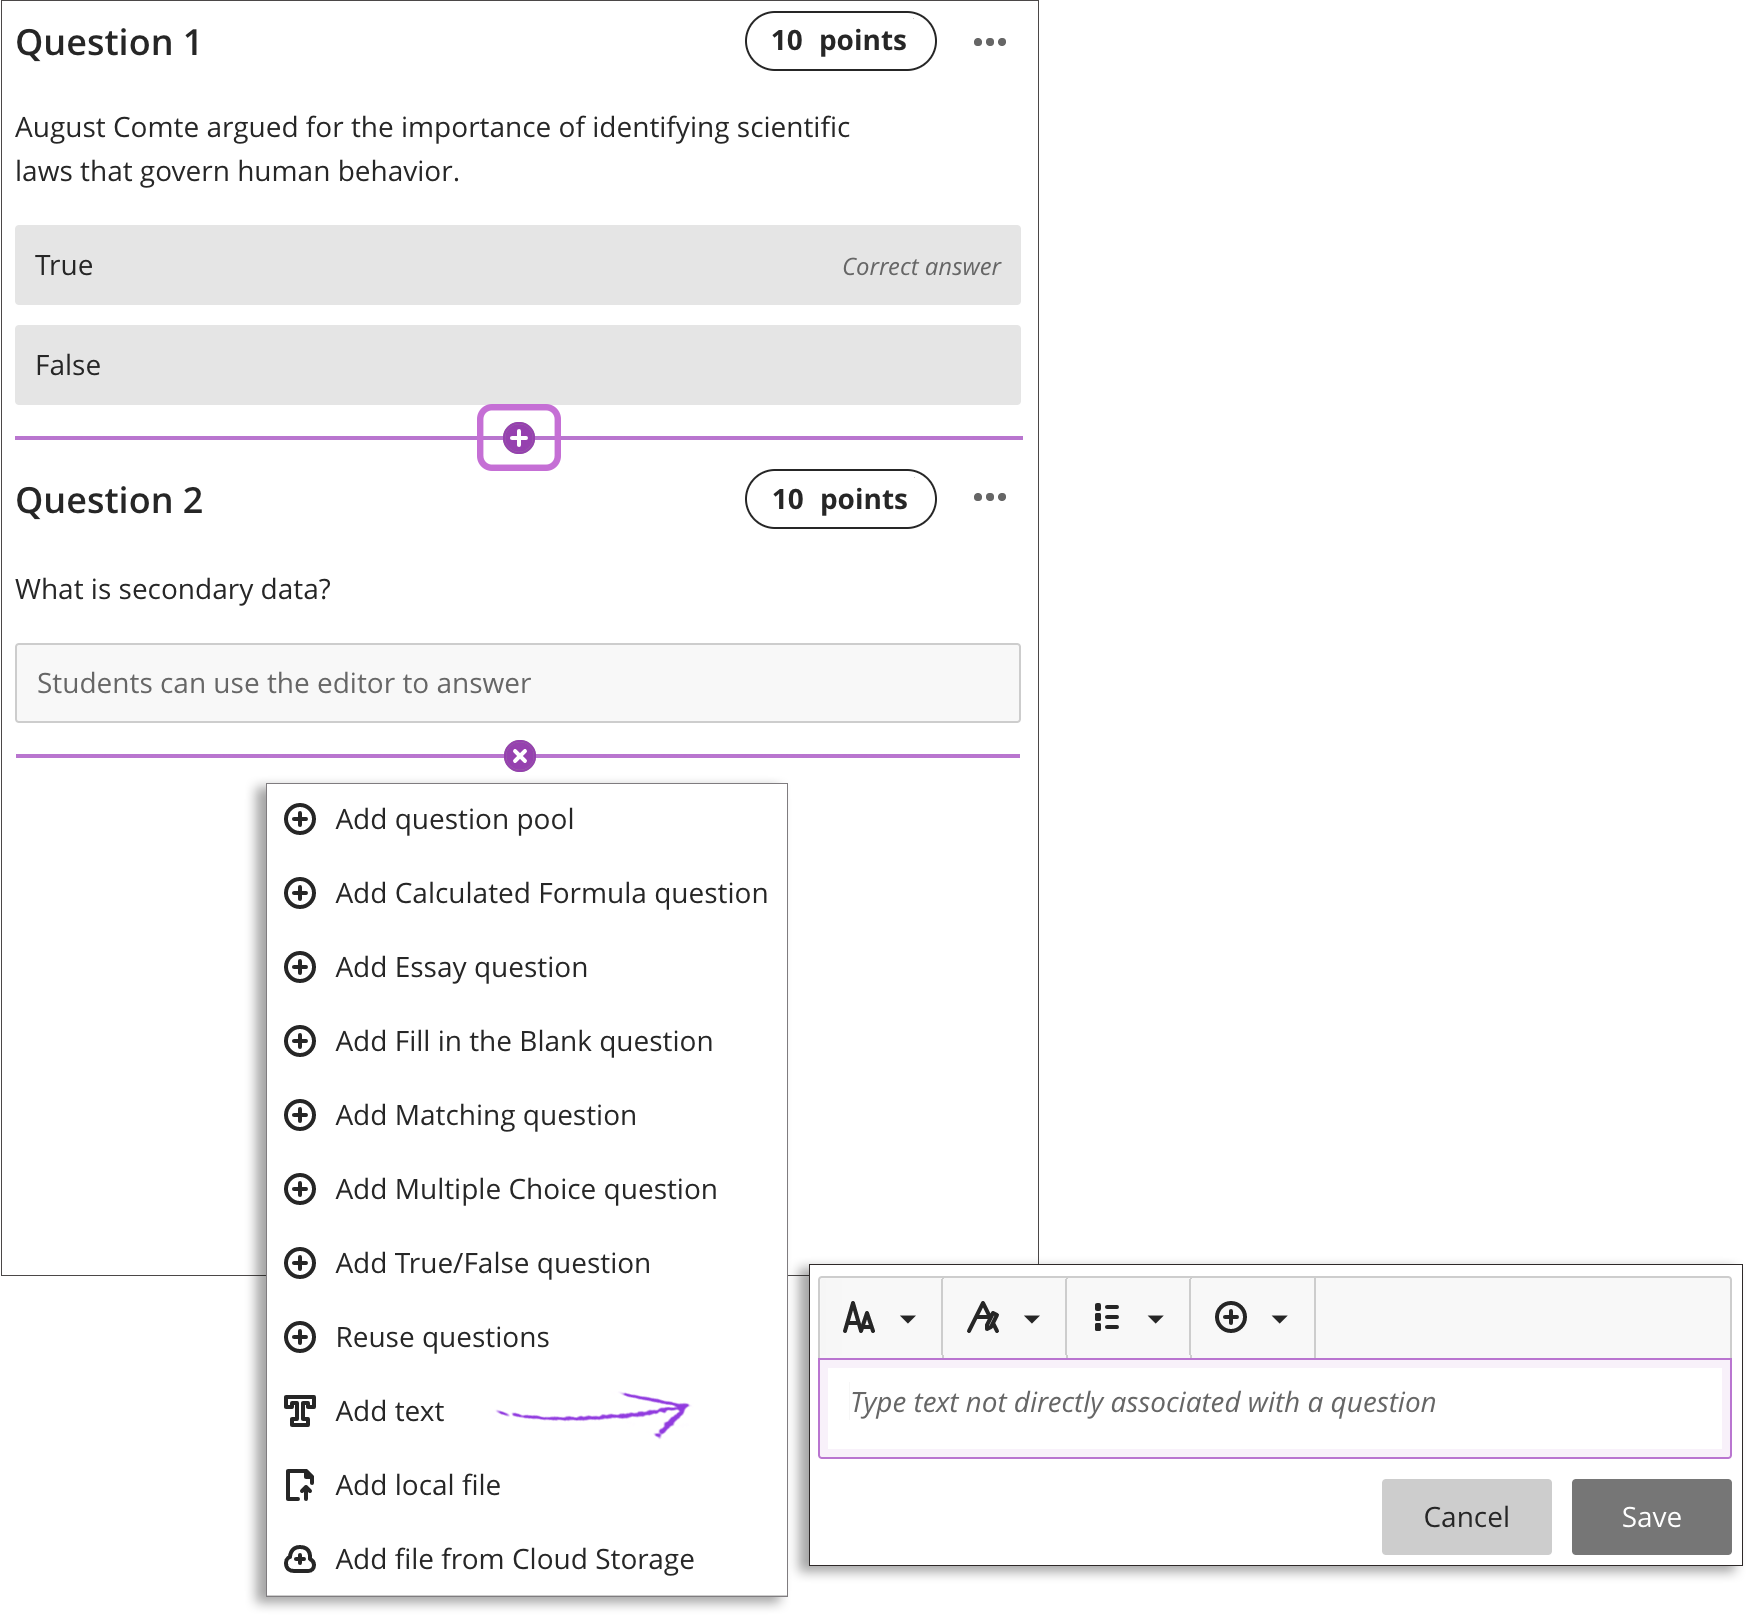
- When you create a new test, select the plus sign to open the menu and select a question type. You can also reuse questions and content from existing assessments. If you add questions to a test, you can’t enable anonymous or parallel grading.
- The Test Content area opens where you type the question and answer choices if required, such as for Multiple Choice questions. Questions have a default value of 10 points. Select the Points box to type a new value.
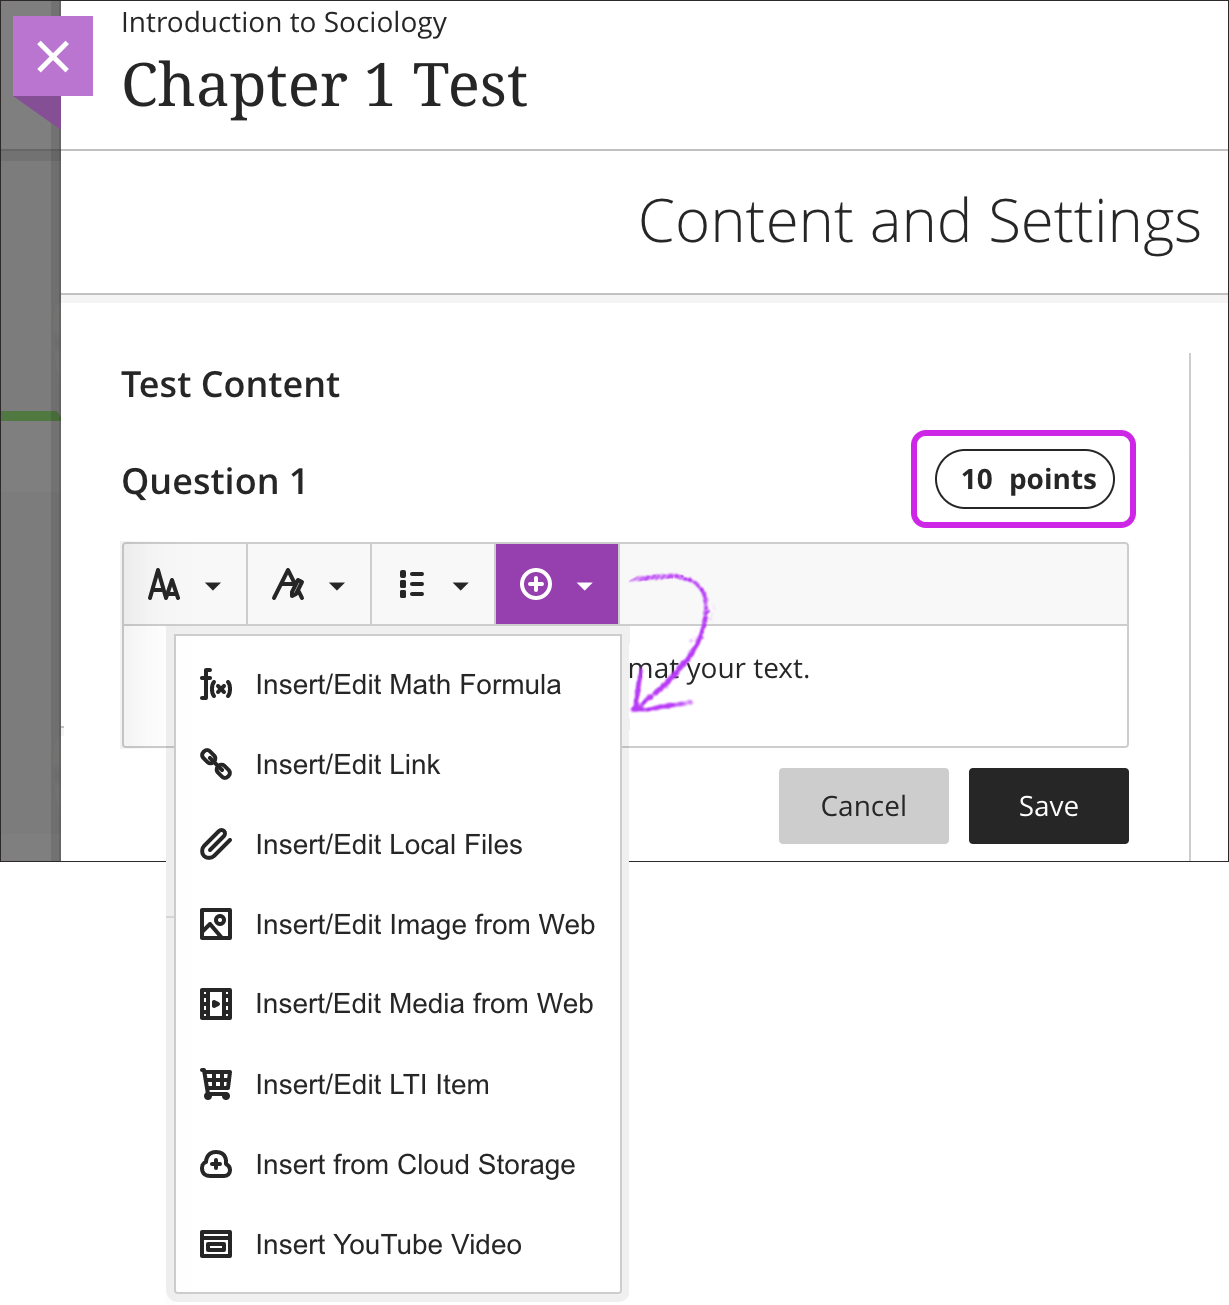
- You can use the options in the editor to format the text.
- To help keep your test content organized, you can add files within individual questions. Make a selection from the editor’s Insert Content menu, such as Insert from Cloud Storage.
- Select Add text to open the text block editor. You can include instructions for a section of the test or introductory text for an audio file or image. You can also use the editor to embed images and attach files along with your text.
- If you create a test that only includes text blocks, you can manually change the Maximum score in the Test Settings panel. For example, you may want students to upload submissions or use the freeform text fields.
- To add additional files, select Add local file to browse for files on your computer. You can’t add a folder of files
- For more information about Question Types in tests, please visit this page.
Reordering Questions and Content
- Questions are numbered automatically in the order you add them. The question numbers update when you reorder. Before students open the test, you can reorder the elements of your test.
- Point to a test item to access the Move icon. Press and drag the question, text block, or file to a new location.
Test Settings (Ultra)
Test Availability
Test Availability
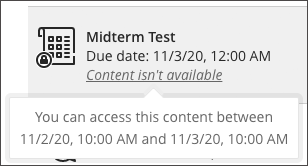
Students can’t see a test until you choose to show it. By using conditional availability, you can create all your content ahead of time and choose what you want students to see based on your schedule. You can also set availability conditions based on date, time, and performance on other items in the course Gradebook. On the Course Content page, students can see when you set the test to show.
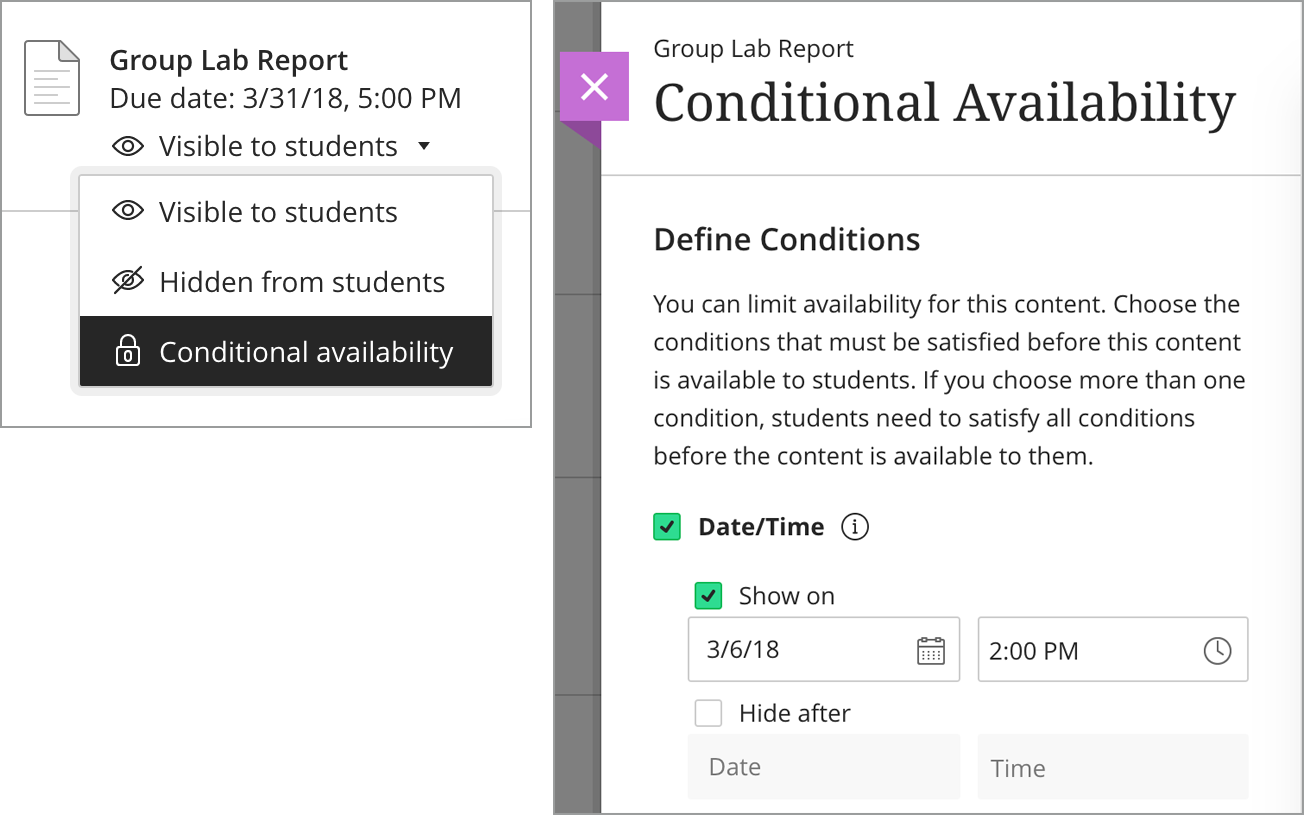
- To do this, select the visibility option in the top right corner of the test, and click “Conditional availability” in the dropdown.
- You can show, hide, or use rules to release content to students. You can release an item or folder on an exact date, until a certain date, or during a defined period of time.
- After you choose dates and times, you can also show or hide the content for students before they have access.
- Visible to students. If you choose to show the content to students before they can access it, your date and time choices are shown with the item on the Course Content page. Students see the date and time the content will be released and when they can no longer access it. After students’ access ends, the content is still visible but they can’t access it.
- Hidden from students. If you choose to hide the content from students before they can access it, the content is only visible to students when they’re able to access it. Students don’t see the dates and times when they can no longer access the content. After students’ access ends, the content is hidden from their view.
- Visible to students. If you choose to show the content to students before they can access it, your date and time choices are shown with the item on the Course Content page. Students see the date and time the content will be released and when they can no longer access it. After students’ access ends, the content is still visible but they can’t access it.
General Settings
General Settings
- To change the test’s settings, select the Settings icon to open the panel where you provide the test’s details and information.
- You can set accommodations for students and make them exempt from certain course requirements, such as test due dates and time limits. To select accommodations, go to the Roster and access the student’s menu. The number of accommodations you’ve made appears on the test page in the Test Settings section.
- You can randomize questions and their answers to support practice/drilling activities and help students avoid academic dishonesty. You can use one or both settings so tests appear differently for each student. Use the Randomize questions and Randomize answers check boxes accordingly.

- You can’t randomize questions in a test with text blocks or attachments.
- You can only randomize answers for Matching and Multiple Choice questions. If you want to randomize answers for True/False questions, use the Multiple Choice question type with True and False answer choices.
- Questions appear in order to you but are randomized for students. To prevent confusion, don’t add numbers to reference other questions within the test.
- You can change the test’s Grade Category to be part of one of the custom gradebook categories you set up in your course. You can create new categories to customize how coursework is grouped in your course. You can use the default and custom categories when you set up the overall grade.
- By selecting the dropdown for Attempts Allowed, you can let your students submit more than one attempt at a test. When you allow multiple attempts, you can also choose how the final grade is calculated.
- Choose how you want to calculate the final grade:
- Average of all attempts
- First attempt with a grade
- Attempt with highest grade
- Last attempt with a grade
- Attempt with lowest grade
- Choose how you want to calculate the final grade:
- From the Grade using menu, select an existing grading schema such as Points. A test’s score consists of the sum total of all the questions’ points. You can change the grading schema at any time and the change will show to students and in your Gradebook.
- When you create a test without questions, you can enable anonymous grading by checking Hide student names, so student names are hidden while you grade. You may only add text and files to anonymously graded tests.
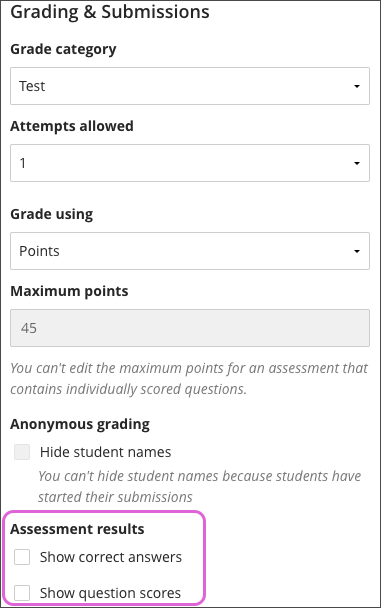
- Select the Show correct answers check box to allow students to see the correct answers to automatically scored questions after they submit.
- In the assessment settings panel, the Show correct answers and Show question scores aren’t selected by default, so correct answers and scores per question are hidden from students. When you want students to review the answers with the assessment content, return to the settings panel and select Show correct answers. Show question scores will be selected automatically. When you show correct answers, you need to also show the question scores. To show only the score per question but not the correct score, clear the check box for Show correct answers.
- The due date you set doesn’t affect this setting. Select the check box when you’re ready to reveal the answers to all students.
- After students complete an assessment and return to review it, a banner appears at the top of the assessment. They’re informed that their instructor will reveal the correct answers after all students have submitted. Any feedback you’ve provided won’t appear until grades are posted.
- If you don’t want students to see the banner for assessments without questions, select the check box for Show correct answers during creation.
- In the assessment settings panel, the Show correct answers and Show question scores aren’t selected by default, so correct answers and scores per question are hidden from students. When you want students to review the answers with the assessment content, return to the settings panel and select Show correct answers. Show question scores will be selected automatically. When you show correct answers, you need to also show the question scores. To show only the score per question but not the correct score, clear the check box for Show correct answers.
- You can issue an Access Code to control when students and groups take an assessment. In a test or assignment’s Settings panel, select Add access code in the Assessment security section.
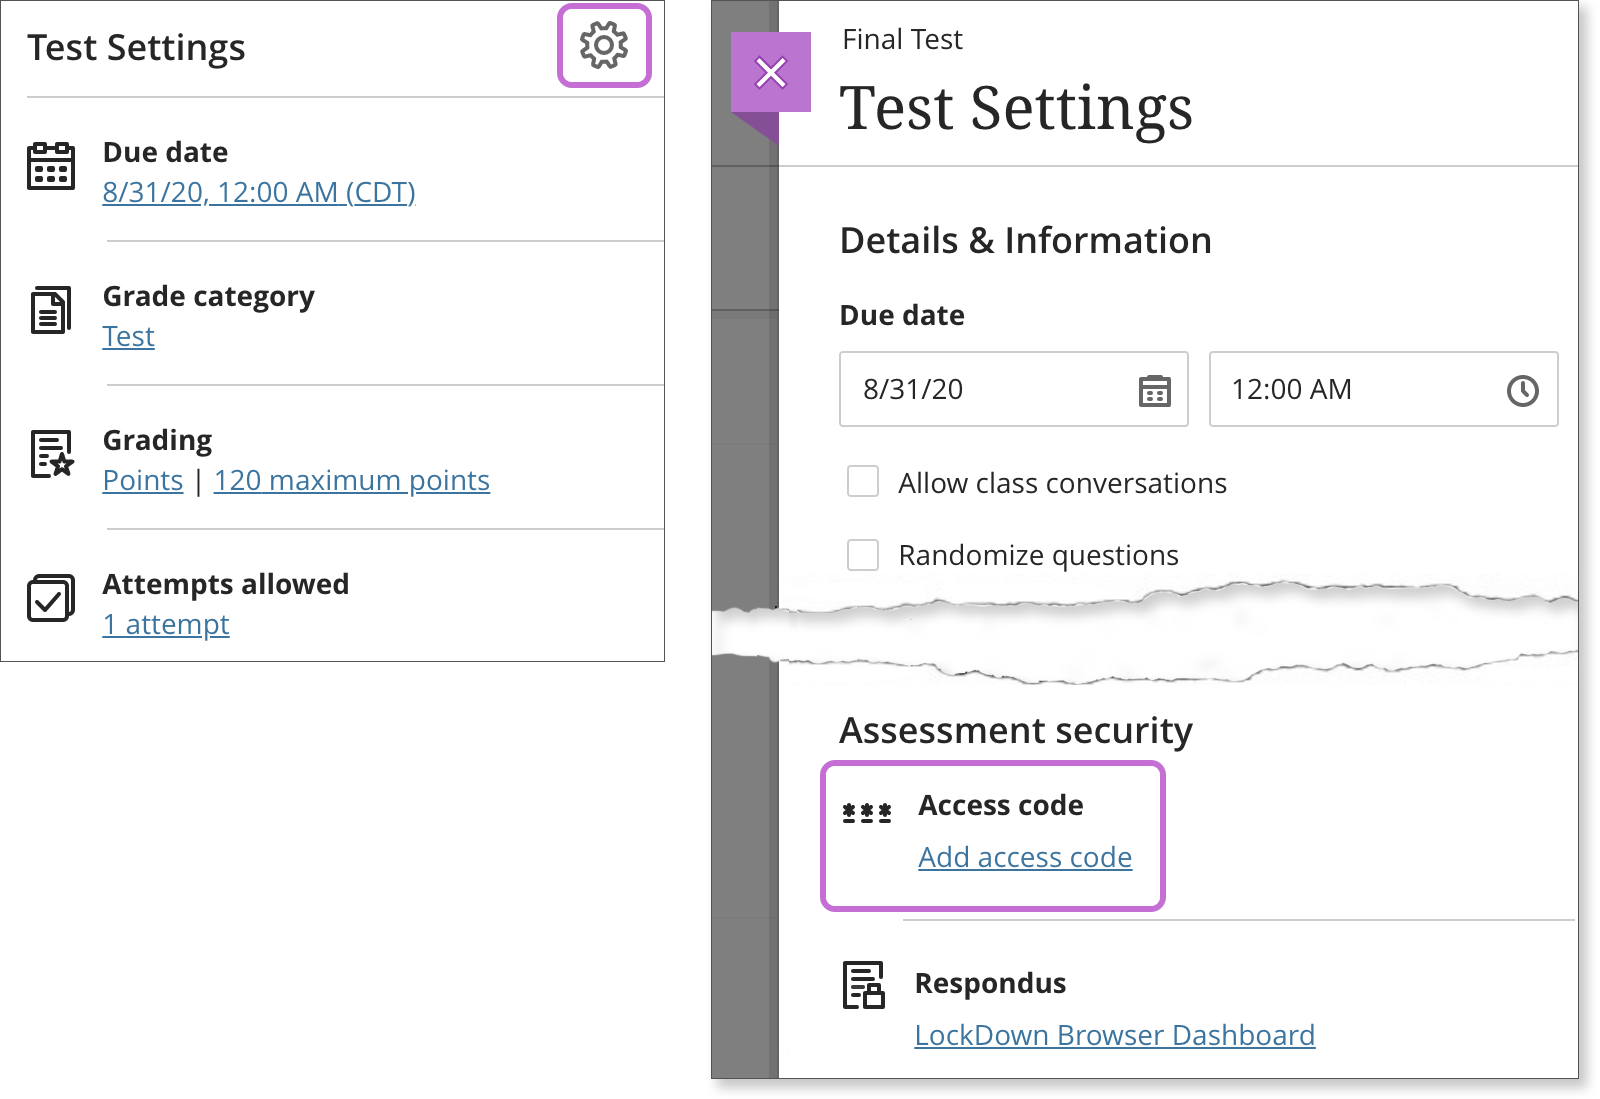
- At this time, access codes are generated randomly by the system. You can’t customize the access codes.
- The access code isn’t stored anywhere in the system. Students can only receive the access code from you or other roles you choose to give it to. You can change the access code as needed and let students know.
- Students can use the same code if they save the assessment and want to return later. Students don’t need the access code to view the grades and feedback you post.
- You can also add an optional description in the Description box at the bottom of the Settings panel. The description appears with the test title on the Course Content page.
- Adding a time limit by selecting the Time Limit setting option puts a restriction on how long a test can be open by a student before they must submit. The test attempts are saved and submitted automatically when time is up. You can also allow students to work past the time limit. Note: If you allow multiple attempts, the time limit applies to each attempt.
Watch a video of timed Assessments in Ultra.
Creating a Test (Original)
Create a New Test
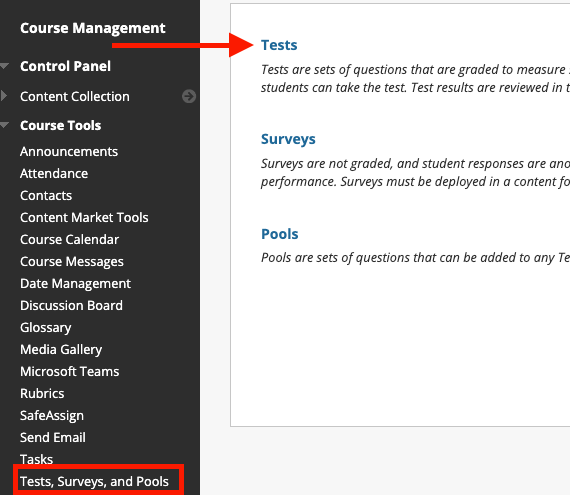
From your course homepage, look for the Control Panel in the left hand navigation.
Select Course Tools, then Tests, Surveys, and Pools and finally Tests to be brought to the Test tool area.
Creating a new test
- On the Tests page, select Build Test.
- On the Test Information page, type a name. Optionally, provide a description and instructions.
- Select Submit.
- On the Test Canvas, from the Create Question menu, select a question type.
- On the Create/Edit page, provide the necessary information to create a question.
- Select Submit.
- When you have added all the questions you need, select OK. The test is added to the list on the Tests page and is ready to make available to students.
Tests with Forced Completion, Timer, or Password
Some test settings let you control the amount of time that students can access a test. You can also set a password for more secure online testing.
Force completion
If you turn on Force Completion, students must complete the test when they launch it. Students may only access the test ONE TIME. The Save function is available for students to save the questions as they work through them, but they may not exit and re-enter the test. In the instructions, Force Completion is noted and explained to students. If you don’t turn on Force Completion, students may save their progress, navigate away, and return to complete the test.

If students accidentally close their browsers, leave the test page, or lose power or their internet connections, they can’t continue. They must contact you and ask for a new attempt.
For these reasons, we do not recommend the Force Completion option. If necessary, it’s advised that students take the test on campus, connected to an Ethernet cable instead of Wi-Fi, and with a proctor. If issues occur, the proctor can reset the test.
Example: Force completion with timer
Students must finish the test after they begin. They can’t exit the test and return, even though time is left. If students have connectivity issues, they must contact you to reset a test with Force Completion.
Example: No force completion with timer only
A student may lose internet connection for 10 minutes on a timed test. After the connection restores, the student can access the test and continue to work. With Auto-Submit, this student will miss out on some work time. Without Auto-Submit, the student can continue to work and you can check the student’s completion time after submission.
Set timer
You can set a timer to limit students’ completion time. You can set the timer to auto-submit the test when the timer ends or allow students to continue working and manually submit. You can view students’ completion times in their submissions.
Select the Set Timer option and type the amount of time in the Minutes box.

During a timed test, the time elapsed is displayed to students. Timer warnings appear at set increments when half the time remains down to 30 seconds.
If students save and exit the test, the timer continues. Students can return to work on the test until they submit or the timer auto-submits, whichever comes first.
Auto-Submit
If you set the timer, you can turn on Auto-Submit. Tests are automatically saved and submitted when the time expires.
If you don’t turn on Auto-Submit, students have the option to continue when the time expires even beyond the 420-minute maximum timer length. Those tests appear with the Needs Grading icon in the Grade Center to alert you students used more time. The tests also appear with an OVER TIME label in the Test Information area. The system doesn’t apply an automatic penalty for completion times that are over the limit. On a student’s submission page, you can adjust the grade based on the completion time.
Example:
On Tuesday, a student begins a test with a time limit of 60 minutes without Auto-Submit. The student exits the test with half of the questions left. The timer doesn’t stop when the student exits. On Wednesday, the student returns to finish the test and submits it. The time elapsed is 16 hours and 19 minutes.

View completion time
To view the completion time, open a student’s submission from the Grade Center and expand the Test Information section.

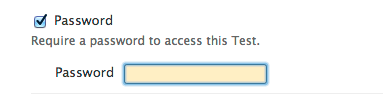
Password
You can set a password for students to use to open a test or survey. Passwords have a limit of 15 characters and are case sensitive.

Deploying a Test
After you create a test or survey, the next step is to deploy it. First, you add the test or survey to a content area, folder, learning module, or lesson plan. Then, you make the test or survey available to students.
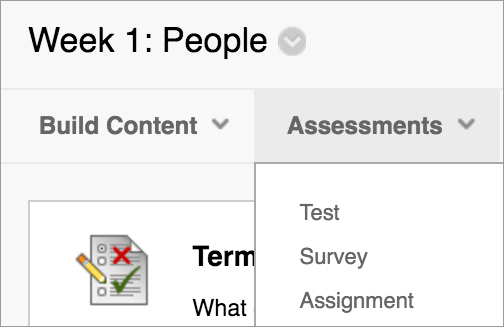
- Navigate to where you want to add a test.
- Select Assessments to access the menu and select Test.
- Select a test from the list.
- Select Submit. The Test Options page appears.
- Make the test available to students.
- Optionally, select the options (see below) for feedback and display, and set the due date and display dates.
- Select Submit.
Test Settings (Original)
Use the information below to better understand the options and settings available to you when deploying a test in Blackboard Learn Original.
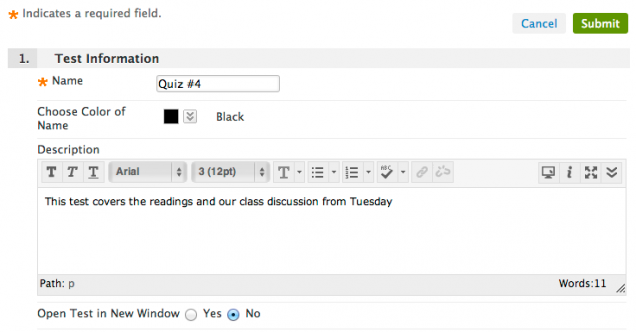
Test Information
Test Information
The first section of the test options allows you to enter very basic information about your test, including the name and description that is displayed to students.
- You are required to provide a Name for your test
- You have the option to enter a description which will be displayed to students to provide additional details about the test.
- Open Test in New Window specifies whether you want the test to open in a new tab when the students begin taking it. ‘No’ is the default setting
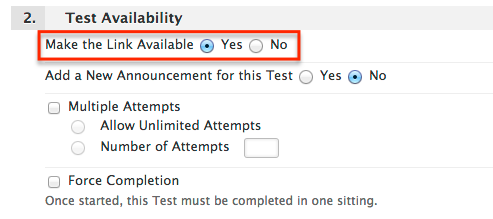
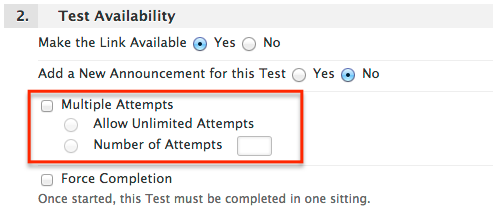
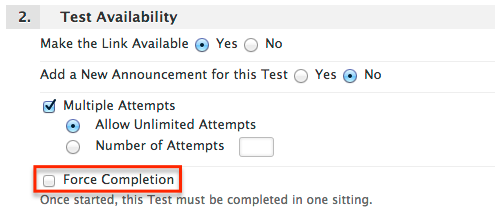
Test Availability
Test Availability
The Test Availability section contains options that specify how students see and interact with your test.
- Make the Link Available governs whether or not students will be able to see the test within the course. Select No to hide the test to students until you are ready to release it.
- Using Multiple Attempts you can allow students to attempt the test as many times as you wish. Each attempt will be recorded in the Grade Center.
- When an exam is deployed in Blackboard with the Force Completion option checked, it requires students to complete the test on their first time opening it. If a student closes their browser or tab, experiences a browser or computer crash, or their connection to the Blackboard server times out, they will not be able to re-enter the test. It is then up to the instructor to clear the student’s exam attempt so the student can start a new attempt.
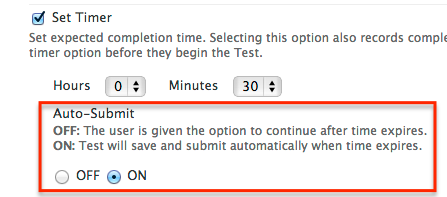
- Rather than using Force Completion, it is recommended that you make the exam timed by choosing the Set Timer option. The Timer feature records completion time for an exam. Setting the timer allows you to see how long a student spent on an exam, regardless of any connection issues. When force completion is disabled, the student can reenter the exam. The exam timer continues to record time on the backend even if the student has exited the attempt.One thing to keep in mind when using the timer is that the timer shown to students uses JavaScript and can be affected by the browser and computer settings. The official time is calculated on the Blackboard server. The timer begins when a student starts the assessment and ends when they click Submit. It is good practice to encourage your students to keep a separate timer when taking timed exams as the time displayed in the test status bar can be affected by browser and computer settings and may not always be accurate.
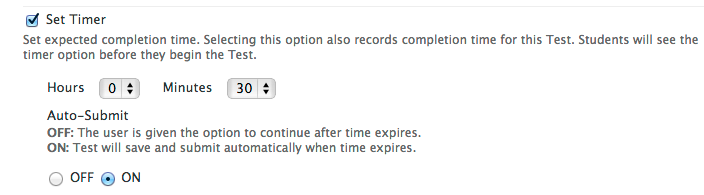
- When Auto-Submit is enabled the test will save and be submitted automatically when the time limit has been reached. Disabling this option gives the student a choice to continue working on the test once the time limit has passed. Any extra time they spent will be recorded in the grade center.
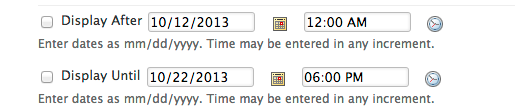
- Display After and Display Until specify when the test will be visible to students. Use this option to automatically schedule a test to go live rather than manually releasing it using the Make the Link Available option.
- Use the Password option to set a password and restrict the test to those users who you choose to provide it to.
Due Date
Due date
You can set a Due Date for your test in this section. Due dates do not affect the test availability, but any tests submitted after the due date will be flagged as late in the Grade Center.

Self-Assessment Options
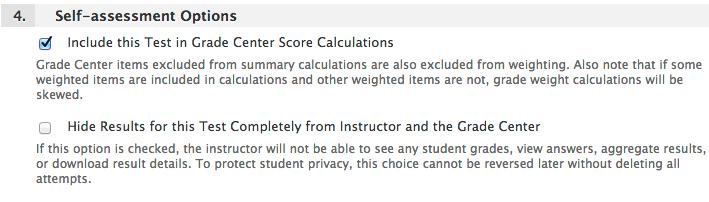
Self-Assessment Options
-
- Include this Test in Grade Center Score Calculations specifies whether the score the students receive will be recorded in the Grade Center calculations. Uncheck this box for practice tests or for anything that you do not want to affect grade averages in Blackboard.
- Hide Results for this Test Completely from Instructor and the Grade Center can be used for completely anonymous tests. Students will be able to view the results.
Note: Avoid choosing this option unless you want results to be completely anonymous – this decision cannot be reversed once the test has been taken without deleting the attempts.
Show Test Results and Feedback to Students
Show Test Results and Feedback to Students
You can set which results and feedback are available to students after they complete a test. You can set one or two rules with the menus. You can’t choose some rules in combination. After you select a rule in the first menu, some may not appear in the second menu.
If rules conflict, the system grants the student or group of students the more permissive settings. For example, students will receive the greatest number of attempts and longest availability time.
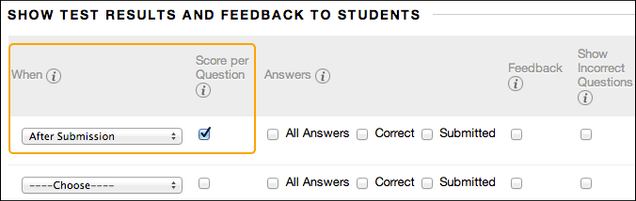
There are two default options applied to tests: After Submission and Score per Question. If you make no changes, students see their overall test scores and the scores earned for each individual question after they submit their tests. Select more options to determine what else they see, such as the correct answers or your feedback.
Students can always see their overall test scores. You can’t change that option from this page. If you don’t want them to see their scores yet, access the Grade Center column’s menu and hide the column from students. However, when you hide a test column from students, they see nothing about the test in My Grades. When they access the test in the content area, they receive a message that says when they submitted their tests. No scores appear.
There are several options for the When setting. You must make a selection. Set when appropriate test results and feedback are shown to students:
- After Submission: This option is the default.
- One-time View: After students submit their tests or surveys, the selected results and feedback options are in effect for students to view ONCE. However, students can always view the scores they earned unless you hide the Grade Center column from students. Immediately after a student navigates away from the test or survey, any other results and feedback are restricted. You can change the setting or add another rule for a second viewing. A second rule is not combined with the one-time view rule but is applied separately.
- On Specific Date: View results and feedback after the selected date and time.
- After Due Date: after the date indicated in the Due Date section of test settings
- After Availability End Date: after the test is no longer available to students based on the Display Until date under the Test Availability section
- After Attempts are graded: After all students submit the test or survey, and all attempts are graded, results and feedback are made available to students. If one or more students don’t submit an attempt, you must assign a grade of 0 so that all students can view the chosen results and feedback.
There are 6 main settings options:
- Score per question (Automatically set by default) – Shows the overall test scores and the scores earned for each individual question. PLEASE NOTE: if you leave this default box checked, ALL of the exam questions (but not the answer choices) will be available for the student to view after they submit their exam.
- All Answers – Shows the questions and all answer choices.
- Correct – Shows the questions and correct answers.
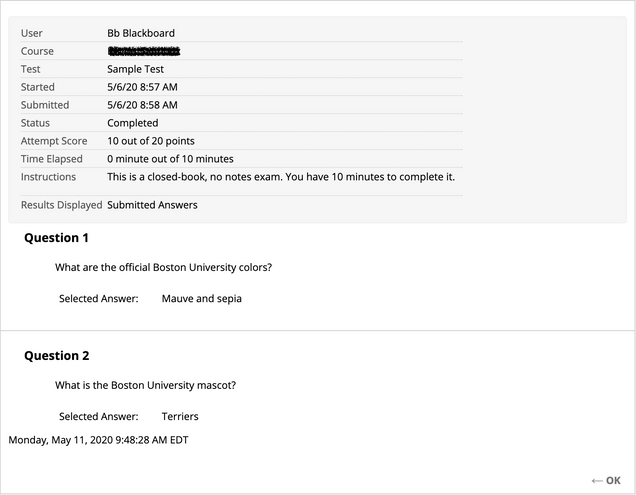
- Submitted – Shows the questions and the answer choices selected by students.
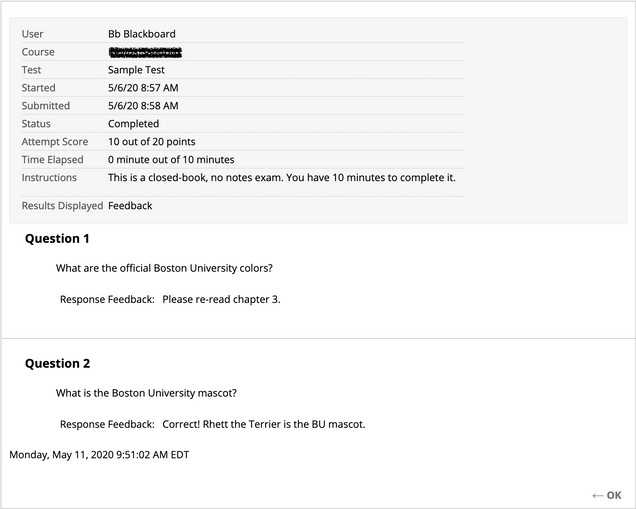
- Feedback – Shows the questions and any instructor feedback messages for each question.
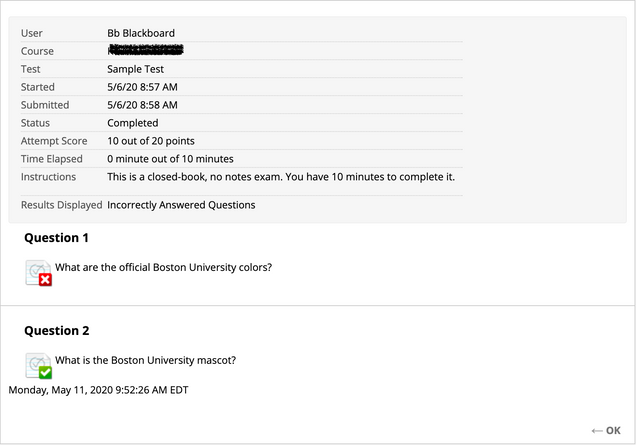
- Show Incorrect Questions – Shows the questions and the answer choices selected by students with an indication that the answer is incorrect.
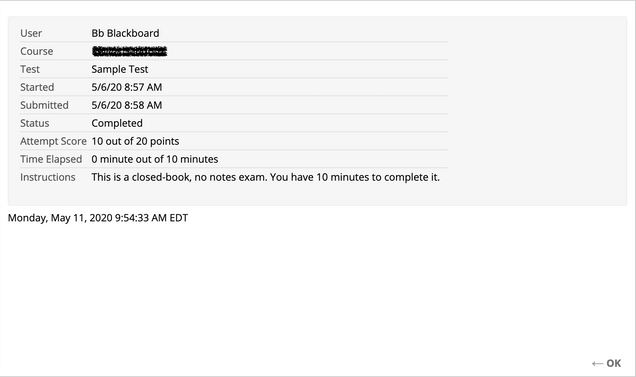
If you check NONE of the Check-boxes – Shows the overall test score only.
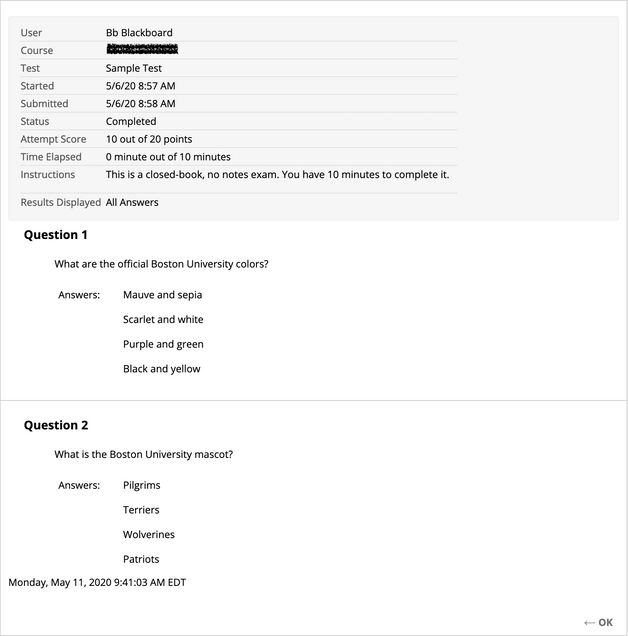
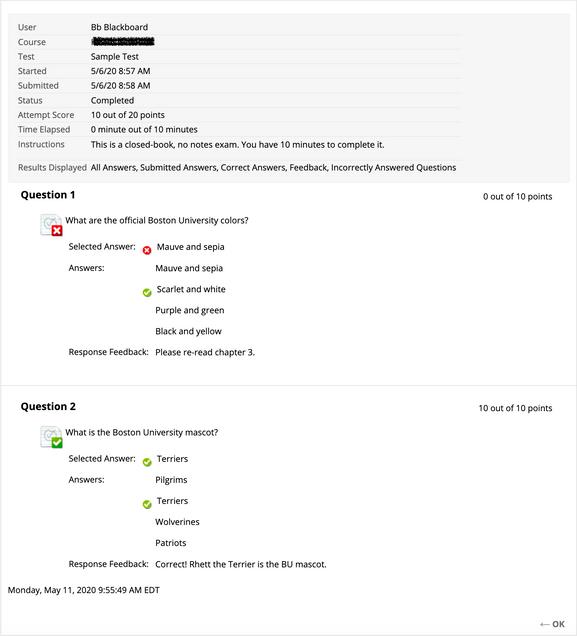
Here are what the students will see based on the above options:
- Score Per Question (Note: with this default checked, students will see the exam questions):

- All Answers:
- Correct:

- Submitted:
- Feedback:
- Show Incorrect Questions:
If you check NONE of the boxes (only the total score displays):
If you check ALL of the boxes:
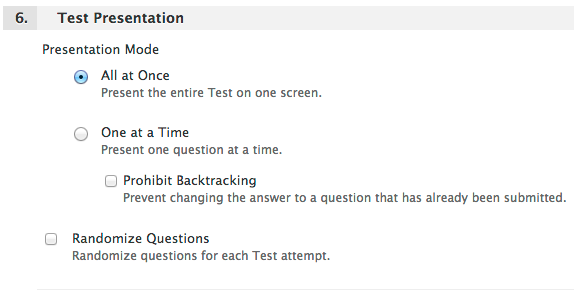
Test Presentation
Test Presentation
- The default option, All at Once will display all questions to students in one page.
- One at a Time presents the questions in order one at a time. This option can be useful for longer tests because the student is interacting with the system after each question and sending data to the server to be saved as they proceed through the test. You can check the box for Prohibit Backtracking to prevent students from returning to a previous question and changing their answer.
- Randomize Questions will present the questions in a different order than you created them, regardless of which presentation mode you choose.