Capsulorrhexis
| Manipulate cystotome and/or Utrada forceps | |
| Stabilize dominant hand |
|
|
| Capsulorrhexis performed using cystotome (bent 27 gauge needle) and Utrada forceps. |
The step of capsulorrhexis not infrequently inspires fear and trepidation in the beginning phacoemulsification surgeon. However, a measured and well-planned approach can minimize complications.
Instrumentation
The capsulorrhexis typically begins with a cystotome, a sharp tipped instrument with a bent shaft designed to help puncture the anterior capsule and allow manipulation of the resulting flap. Pre-bent cystotome needles are available that provide a consistent instrument. A cystotome can also be created from a 27 gauge needle. In either case, the needle is attached to a syringe, typically a 1 cc tuberculin syringe, or larger size based on surgeon handling preferences.
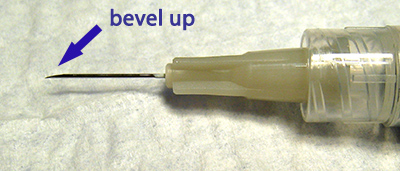
Figure 1A: A 27 gauge needle held bevel up, ready for cystotome preparation.
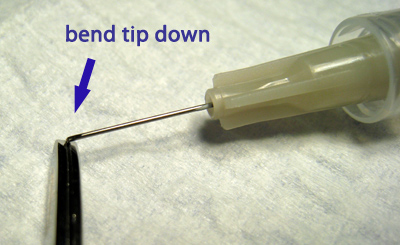
Figure 1B: First bend the tip down, where the length is based on surgeon preference.
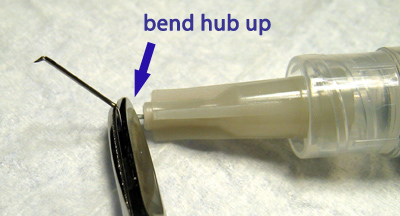
Figure 1C: Then bend the needle up near the hub.
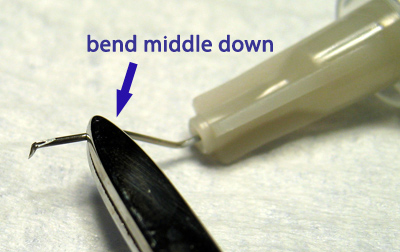
Figure 1D: Optionally, create an additional bend down in the middle of the needle to reach into deeper chambers.
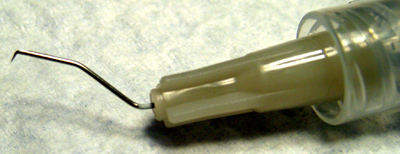
Figure 1E: Final appearance of surgeon-bent cystotome needle.
To create a cystotome using a 27 gauge needle, begin by using a blade breaker (or like instrument) to bend the needle tip down while holding the bevel up (see Figures 1A-E). Then, while maintaining this needle orientation, bend the needle up near the hub. Experience will aid in determining the optimal preferred angles, although bends near 90 degrees are common at the tip and slightly less than this angle at the hub. Others introduce a third bend downwards in the middle of the needle to provide more vertical displacement of the tip to aid in reaching down into deep anterior chambers.
Many surgeons use a second instrument, the Utrada forceps, to manipulate the anterior capsular flap once fashioned with the cystotome. Others use a cystotome for the entirety of their capsulorrhexis, a technique which aids in bimanual or microcoaxial phaco where the main wound does not permit easy manipulation of a standard sized Utrada forceps. Still others use specially designed Utrada style forceps for the entire rhexis, which have a sharp tip that obviates the need for a cystotome.
Technique
Initial Tear (Cystotome)
Appropriate filling of the anterior chamber with viscoelastic is critical to maintaining optimal tearing characteristics of the capsule (see “Viscoelastic” section for further details). Particularly, the anterior lens capsule, while normally convex, will flatten under the force of the viscoelastic in a well-filled anterior chamber. As capsulorrhexis proceeds, viscoelastic will exit the main wound due to repeated manipulation. Good technique will limit this efflux of viscoelastic. However, a difficult capsulorrhexis or compromise of instrument positioning within the main wound will allow a significant amount of viscoelastic egress. This loss of viscoelastic has an unfavorable consequence on the flattening effect of the viscoelastic on the anterior lens capsule, allowing the capsule to resume its convex shape. This convexity promotes a “downhill” trajectory of the capsulorrhexis towards the lens periphery, and could lead to potential complications. As a result, if significant viscoelastic is lost during the capsulorrhexis or the potential for peripheral extension of the rhexis exists, the surgeon should halt further capsular manipulation and re-inject viscoelastic to again flatten the anterior lens surface. The viscoelastic can also be used to gently manipulate the flap into a more upright position to allow for easier grasping, and also to force back iris to help visualize a peripherally escaping flap edge.
To begin, the anterior capsule is punctured, and an initial cut in the anterior capsule is made with the cystotome. The shape and direction of this cut is surgeon dependent. Many surgeons begin in the center of the capsule for the initial puncture, then initiate a cut along the 90-270 degree axis from the main wound entry site. The direction of this cut to the left or right (from the surgeon’s view) is surgeon preference. As the pupil border is approached, the next decision is whether to “push” or “pull” the rhexis. Some surgeons prefer to “push” the rhexis, meaning the flap is fashioned in the clock direction away from the main wound. Others prefer to “pull” the rhexis, fashioing the flap in the clock direction towards the main wound first. As manipulation under the main wound tends to be the most challenging portion of the capsulorrhexis, some surgeons prefer to perform this portion first (ie, “pull”), while others prefer to save it for last (ie, “push”). Given loss of viscoelastic and the resulting less favorable tearing characteristics of the capsule at later stages of the rhexis, the “pull” technique may allow the surgeon to complete the under the wound rhexis at the more optimal early stages of the rhexis. However, the chosen technique is largely based on surgeon comfort and practice.
The initiation of the capsulorrhexis can also be performed in a “lazy C” fashion. The capsule is initially punctured centrally, followed by a “C” or “comma” shaped incision of the anterior capsule with the cystotome. This technique immediately fashions a capsular flap ready for manipulation, and avoids the unpredictability of the flap tear during the “push” or “pull” initiation following a straight radial starting tear.
Using either of the above techniques, the initial creation of the capsulorrhexis flap requires careful control of the cystotome needle depth. Puncturing too deep into the anterior lens will jostle anterior cortex, which may spread and thus hinder the view to the fledgling capsular flap, or even create optically distorted “pseudoflaps”. This view can become particularly obscured in the setting of white cataracts where the cortex has a milky, opaque consistently. The cystotome needle should therefore penetrate only enough to manipulate the anterior capsule. After fashioning the initial flap, it should be left upright, floating in viscoelastic and folded over such that the inner aspect of the capsule faces upwards. A flap left flat on the anterior lens surface becomes more difficult to grasp by the Utrada (or other capsulorrhexis) forceps (note that a cystotome based rhexis alternatively requires this flat orientation).
Completing the Rhexis (Utrada Forceps)
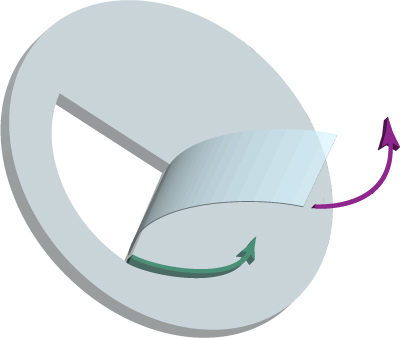
Figure 2: Always keeping the flap “folder over” ensures proper capsulorrhexis control. Pulling the flap tangentially (purple arrow) maintains a shearing force which ensures a circumferential rhexis (green arrow).
Next, the Utrada forceps are used to grab the folded capsular flap. The flap should be manipulated near the torn edge, approximately 1mm from the site of the tear. Grabbing too close the torn edge may result in an inadvertent extension of the tear, while grabbing too far from the tear point will result in poor flap control. Careful attention must be paid to the position of the forceps within the wound to avoid loss of excessive viscoelastic. This may require lifting one’s elbow to bring the forceps tips deeper into the AC towards the capsule, using the wound as a pivot point as opposed to pressing down on the posterior lip of the wound.
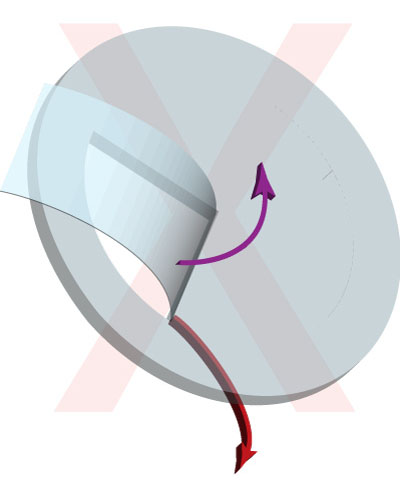
Figure 3: When the capsular flap has its anterior surface facing up, capsulorrhexis control can be lost. Pulling the flap tangentially (purple arrow) produces a tearing force which is unpredictable and can result in rhexis misdirection (red arrow).
Once the flap is grasped, the flap should be carefully torn tangentially, always keeping the flap “folded over”, such that the underside of the capsule is always facing up. This positioning ensures a shearing force, which maintains a higher degree of control (Figure 2). If this positioning of the capsule is lost, the capsule should be immediately released. If the capsular flap is positioned such that the anterior surface faces up, further manipulation will result in a ripping force, producing a far less predictable result in both magnitude and direction of the tear (Figure 3) (see Barry Seibel’s “Phacodynamics” textbook for an excellent discussion on this topic). A tangential tear involves the forceps tip following the course of the desired tear direction. Again, as the forceps are positioned further away from the point of tear, control lessens. Therefore, the flap may need to be re-grasped several times during the course of the capsulorrhexis, to ensure adequate control of the capsular flap by re-acquiring the flap closer to the point of tear.
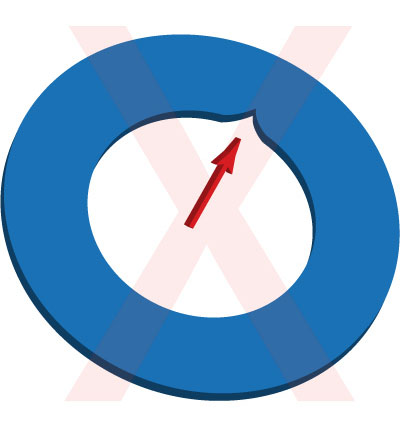
Figure 4: A notch in the capsulorrhexis created by an inside-out manuever (indicated by red arrow) produces an area of weakness that can result in radial tears.
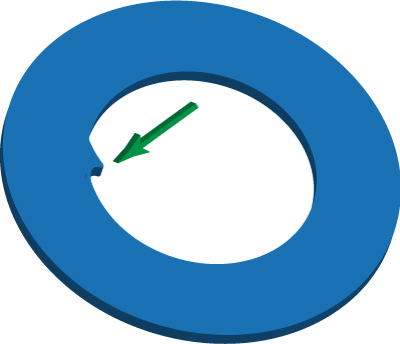
Figure 5: A tag in the capsulorrhexis created by an outside-in manuever (indicated by green arrow) is acceptable and stable, since no vulnerability in the capsule is typically introduced.
The capsulorrhexis can be started small in size, and then enlarged by spiraling the flap around the initial starting point. A rhexis that provides 360 degrees of intraocular lens optic edge coverage helps prevent posterior capsule opacification, and thus a capsulorrhexis small enough to accomplish this task (approximately 0.5 to 1 mm smaller than the optic size) should be aimed for. For example, an Alcon SN60WF lens has a 6.0mm optic, and thus a rhexis of 5.0 to 5.5mm in size is optimal. A capsulorrhexis that is too small can hinder lens removal and may lead to anterior capsular tears during phacoemulsification, so the spiraling technique mentioned previously should be used to reach a sufficient size opening in the anterior lens capsule. In the presence of dense lenses, a larger capsulorrhexis may be helpful in faciliating nuclear quadrant removal. The pupillary border is often used to help guide flap creation to ensure a round rhexis, however, care must be taken in the presence of small, large, or irregular pupils to avoid inadvertent capsulorrhexis size anomaly.
When completing a capsulorrhexis, the finishing motion should bring the flap from outside to in. As a result, the edge of the capsular opening should be round with no areas such that the opening creates a divot in the intact capsule. These areas created by an inside outside completion have an inherent weakness and may be disrupted with minimal force, leading to unanticipated radial tears during phacoemulsification. However, capsular tags that point centrally to the capsular opening are permissible and stable, as such tags do not promote radial extension.