Lens Insertion
| Manipulate viscoelastic cannula and IOL injector | |
| Inject viscoelastic and rotate (or plunge) injector for IOL |
|
|
| Injection of viscoelastic followed by IOL injection, with final placement by Sinskey hook. The Monarch II cartridge-based injector system with an acrylic SN60WF lens is used here (Alcon Laboratories, Inc, Fort Worth, Texas). |
The placement of the IOL can be done by a variety of techniques, including traditional lens folding forceps versus newer injector systems. We outline the procedure for typical IOL cartridge-based injection into the capsular bag.
Instrumentation
First fill the capsular bag and anterior chamber with viscoelastic, to ensure proper capsular bag expansion and AC maintainance during the injection procedure. We prefer a cohesive viscoelastic (ie, Provisc), as it is more readily removed at the end of the case (see “Viscoelastic” section for more details).
There are a number of injector-based IOL systems, many of which use a cartridge for injection. We will not discuss loading of the IOL into the cartridge and injector here, please refer to your injector manufacturer’s instructions. In most systems, adequate filling of the cartridge with viscoelastic is recommended to promote easy, friction-free travel of the IOL through the cartridge.
Technique
Begin by injecting viscoelastic upon entry through the main wound. This creates a leading bubble of viscoelastic that pushes away iris and capsule from the cannula tip. Ensure that the viscoelastic fills the capsular bag adequately, as failure to do so will lead to capsule-IOL friction which may lead to capsular rupture. Also, inadvertently placing viscoelastic in the sulcus will instead compress the capsular bag making IOL insertion more difficult. Finally, upon exit, place additional viscoelastic under the wound edge to tamponade iris away from the wound.
After properly loading the lens, insert the cartridge tip into the wound. Note that for most injectors, merely having the tip firmly into the wound is sufficient, and full entry into the AC with the cartridge tip is not required (refer to your manufacturer for more information). However, adequate pressure maintenance with the injector is required to prevent the tip from exiting the wound during injection. Also, orient the cartridge tip down towards the AC, to avoid stripping Descemets membrane at the roof of the wound edge.
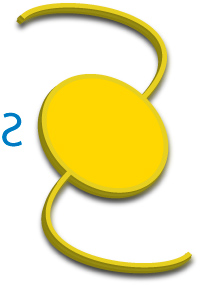
Figure 1A: Proper “reverse S” IOL orientation.

Figure 1B: Upside down IOL in “S” orientation.
Advance the IOL by rotating (or plunging) the injector end, always watching the IOL as it travels down the cartridge for proper orientation and movement. As the leading haptic enters the eye, ensure that the IOL is oriented in a “reverse S” fashion (Figures 1A and 1B). If not, the injector can be rotated to bring the IOL back into the proper orientation.
Remember, if the IOL is in “S” orientation, STOP.
Placing an IOL upside down into the capsular bag with a traditional non-wavefront optimized IOL (ie, SA and MA series Alcon lenses) will result in a small myopic shift. However, the optical consequences of placing a newer generation, wavefront optimized IOL upside down into the capsular bag is not fully understood and should be avoided.
The leading haptic can be guided into the capsular bag along with the majority of the optic during injection. At the end of injection, the trailing haptic will often be slightly elevated out of the bag.
To properly place the IOL completely in the bag, it must often be manipulated after injection is completed. This can be accomplished with an IOL manipulator, Sinskey hook, or even the IA tip. Using the surgeon preferred instrument, the IOL trailing haptic can be gently nudged past the anterior capsular edge and downwards into the bag. Or, using an IOL manipulator, the optic-haptic juncture can be engaged while the IOL is rotated in clockwise fashion, pushing the IOL and haptic down into the bag in the process. Note that rotation should always be clockwise, as this direction ensures that the optic-haptic juncture will lead the haptic during rotation and avoid the haptic from engaging or tearing the capsular bag. Once in the bag, the manipulating instrument can be used to center the IOL by applying gentle downward force with the instrument tip on the center of the optic and sliding the IOL into the proper position.