Blackboard Ally for Courses
Ally is an accessibility tool that is directly integrated with Blackboard. Ally focuses on digital accessibility for students and provides guidance and tips for lasting improvements to your content accessibility. With Ally you can:
- Receive feedback on the accessibility of your content
- Improve content accessibility with Ally’s step-by-step instructions
In addition to providing you with insights about your content accessibility, Ally can automatically create alternative versions of your files. This allows students to choose the type of file that best suits their needs. While you’re in the process of improving files, students can still access alternative copies.
Why use Blackboard Ally?
Your class is full of diverse students with unique learning abilities. Providing them with more accessible original content means they can choose formats that work best for them: HTML for improved reading on mobile phones, Electronic Braille for the visually impaired, and Audio for learning on the go. Ally automatically scans your original content, and performs a series of steps to make them more accessible.
- Generate alternative formats for students to download
- Provide accessibility scores
- Give feedback on how to improve your accessibility score
Note: When you receive any type of accessibility “score” on your content, this acts as a recommendation, not a definitive evaluation. Accessibility scores do not have any effect on courses directly, and only serve to offer guidance to you as an instructor.
How to tell if Ally is Enabled
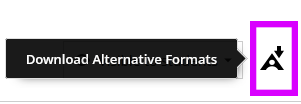
When you log in to your Blackboard course, look for the Download Alternative Formats icon (shown below) next to any supported content. To explore the full list of supported alternative formats generated by Ally, visit this page. You can then view and download the format that best meets your learning preferences or accessibility needs.
Alternative Formats
When a user selects an alternative format from the menu, Ally automatically generates alternative formats of the course content based on the original files. These formats are made available alongside the original materials, allowing users to access everything from a single, convenient location.
Video: Overview for Instructors of Ally for Blackboard
To view the available formats or manage their availability, select the Download Alternative Formats icon wherever it appears in your course.
Note: The alternative formats created depend on the original content. If you don’t see an option to download alternative formats, Ally isn’t enabled for that course or the file is not a supported content type.
Types of Alternative Formats
Audio
The audio alternative reads aloud the text in the original content. This also includes alternative descriptions for images, if they are provided.
The audio format is saved as an MP3. MP3s are compressed, high-quality sound files that can be played on any computer or mobile device.
Audio formats fail if the original document contains more than 100,000 characters.
Audio formats are also available in alternative languages.
Why use audio?
Not only does audio benefit individuals with visual impairments, research has also proven that audio can increase learning (Boyle et al., 2003).
Your students may consider audio a good choice if:
- They prefer to listen than read.
- They’re an auditory learner.
- They want to read and listen to the content at the same time.
- They have a lot of material to read and find their eyes get tired.
- They read on their commute.
- They don’t want to, or can’t, carry print materials for any length of time.
- They have a visual impairment.
- They want to adjust the speed of the audio.
Most players allow you to adjust playback speed. For example, Windows Media player, VIC, Audacity, and iTunes.
Electronic Braille
The electronic braille alternative creates a BRF file that can be read on a refreshable Braille display (RBD), other Braille reading devices, or within a Braille software like Duxbury.
Think of a Refreshable Braille Display (RBD) as a monitor-less computer. Most RBDs can connect to internet, create documents, access calendar, and a lot of the basic functionality a computer provides. RBDs can be a standalone device. They can also be connected to a smartphone, iPad, or laptop. Most RBDs are limited to reading one line of Braille at a time.
Why use electronic braille?
While audio is excellent for reading comprehension, those who read braille acquire higher literacy rates on average. With braille, users with visual impairments can know the spelling, punctuation, and format of text on a page.
Electronic braille is a good option for students if:
- They have a visual impairment.
- They are familiar with braille.
- They prefer to read.
- They want to read and listen to the content at the same time.
Immersive Reader
Immersive Reader is an online alternative format that enhances the reading experience, increasing the readability of the content. This tool allows learners to:
- Change font size and text spacing
- Change the contrast between the text and the background color
- Learn spelling and grammar by splitting words into syllables
- Highlight verbs, nouns, adjectives, and sub-clauses
- View a picture dictionary
- Increase reading speed with line focus
- Convert text-to-speech (both male and female voices)
- Translate content in real-time
Microsoft Immersive Reader is a solution that supports learners with different needs, taking online learning to a whole new level.
The following section dives into the Immersive Reader’s features.
How to use Immersive Reader
Using the Immersive Reader alternative format is simple. Follow this guide to get started:
- From the Download alternative formats window, select the Immersive Reader button and select Download. Keep in mind this is an online tool, therefore no file will be downloaded to your device.
- Immersive Reader opens and displays the content of the selected file. Keep in mind that images and tables are not currently supported.
On this screen, it’s important to identify the following buttons:
a. Play/Pause – Starts and pauses the text-to-speech feature
b. Voice settings – Change the Voice Selection (male or female) as well as the Voice Speed
c. Text preferences – Change Text Size, Font, Background color, and spacing
d. Grammar options – Divide words into syllables and highlight parts of speech (nouns, verbs, adverbs, and adjectives)
e. Reading preferences – Activate Line Focus reading, view Picture Dictionary for common words, and more
ePub
The ePub alternative creates a digital publishing file that can be viewed on mobile devices. ePub files are reflowable. Reflowable means that the content displayed automatically adapts to the device it is viewed on.
Why use ePub?
ePub is powerful. With it, readers can take notes, highlight content, adjust text and background, and in some cases use text-to-speech.
ePub is a good option for your students if:
- They want to adjust font size and background color.
- They want to highlight content, take notes, and bookmark important pages.
- They want to be able to copy, paste, and search text.
- They want to use text-to-speech and adjust the speed of the speech.
- They prefer to read.
- They read on their commute.
Semantic HTML
What is Semantic HTML? Tags and elements—such as blockquote, paragraph, and headings—are added to add meaning to a page. These tag and elements aid screen reader users with good content structure.
Semantic HTML is viewed in a browser and adapts to the device you are viewing it on.
Semantic HTML is available offline on your mobile device, if you don’t close your browser.
Why use Semantic HTML?
Semantic HTML is ideal when the content has complex layouts.
Semantic HTML is a good option for students if:
- They want to adjust font size and background color.
- They want to highlight content, take notes, and bookmark important pages.
- They want to be able to copy, paste, and search text.
- They want to use text-to-speech and adjust the speed of the speech.
- They prefer to read.
- They use a screen reader.
OCR PDF
OCR stands for Optical Character Recognition. The OCR PDF alternatives are created when the original content is a PDF of an image. OCR technology analyses the content and converts the image into searchable text.
The conversion is only as good as the quality of the original content. If the content is difficult to analyze, there may be mistakes.
Why use OCR PDF?
OCR PDF is a good option for students if:
- They want to be able to copy, paste, and search text.
- They want to use text-to-speech and adjust the speed of the speech.
- They prefer to read.
- They read on their commute.
- They use a screen reader.
Tagged PDF
A Tagged PDF alternative uses tags and elements—such as blockquote, paragraph, and headings—to add meaning to a page. It aids screen reader users with good content structure.
Why use Tagged PDF?
Tagged PDF is a good option for students if:
- They want to be able to copy, paste, and search text.
- They want to use text-to-speech and adjust the speed of the speech.
- They prefer to read.
- They read on their commute.
- They use a screen reader.
BeeLine Reader
BeeLine Reader makes reading on screen easier and faster. Instead of using plain black text, BeeLine Reader displays text using a subtle color gradient that helps pull your eye through your readings. This new display format has been honored by the United Nations and is used by readers in 120 countries around the world.
More on the BeeLine Reader website
Why use BeeLine Reader?
BeeLine Reader’s color gradient technique not only increases reading speed but also enhances focus. BeeLine Reader is popular among undergraduate and graduate students with heavy reading loads. This includes programs like law, medicine, and the humanities. BeeLine Reader’s approach also benefits people with dyslexia, ADHD, low vision, and anybody who may have difficulty with visual tracking or focus.
BeeLine Reader is a good option for students if:
- They read a lot on screen and wish they could read more easily and quickly.
- They read on their commute and find reading in this environment difficult.
- They prefer to read.
- They have a lot of material to read and find your eyes get tired.
- They read late at night, when their eyes are tired.
- You want to be able to read the content faster.
- They experience dyslexia, ADHD, or low vision.
- They have difficulty with visual tracking or focus.
Accessibility Scores and Course Accessibility
Ally measures the accessibility of each file attached to your course and shows you at-a-glance how it scores. Scores range from Low to Perfect. The higher the score the fewer the issues.

For files with Low to High scores, Ally shows you the issues and gives a step-by-step guide on how to fix them.
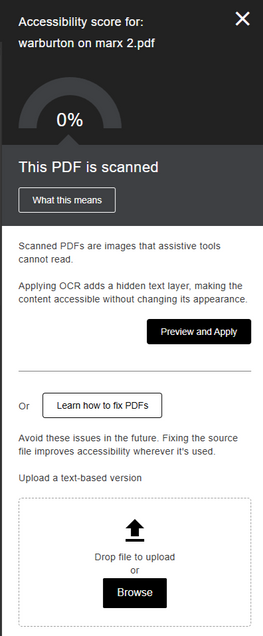
Find a file and select the Accessibility score. In this example below, the PDF document was identified as a scanned book, so Ally will provide next steps such as giving the option to upload a text-based version of the PDF reading.
More on Accessibility Scores
To measure accessibility, Ally assigns your content an accessibility score. Each score is composed of both a numerical number and a colored gauge that reflects the number.
Note: Typically, you should see your accessibility score within 15-90 seconds. This may take longer if your content is complex, or if you have a lot of course content and it is being assessed all at once. Also, you can refresh the Blackboard course page if the Ally icons do not appear next to your content immediately.
Currently, Ally checks files in these formats:
- PDF files
- Microsoft® Word files
- Microsoft® PowerPoint® files
- OpenOffice/LibreOffice files
- Uploaded HTML files
- Image files (JPG, JPEG, GIF, PNG, BMP, TIFF)
Improving Your Score
Once you know the accessibility score, you can begin to explore the accessibility issues and improve your content to raise the score. Accessible documents are important for all audiences, and Ally gives you the tools to understand common issues and improve your course files.
Find a content item and select the Accessibility score indicator (below – can be green, yellow, or red) to view the instructor feedback panel.

Remediating Common Content Accessibility Issues
Remediating Content Accessibility - Microsoft Word
The following is a list of examples of different types of accessibility issues that commonly arise and how to go about fixing them.
Microsoft Word Issues
| Issue | Description | Solution |
| The document does not have any headers | This document doesn’t contain any marked-up headings. Headings are important as they provide structure to a document, especially those that consist of many pages. When headers are properly and consistently used, the document becomes much easier to understand and navigate for all users. Sighted users rely on text size and bold to identify different sections, properly coding those as headings allows users of assistive technology to do the same. | In Word, select the text that should become a heading (document title, section titles).
Under the Home tab in the Styles group, click the appropriate heading level. If you don’t see the heading level you are looking for, click the arrows to browse the full list of preset styles. Always choose “Heading 1” for the title of your document, “Heading 2” for section headings, “Heading 3” for subsection headings, etc. “Normal” is used for paragraph text. Repeat these steps for all the text that should become headings. |
| The headings in this document do not begin at level 1 | The headings in this document don’t begin with heading 1 and therefore don’t follow a logical order. Having the main heading at the beginning of the document will provide a more logical structure and will make the document much easier to understand and navigate for all users.
For standard documents, the title of the document should be Heading 1. |
Open the Word document and change the title of the document to heading level 1. Make sure section titles begin at heading level 2, with sub-sections at heading level 3. |
| The headings in this document do not follow a logical structure | Headings should be hierarchical, starting at heading level 1 for the title of the document, then heading level 2 for the sections of the document, then heading level 3 for subsections, and so on. Heading levels should not be skipped. | In Word, go to View and open the Navigation pane. This will allow you to get a quick look at the heading structure. Check to see that the correct sections are nested under their parent section.
Click through the headings of the document to uncover any skipped heading levels (e.g. going from heading level 2 to heading level 4) – the accessibility checker in Word will call out skipped headings. |
| This document has contrast issues | This document contains text with low contrast between the text and its background. This can cause the text to be difficult to read, especially for those with low vision, poor eyesight or color blindness. | Change any light font colors to a darker shade (if using headings, modify the style to save time – open the Styles pane, right click on the heading level and select modify, adjust the color in the ).
Check your tables – change the color palette used for tables to increase contrast in header rows. Use a tool like the Document Accessibility Toolbar to scan for contrast issues (https://www.visionaustralia.org/dat) |
| The document does not have a language set | The document does not specify the language in which it’s been created. Certain technologies, such as screen readers, rely on the specified language to determine how to pronounce the document text. | Click Review > Language > Set Proofing Language. |
| The document does not have the correct language set | This document does not specify the correct language in which it’s been created. Certain technologies, such as screen readers, rely on the correct language being specified to determine how to pronounce the document text. | Click Review > Language > Set Proofing Language. |
| The document’s heading structure goes beyond six levels | The headings in this document goes beyond six levels. Most technologies, including screen readers and other assistive technology, are limited to six levels of headings. Going above this can cause these headings to not be represented or read appropriately. | In Word, review your heading structure by going to the View tab and opening the Navigation pane. See if you can reduce the number of sections by using bulleted, numbered, or outlined lists instead.
Make sure your headings are labelled hierarchically (heading 3s are nested under heading 2s) and you’re not assigning them chronologically (heading 1, then 2, then 3, then 4, 5, etc.). |
| The document has images without alternative descriptions | This document contains images that don’t have a description or alternative text. People with screen readers or other assistive devices rely on these descriptions to understand the image content and purpose. Alt text will also display if an image doesn’t load – benefitting everyone. | Right click on the image (Shift + F10), select Format Picture, under Properties and Layout open the Alt Text pane, enter text in the Description field (not the Title field) |
| The document has tables that don’t have any headers | This document contains tables that don’t have or properly specify a header structure. People with screen readers or other assistive devices rely on a correct heading structure to help them navigate the table and match the headings to the data cell. | Click on the table row that contains the headers. Right click (Shift + F10), open Table Properties. Under Row tab, select “Repeat as header row at the top of each page.” Uncheck “Allow row to break across pages.”
Make sure you’re not using tables for layout purposes. If your table doesn’t need headings (the top row or first column doesn’t serve as a label for the data/info underneath/beside) then do not use a table. |
| The document is malformed | These documents are malformed and therefore cannot be opened and viewed by many or even most people. While some technologies might be able to deal with some malformed documents, there’s no guarantee that everyone will be able to view the document or that the formatting and content will be as intended. | If you do not have the original source document, you may not be able to fix this problem.
If you can open the file on your computer, paste the content in a new document and try to save and re-upload the document. |
Remediating Content Accessibility - PDF Documents
The following is a list of examples of different types of accessibility issues that commonly arise and how to go about fixing them.
PDF Issues
| Issue | Description | Solution |
| The document is scanned but not OCRed | These documents are either entirely scanned or contain pages that are scanned. This means it’s an image of a document and the text cannot be accessed by assistive technology. Scanned documents, especially those of poor quality or those containing handwriting, can be difficult to read for everyone. They also have other usability issues such as not being able to search inside the document. | Acrobat Pro will convert the scanned image to text. In Acrobat Pro, under Tools, select Enhance Scan. Make sure Recognize text is selected. The higher quality the scan, the more accurate the conversion will be.
If you do not have Acrobat Pro, use Ally. Next to the file, click on the small arrow pointing down to the right of the editing wheel. Select Alternative formats. You can download an OCRed PDF. If you want to go one step further and add headings, paste the text from the PDF into a Word document and add headings. |
| This PDF contains images that are missing an alternative description | An alternative description is a textual alternative for an image. It allows students with visual impairments to perceive the image. Alternative descriptions should be added to all images, including those embedded within PDF, Word, PowerPoint and other documents. | If you have the source document, use Word to add alternative text to the document images. Right click on the image (Shift + F10), select Format Picture, under Properties and Layout open the Alt Text pane, enter text in the Description field (not the Title field).
If you do not have the source document, you will need Acrobat Pro to add alt text to the images. In Acrobat Pro, go to Tools. Select Accessibility. From the Accessibility toolbar you can select “set alternate text”. You will be taken from image to image and can add alt text or mark the image as decorative. |
| This PDF has no title | PDF titles are used as the document title for a PDF window or tab, making it easier to navigate to the PDF and understand the purpose of the PDF. Often the default is the file name which may not be meaningful/descriptive. | In your PDF viewer, Files > Properties > type a meaningful/descriptive title in the Title field |
| This PDF has contrast issues | Low contrast can make documents difficult to read. | If you have the source document in Word, start there by changing the font color to improve contrast.
If do not have the source document but you have Adobe Acrobat Pro, use the Enhance Scans tool to improve contrast. Tools > Enhance Scans. If you do not have Adobe Acrobat Pro, you may be able to change the contrast with a program like Photoshop. |
| The headings in this PDF do not follow a logical structure ***and you have the original source document in Word | Headings should be hierarchical, starting at heading level 1 for the title of the document, then heading level 2 for the sections of the document. Heading levels should not be skipped. | If you have the source document, use Word to fix the headings. Headings should be hierarchical, starting at heading level 1 for the title of the document, then heading level 2 for the sections of the document. Heading levels should not be skipped.
In Word, click through the headings of the document to uncover any skipped heading levels (e.g. going from heading level 2 to heading level 4). |
| The headings in this PDF do not follow a logical structure ***and you do not have the source document | Headings should be hierarchical, starting at heading level 1 for the title of the document, then heading level 2 for the sections of the document. Heading levels should not be skipped. | If you do not have the source file, you will need Acrobat Pro (and not Reader), to alter the document tags. Open the tags pane (View > Show/Hide > Navigation > Tags). Review the tag tree and check the heading levels (H1 = heading level 1, H2 = heading level 2, etc.). You can double click on the tag to change the heading. |
| This PDF does not have a language set | Setting a designated language for a document allows the PDF to be interpreted by services like Ally to know what language the words and sentences of the document are intended to be read as. | In your PDF viewer, Files > Properties > Advanced > select language |
| The document is untagged | These PDF documents are not tagged. PDF tags are hidden labels that clarify the structure of the document and define what’s a heading, paragraph, table, list, etc. Without these tags, PDF documents are essentially just a bag of difficult to distinguish words that can be really hard to navigate and understand for people with screen readers or other assistive devices. | If you have the source document, it is much easier to add headings in Word and save the document as a PDF.
Otherwise, you will need Adobe Acrobat Pro to fix this problem. Open the Accessibility tool (Tools > Accessibility). Select “auto tag document”. Review the tags to ensure they are in logical order. Always choose “Heading 1” (<H1>) for the document title, “Heading 2” (<H2>) for section headings, “Heading 3” (<H3>) for subsection headings, etc. “Paragraph” (<P>) is used for paragraph text. If there are errors in the tags, double click on them to change the heading level. |
| The document is scanned and OCRed | These scanned documents have been OCRed (Optical Character Recognition). Digitizing printed text through OCR allows users and assistive technologies to extract and search text inside the document. OCRed documents, especially those of poor quality, can still be difficult to read for everyone. | To improve the readability of the document, it is recommended that you add tags. Tags act like headings, allowing users to navigate from section to section.
If you have the source document, it is much easier to add headings in Word and save the document as a PDF. Otherwise, you will need Adobe Acrobat Pro to fix this problem. Open the Accessibility tool (Tools > Accessibility). Select “auto tag document”. Review the tags to ensure they are in logical order. Always choose “Heading 1” (<H1>) for the document title, “Heading 2” (<H2>) for section headings, “Heading 3” (<H3>) for subsection headings, etc. “Paragraph” (<P>) is used for paragraph text. If there are errors in the tags, double click on them to change the heading level. |
Remediating Content Accessibility - Microsoft PowerPoint
The following is a list of examples of different types of accessibility issues that commonly arise and how to go about fixing them.
Microsoft PowerPoint Issues
| Issue | Description | Solution |
| This presentation has contrast issues | This document contains text with low contrast between the text and its background. This can cause the text to be difficult to read, especially for those with low vision, poor eyesight or color blindness. | Change the slide theme in order to improve contrast between the text and background. |
| This presentation contains images that are missing an alternative description | An alternative description is a textual alternative for an image. It makes it easier to connect the image to its context and allows students with visual impairments to perceive the image. Alternative descriptions should be added to all images, including those embedded within PDF, Word, PowerPoint and other documents. | Right click on the image (Shift + F10), select Format Picture, under Properties and Layout open the Alt Text pane, enter text in the Description field (not the Title field) |
Remediating Content Accessibility - Images
The following is a list of examples of different types of accessibility issues that commonly arise and how to go about fixing them.
Image Issues
| Issue | Description | Solution |
| The image can induce seizures | These animated images contain flashing or contrasting lights or patterns that can lead to seizures for people that suffer from photosensitive epilepsy, which is a very serious and potentially life-threatening condition. Animated images with these characteristics can be generally unpleasant to look at, even for those not prone to seizures. | Find an alternative image. Do not use this image. |
| The image has text that is not part of the alternative description | The image contains text that is not represented in the description or alternative text of the image. People with screen readers or other assistive devices rely on these descriptions to understand the image content and purpose and will not be able to read any text in the image that’s not part of the description. | If this is an image acting as text (like a banner graphic), replace it with actual text.
If this is a screenshot that contains text components, just make sure the alt text is descriptive enough to capture the nature of the screenshot. In such cases, this is not a problem that needs to be fixed – you just need to be smarter than the machine (Ally) at determining whether or not it is a problem. |
| The image has contrast issues | The image contains text with low contrast between the text and its background. This can cause the text to be difficult to read, especially for those with low vision, poor eyesight or color blindness. | Upload the image into a program like Photoshop to increase the contrast.
If you do not have a fancy image editing program, use PPT. Upload the image to a PPT slide. Under the Picture Format tab, you can adjust the contrast of the image in the Corrections dropdown menu. Right click on the image to save it as a picture. There is no way to know if the contrast has been improved enough to satisfy Ally’s evaluation, but use your best judgment to do what you can. |
Ally FAQs for Instructors
How can I show my Blackboard screen to students without showing the accessibility scores?
Switching into Student Preview mode while you’re projecting or screensharing your Blackboard course allows you to show content in the course without showing any instructor controls (including accessibility scores and course reports) to students.
What does the instructor need to do to generate alternative formats for a content item?
Nothing. Ally automatically picks up on any existing or new materials, runs it through the accessibility checklist, and makes the alternative formats available to both the student and the instructor.
Is there a file size limit?
Ally doesn’t enforce a file size limit. There may be cases where the algorithm fails to generate alternative formats for certain large files.
- Keep the original content to fewer than 100 pages to generate an OCR format for scanned documents.
- Limit content to 100,000 characters for the audio format. This character limit typically corresponds to at least 30 pages or several hours of audio.
- Limit content to 30,000 characters for the translated format.
- Limit to 50MB fixed files uploaded through the Instructor Feedback panel.