There is a three-step process to start using Gradescope. Once you have created your Gradescope course, check out the other TechWeb tutorials or head to the Gradescope article on starting up your course in Blackboard.
Creating Your Course Through Blackboard Learn Ultra
- In the Content area, click the purple plus (+) symbol and select Content Market
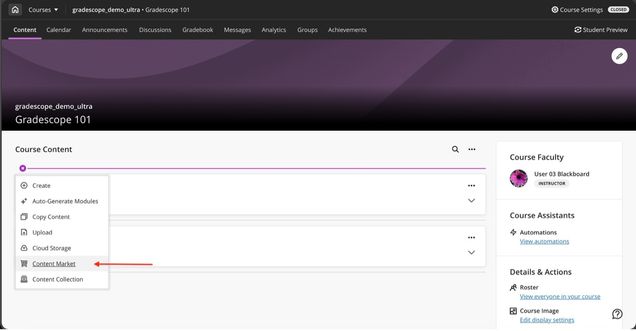
- In the Content Market, find Gradescope Course

Recommended: click the small plus in the lower-right corner to add a link in the Content area as a quick way to launch Gradescope
Click the full square to launch the platform, but not create a content item
New Gradescope users: At this point, a new Gradescope account will be created for you if you do not already have one associated with the email address (e.g., your school email) that you use in Blackboard.
Existing Gradescope users: If you already have a Gradescope account under the email address that’s associated with your Blackboard account (e.g., your school email), a new Gradescope account will not be created for you, and clicking the Gradescope link in Blackboard will take you to your existing account.
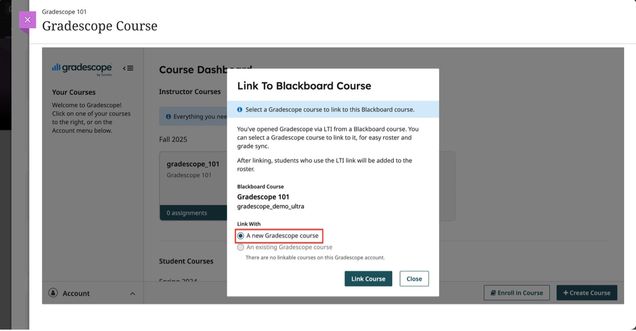
- Within the LTI, select A new Gradescope course to create the course in Gradescope and link it with Blackboard
On the Course Settings page, you can update the course title, description, rubric types, and score bounds. Keep in mind that course title and description changes made here will only appear in Gradescope, not in Blackboard.
- When you’re finished, click Update Course. Next, you will need to sync your roster.
Creating Your Course Through Blackboard Learn Original
Gradescope courses can be created through the Gradescope LTI integrated into Blackboard Learn Original View.
- Log into Blackboard with your Kerberos credentials and click on the Blackboard course you’d like to link to Gradescope.
- Next, click Tools, and then click Gradescope Course.
- Once Gradescope launches, you’ll see a dialog box with course-linking options. Choose to link to a new or existing Gradescope course, and then click Link Course to go to the Course Settings page.
- New Gradescope users: At this point, a new Gradescope account will be created for you if you do not already have one associated with the email address (e.g., your school email) that you use in Blackboard.
- Existing Gradescope users: If you already have a Gradescope account under the email address that’s associated with your Blackboard account (e.g., your school email), a new Gradescope account will not be created for you, and clicking the Gradescope link in Blackboard will take you to your existing account.
- On the Course Settings page, you can update the course title, description, rubric types, and score bounds. Keep in mind that course title and description changes made here will only appear in Gradescope, not in Blackboard.
- When you’re finished, click Update Course. Your course is now linked and your students can access this Gradescope course. Now, it’s recommended that you sync your roster.