
Use the HTML Email Makr to easily create an HTML-formatted email online. Once you’ve created a message with the HTML Email Makr, you have a number of options to finalize or submit your email:
- Send yourself a copy for further editing/review/approval before submitting.
- Download/edit/upload the HTML after you’ve created your email.
- Submit it directly to the BU Specmail bulk emailing system.
This is a kiosk-style application; you do not save your work in the application.
How to use HTML Email Makr
We’ve created this lightweight app so you can create an HTML-formatted message in a few simple steps without the need to know much (if any!) HTML. Log in to HTML Email Makr and:
1) Build Your Template
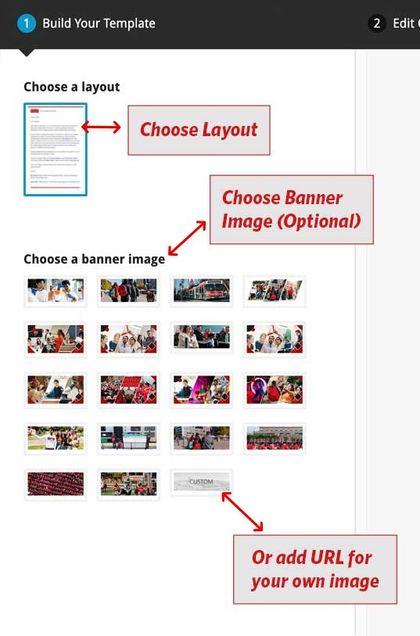
Choose from different layouts and banner images (or use your own banner image).
You can change the images or layout at any time during the process.
If you want to use your own banner image:
- The image should be exactly 760 pixels wide.
- The image should not be taller than 350 pixels in height.
- Upload the image to your own website using your site’s Media Library or FTP settings.
- Get the URL to your image and paste the full URL into HTML Email Makr.
Departments that want to use a custom image for all their bulk emails are encouraged to create and upload an image to your own website, and reuse the same URL every time you need to send a bulk email.
Make sure the image is publicly available and not behind an access restriction. Restricted-access images will not show up in the message.
Uploading an HTML File to the BU HTML Email Makr
If you have a previously saved HTML email ready or need to upload a starter template:
- Open the BU HTML Email Makr and navigate to the home screen.
- Click Upload… in the upper-right corner.
- Browse to and select your .html file.
- Click Open to begin the upload.
- Click Upload & Continue…
- Review the imported email to ensure the text, images, links, and formatting appear correctly.
- Make any necessary edits, then proceed to Preview and Submit.
2) Edit Your Content
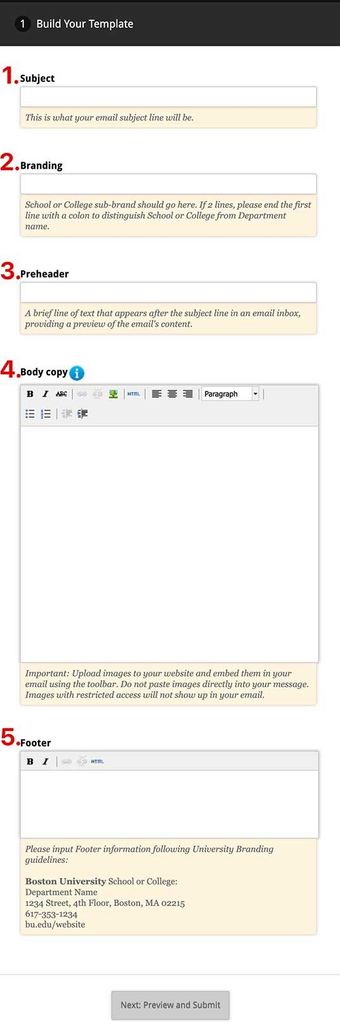
There are 5 text fields to edit:
- Subject – This is the subject line of the message. This is what recipients will see in their inbox. This does not appear in the message preview within HTML Email Makr.
- Branding – This is the branding text that appears within the heading section of the layout you have selected. You cannot use HTML code in the heading.
- Preheader – A brief line of text that appears after the subject line in an email inbox, providing a preview of the email’s content.
- Body Copy – This is the main content of your email. You can format the text, add links, and include photos. Like the custom content banner, any images you include in your email body need to be uploaded to your own website and not restricted, and specify the URL to the image in HTML Email Makr.
- Footer – This is the text in the footer section of the layout you have selected. Footer is usually used for department name, address, and contact information. You can use bold & italic text and links in the footer. No other HTML should be used.
VERY IMPORTANT NOTE: For consistent formatting it is always best to work with plain text and do your formatting within the HTML Email Makr tool. Avoid copying/pasting text from Microsoft Word, other HTML emails, or a web browser. If you need to copy/paste content from MS Word or a browser, it’s always best to copy/paste your content into a plain text editor first (like Notepad or TextEdit), and then copy/paste the text again into HTML Email Makr.
You’ll always see a preview pane to the right of the editing window, and the edits you make will be reflected in real time in the preview window.
3) Preview and Submit
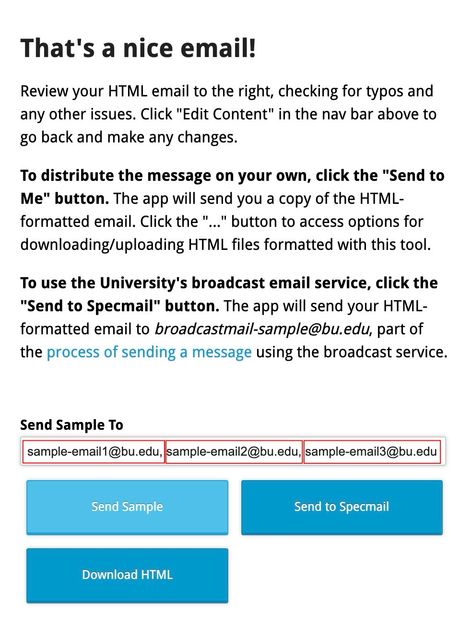
When you are done formatting your email, click the Preview and Submit tab. You’ll see an exact copy of how your HTML-formatted email will look to your recipients when they open it in their email application. Alongside the preview pane, you’ll see 3 buttons. You may choose to:
- Send Sample – This will send a copy of the HTML-formatted email to the email address associated with the BU account you have used to log in to the application or to any email addresses provided, separated by commas. This is convenient if you want colleagues to review the email, provide feedback, or receive a broadcast email approval.
- Download HTML – This will download an HTML file that corresponds to the email you have just created. It’s always a good idea to save a backup copy of each completed broadcast email to your desktop (or another local folder). Having a copy on hand makes it much easier to reference previous editions, reuse content or layouts, and recover anything if you ever need it in the future. You may edit this file or any others previously saved on your machine by clicking the “Upload…” link at the top-right corner of the browser window within the HTML Email Makr.
- Send to Specmail – If your email is ready to go, just click the Send to Specmail button. The email will be submitted directly to BU’s Specmail bulk email system. The Specmail procedures are no different than they were before — Specmail will reply to you to seek the necessary approvals and information about who the message is from, who it should go to, and when it should be sent.
We hope you enjoy using HTML Email Makr. And, more importantly, we hope this tool makes your life easier when creating professional-looking, HTML-formatted emails for your department’s communication needs.
If you have any questions, or experience any problems, please contact the IT Help Center.