Remote Desktop is a convenient way to retain access to your office computer while not in your office, but the default configuration also makes it accessible to the Internet and increases your risk of a system compromise.
To reduce the risk of compromise, the BU Information Security Incident Response Team (IRT) recommends you make the following changes to the configuration of Remote Desktop:
- Use the campus VPN service to first connect to campus, and then remote desktop to the BU PC. The BU two-factor VPN with Duo Security is required for connecting to computers at the Medical Campus and at Charles River Campus HIPAA Components.
- Consider if you need RDP at all; if not please ensure it is disabled.
We discourage the use of gotmypc.com for privacy reasons mostly. We discourage the use of other third party software for security vulnerabilities concerns.
Enabling Remote Desktop Securely on Windows 10
Remote Desktop can be enabled securely on Windows 10 with the following instructions:
- Go to Control Panel (Search for Control Panel via Cortana/Search
- Then on the left hand side, please click “Remote Settings”
- Then click on allow remote connections and also check “Allow connections only from computers running Remote Desktop with Network Level Authentication.
Disabling Remote Desktop
Windows 7
Go to Control Panel, click System And Security, and then click System (or just System if using the classic view).
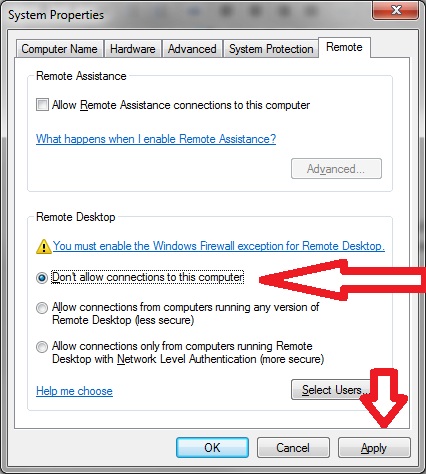
- On the System page, click Remote Settings in the left pane. This opens the System Properties dialog box to the Remote tab.
- To disable Remote Desktop, select Don’t Allow Connections To This Computer,
- Also uncheck the Allow Remote Assistance box only if already checked.
- Click Apply
Windows XP
Click System in Control Panel.
- On the Remote tab, clear the Allow users to connect remotely to your computer check box, and then click OK.

