Install Zoom Calendar Add-ins
You can easily schedule Zoom meetings from your BU calendar using Zoom’s Outlook and Google add-ins. After installing the Zoom add-ins, you’ll be able to schedule Zoom meetings without having to leave your calendar application.
Installing the Zoom for Outlook Add-in
The Zoom for Outlook Add-in is automatically distributed to everyone with Office 365. If you aren’t seeing the add-in when making a meeting, or would like to remove it, use the steps below to manage your installation:
Outlook for Windows (New and Classic) or Outlook for Web:
- Click the Apps waffle icon in the left sidebar

- Click “Manage your apps” at the bottom of the app categories list
- Locate “Zoom” and click it to learn more. To remove it, click the “…” button on the right side of the row and select “Remove.”
Outlook for Mac:
- With Outlook for Mac open, go to “Tools > Get Add-ins” in the menu bar at the top of your screen
- Click “Admin-managed” on the left
- Locate and click the “Zoom for Outlook Add-in” to learn more, add, or remove it from your account.
Once installed, the Zoom for Outlook Add-in will be available automatically anywhere you sign into the Outlook app or website.
Scheduling a Zoom Meeting from Outlook
The Zoom for Outlook Add-in is accessible when composing a meeting invitation in Outlook:
- From Outlook, create a new meeting or event. Add your invitees, set the date, time, and recurrence of your meeting, and add a location if necessary.
- Add a Zoom meeting by locating the appropriate button based on the version of Outlook you use:
- Outlook for Windows (Classic): Click the Add a Zoom Meeting button in the toolbar. If you don’t see it, you may need to click the “…” button to reveal all options.
- Outlook for Windows (New) or Outlook for Web: Click the “Apps” button in the toolbar
 , then select Zoom > Add a Zoom Meeting.
- Outlook for Mac: Click Zoom on the toolbar, then Add a Zoom Meeting. You may need to click the “…” button to reveal the Zoom option.
- If you are asked to sign in, click the “SSO” link at the bottom of the pane. You may need to scroll down to show the button.
- Enter “bostonu” (or “bu-hipaa” if you use Zoom Meetings for HIPAA) in the company domain field. You will be redirected to a BU Login window.
- Configure your meeting options as desired. When finished, click “Add Zoom Meeting.”
- The Zoom meeting will be automatically created and added to your invite. Your invite is now ready to send.
If you need to update your meeting options, you can do so at any time from Zoom directly or by editing your meeting invite and clicking the blue “Settings” gear icon on the ribbon.
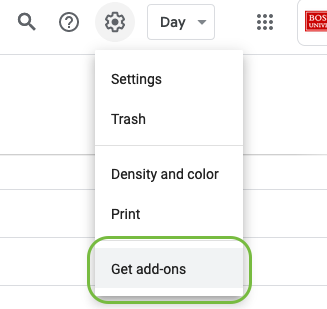
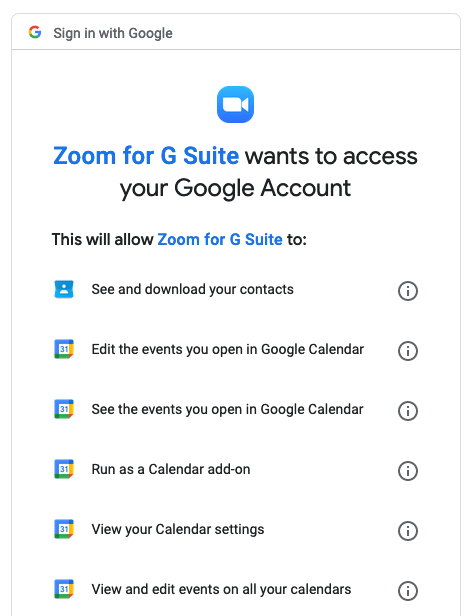
Installing the Zoom for Google Calendar Add-on
What about the Zoom Plugin for Microsoft Outlook?
Zoom has discontinued feature development for the Zoom for Outlook Plugin. Whenever possible, we recommend using the Zoom for Outlook Add-in.
Mac Users
Microsoft has announced the end of life for legacy Outlook plugins. Originally planned for May 2021, this deprecation has been delayed. For more information, please see Microsoft’s support article.
If you currently use:
- Outlook for Mac 2019 or 365
- The Zoom Plugin for Microsoft Outlook
Zoom and Microsoft recommend uninstalling the legacy plugin and migrating to the new add-in.
How can I tell if I'm using the plugin?
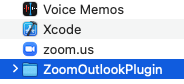
- Open a new Finder window and navigate to your computer’s Applications folder.
- Look for a folder named “ZoomOutlookPlugin.”
- The full path to this folder is: /Applications/ZoomOutlookPlugin
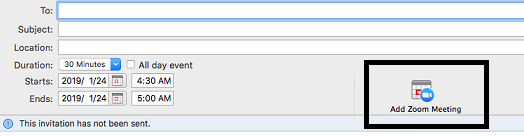
In Outlook for Mac’s New Meeting window, the Zoom plugin creates a button to the right of the Start/End Date and Time fields.
Is my version of Outlook for Mac affected?
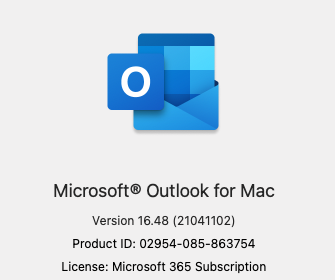
Plug-in support has been discontinued for Office for Mac 2019 and 365. You can confirm which version you use by performing the following steps:
- Open the Outlook app on your Mac.
- Open the “Outlook” menu in your Apple menu bar, then click “About Outlook.”
- Look for the “License” line in the window that appears. Affected versions will read “Microsoft 365 Subscription” or “Volume License 2019.” The listed version number will also be greater than 16.16.
How do I uninstall the Zoom Plugin for Microsoft Outlook?
You can remove the Zoom Plugin using its included uninstaller. For additional assistance, please contact us.
- Quit Outlook, if it is currently open.
- Open a new Finder window and navigate to your computer’s Applications folder.
- Locate and open the “ZoomOutlookPlugin” folder.
- Open the “Uninstall” application and enter an administrator’s username and password. The plugin will finish uninstalling in the background.
After you have uninstalled the plugin, please see the sections at the top of this page for more information about using the Zoom for Outlook Add-in.