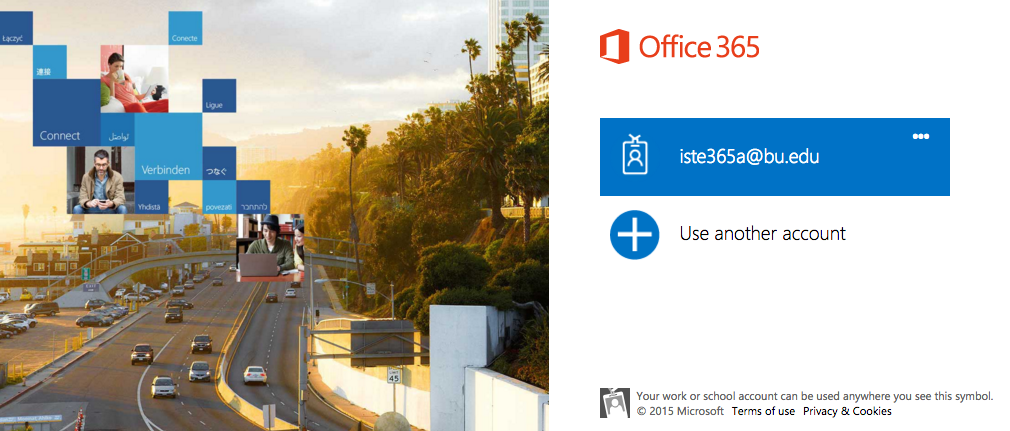
How should I log in to Office 365 Outlook (Exchange Online)?
You can access Exchange Online by logging in at http://www.bu.edu/webmail/ or http://outlook.office365.com/. Whenever you are prompted, use your full BU email address as the User Name (e.g. login@bu.edu) and provide your BU Kerberos password. Below is an example of the correct format for logging in.

How should I log out?
- Click on your Profile icon in the top right corner of the screen.
- Click Sign Out from the dropdown menu. Note: Close/quit out of all your browser windows to fully complete the sign out process.
Can I forward my email to another email account?
Although it is not recommended, information on forwarding your email from Exchange Online to another email account is available. It’s a good idea to “Keep a copy of forwarded messages in Outlook Web App” so you can benefit from the integrated Calendar, Contacts and use of Lync. If you do opt to forward your messages, please be aware of Boston University’s Information Security Policies.
Can I change the account used to send email messages?
If you have multiple accounts in Outlook, when you compose a new email message, Outlook picks the default account as the From account. However, if you want to Reply, Reply All, or Forward a message, Outlook will send your message with the same account the original mail was sent to.
To change which account is used to send a message, follow these steps.
Where can I find the calendar in OWA?
Access to the calendar can be found by clicking on the blue waffle icon in the top left corner of the screen.
What is the Clutter folder?
Clutter is an Office 365 email filtering feature designed to move low priority messages out of your Inbox and into their own folder titled Clutter. Clutter uses actions you have taken in the past to determine the
messages you’re most likely to ignore. It then moves those messages to the Clutter folder.
Individuals can choose to disable Clutter. To disable Clutter, log into the Outlook Web app (OWA) at http://www.bu.edu/webmail/ or http://outlook.office365.com/. Click on the Gear icon, then click Options –> Automatic Processing –> Clutter and select Don’t separate items identified as Clutter then click Save.
If you are using OWA and need to mark messages as “not clutter”, either right click on the message and choose Mark as not clutter or just drag it to the Inbox. If Exchange is missing messages you want marked as clutter, right click and choose Mark as clutter or drag it to the Clutter folder. In Outlook and other clients, you’ll need to drag a message to the clutter folder to mark it as clutter or drag it to the Inbox to mark it not clutter.
Users can drag messages they deem suitable to the Clutter folder to “train” the tool to spot similar email in the future. The tool gets smarter over time, learning from your prior actions with similar messages.
Once Clutter is enabled in OWA, it appears in other clients linked to that Exchange account, including Outlook on both Windows and OS X desktops and notebooks, and the iPhone and Android OWA apps.
For more information, please refer to Microsoft’s documentation on Clutter.
Note: If you have rules moving messages, Clutter is applied after server-side rules are applied and items touched by rules won’t be filtered by clutter.
How do I remove the Bing Maps link in my emails?
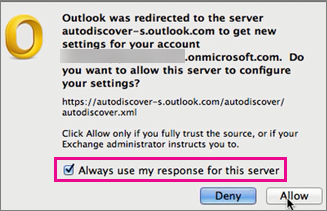
Why am I repeatedly being asked by Outlook to configure my server settings?
After migration a dialog box asks you if you want to allow the server to configure your settings, select the Always use my response for this server check box, and then click Allow. Please note, if you have shared calendars as a part of your Outlook configuration, you may also receive this pop up when the accounts you have shared a calendar with are also migrated.
Can I set up a shared calendar with someone who has not yet been migrated?
When creating a new shared calendar in Office365, if any of the people who you need to share the calendar with have not yet been migrated to Office365, you must use Outlook Web Access (OWA) to create the calendar and the associated permissions. If the people you are sharing the calendar with have all been migrated to Office365, you can create the calendar in the desktop version of Outlook and provide the appropriate permissions.
I’m concerned about the security of my data in Microsoft’s O365 Exchange environment. How is my data secured in O365?
Boston University recognizes that security of electronic data is a growing concern for everyone. Information Security has reviewed Microsoft’s cloud solution and determined that it meets Boston University’s Data Protection Standards. O365 has thorough security controls in place to protect the data we entrust to them. You can read more about Microsoft’s security design in the Office 365 Trust Center.
How do I add my photo to my Office 365 account?
Office 365 allows you to personalize your account by adding a photo of yourself which would be visible to your coworkers. We recommend adding a photo of just yourself, and not to include any illustrations, photos of pets, etc.
Please note that these photos are only visible to others with a BU account. Individuals outside of BU will not be able to see this photo.
- Log in to the Outlook Web App.
- Click the gear icon in the top right corner, and select Office 365 settings.

- Click Personal Info from the left-hand menu.

- Hover over the person icon next to your name at the top of the screen, then click the Change photo button that appears.


- Click Choose file or Browse to select a photo from your computer.
- Click Save.
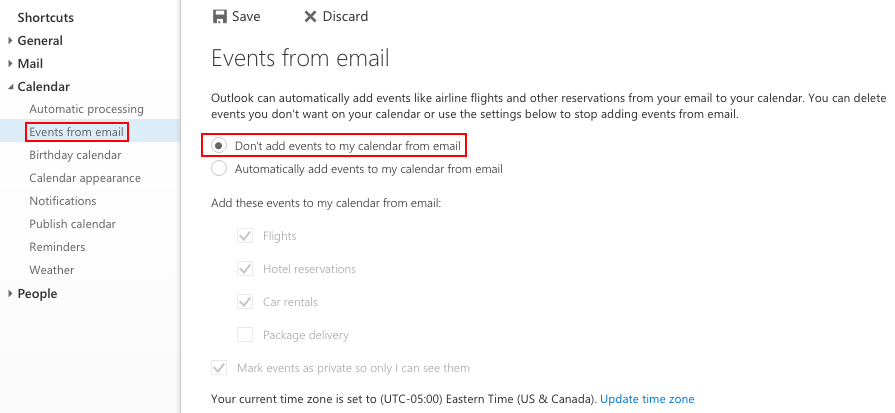
Why are some events automatically appearing on my calendar?
Microsoft has recently enabled a new feature in Office 365 that automatically adds events to your calendar based on emails you received containing information such as flight details and hotel reservations. While some users might find this helpful, others prefer to maintain their calendar manually. To manage this feature:
- Log into http://www.bu.edu/webmail/ or http://outlook.office365.com/ using your full BU email address as the User Name (e.g. login@bu.edu) and your BU Kerberos password.
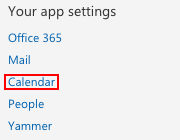
- Click the gear icon in the top right corner.
- Click Calendar under Your app settings.
- In the left hand menu, click Events from email, and select the Don’t add events to my calendar from email option to disable the feature entirely, or select which events you want added to your calendar from email.

- Click Save.