 Piazza is an online platform that facilitates interaction among students and instructors in an efficient and intuitive manner.
On Piazza, students can ask questions, and instructors and fellow classmates can answer. Instructors can allow students to participate anonymously, to encourage participation. At the time of posting a new question, students can select whether they want their question to be public (for the rest of the class to see), or private (for only instructors to see). 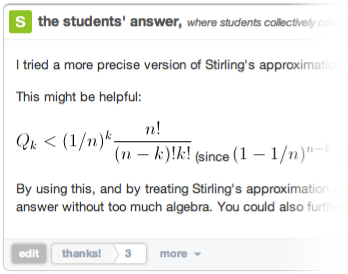 Instructors can make public questions private and vice versa.
Piazza is also collaboration based: a student can edit another student’s question, as well as the collaborative students’ answer (note the position of the apostrophe). An instructor can edit a student’s question, the collaborative instructors’ answer, as well as the collaborative students’ answer. Questions also have a separate follow-up discussion section where follow on questions can be hashed out in a more unstructured manner as a thread. Follow-up discussions are initially marked as unresolved and can be marked as resolved by anyone who thinks the follow-up has been addressed.
For Students
Additional information on the topics below and more can be found in the Piazza Support Center.
Enroll in a Class
- Click the green Students Get Started button:

- Enter your school:

- Enter your class name or number:

Note: If you cannot find your course by typing either the name or the number, check that the semester is correct and try changing the school to a variation of its name (for example, “Boston University” instead of “BU”).
- Select Join as Student:

- Note: If there is an access code, please contact your instructor to request the access code.

- Enter your school email address:
 Once you submit your email, you will receive an activation link in your inbox!
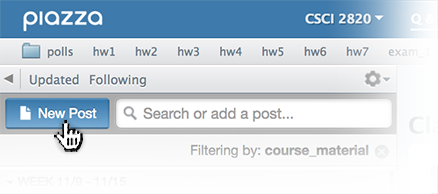
Post a Question
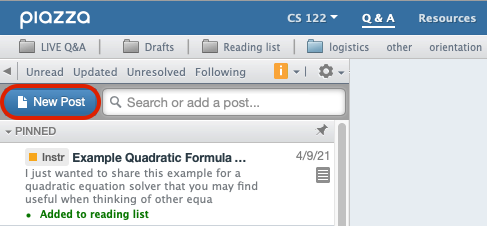


Post a Note


Post a Followup
Creating a Followup Discussion on a Question or Note
To comment or post a followup question to a Q&A post, please click within the text box beneath the post that reads “Compose a new followup discussion.”

When a new followup is posted, it will automatically be set to Unresolved, and an icon reading 1 unresolved followup will display beneath the post in your Q&A feed, as seen below:

You and your classmates can resolve a followup by selecting Resolved just above the followup, as seen below. Should you have additional questions, you can always mark the followup back to Unresolved again.

Note: If your instructor has disabled the Resolved/Unresolved toggle, you will not see this feature.
You can use the helpful link below a followup post to mark it as a good contribution:

If you’d like to keep track of the number of followups in a post, click on the gear icon in the top righthand corner of your Q&A feed and select Show Followup Count.

Email Notification Settings
Steps for Students on How to Adjust Email Notification Settings
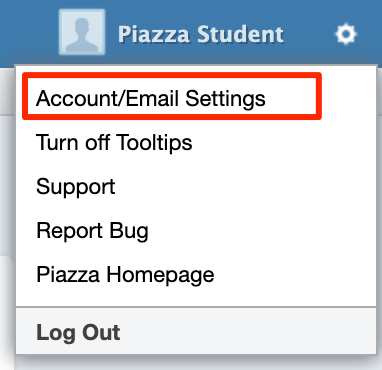
1. Click the gear icon from within Piazza Q&A, then Account/Email Settings in the drop-down menu:

2. Under the Class & Email Settings header, click Edit Email Notifications for the particular class:

3. Select your preferred settings for new posts and for updates to posts you follow, then click Save Settings:

- Real Time: receive an email notification immediately for new posts
- No Emails: do not receive any email notifications, except when an instructor bypasses this setting
- Daily Digest: receive a digest of new posts once a day
- Smart Digest: receive a digest of new posts every 1-6 hours
Note: If you disable your email notifications or drop a class, there may be one more email digest queued up to send. After that, you will not receive any more.
For Instructors
Additional information on the topics below and more can be found in the Piazza Quick Start Guide as well as the Piazza Support Center.
Create a Class and Connect to Blackboard
Steps for Instructors on How to Add/Create A Class on Piazza
- Click the blue Professors and TAs Get Started button on Piazza.com:

- Enter your school:

- Enter your class name for the correct term and click + Create a New Class:
 Note: You can also select Other as a term. If a class already exists with the same name, simply add your last name to the course name or number.
(Example: Test Class 100 – Murphy or TC 100 – Murphy) - Enter your class information:

- Select Join as Professor (or Join as Teaching Assistant):

- Enter your school email address:

Connecting Piazza to Your Blackboard Ultra Course
Piazza can be integrated with Blackboard as a means for creating a cohesive experience for students between your course’s online resources.
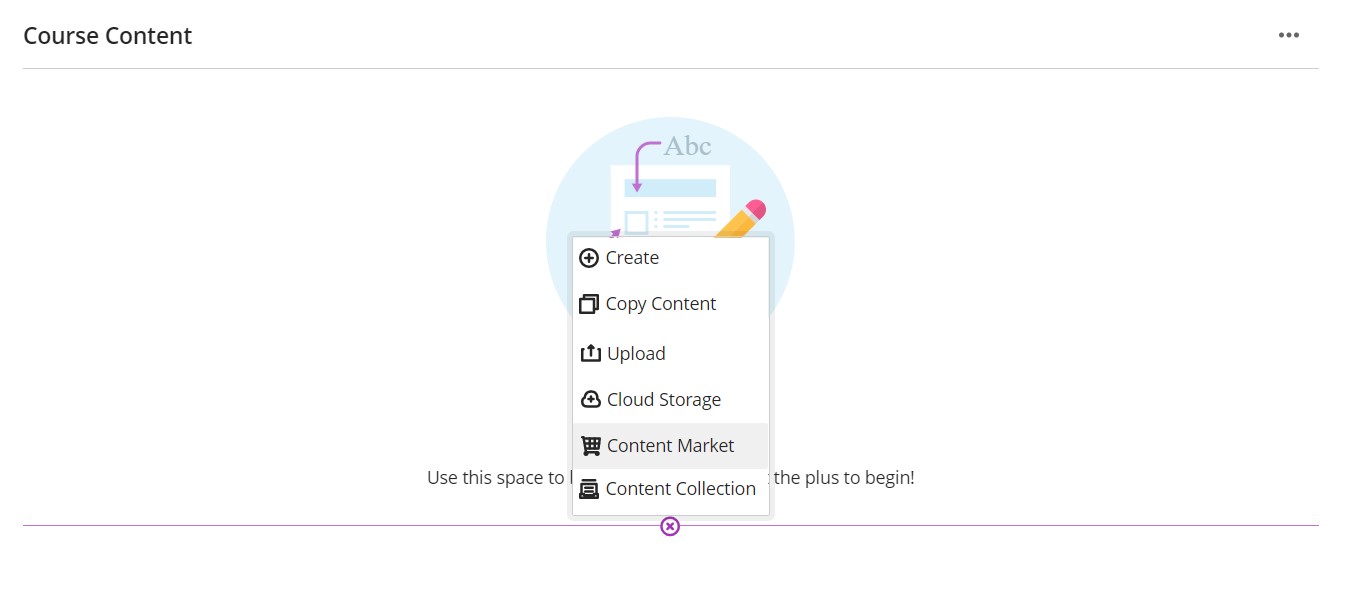
- Navigate to your Blackboard course site’s Course Content page.
- Hover over one of the horizontal lines on the page to reveal a “+” symbol, which will open up a dropdown menu of actions.
- Click Content Market to open the selection of LTI items you can insert.
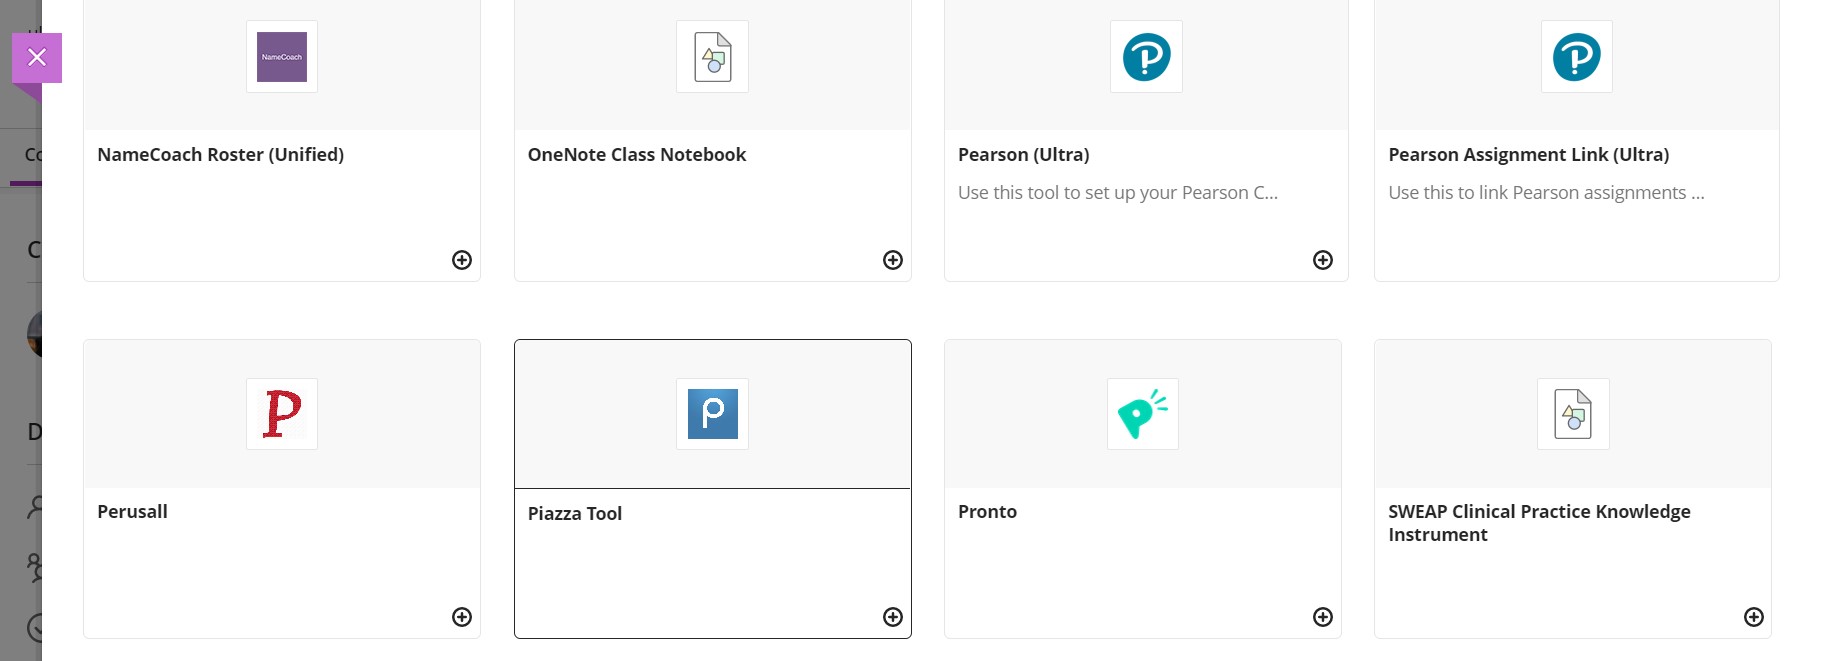
- Scroll down through the Content Market and click on the Piazza Tool item. This will open a new layer with the Piazza LTI where you can select the Piazza class you would like to connect.
- If you wish to create a new course through the LTI, fill in the respective fields of the second section, and click Create New Piazza Class.

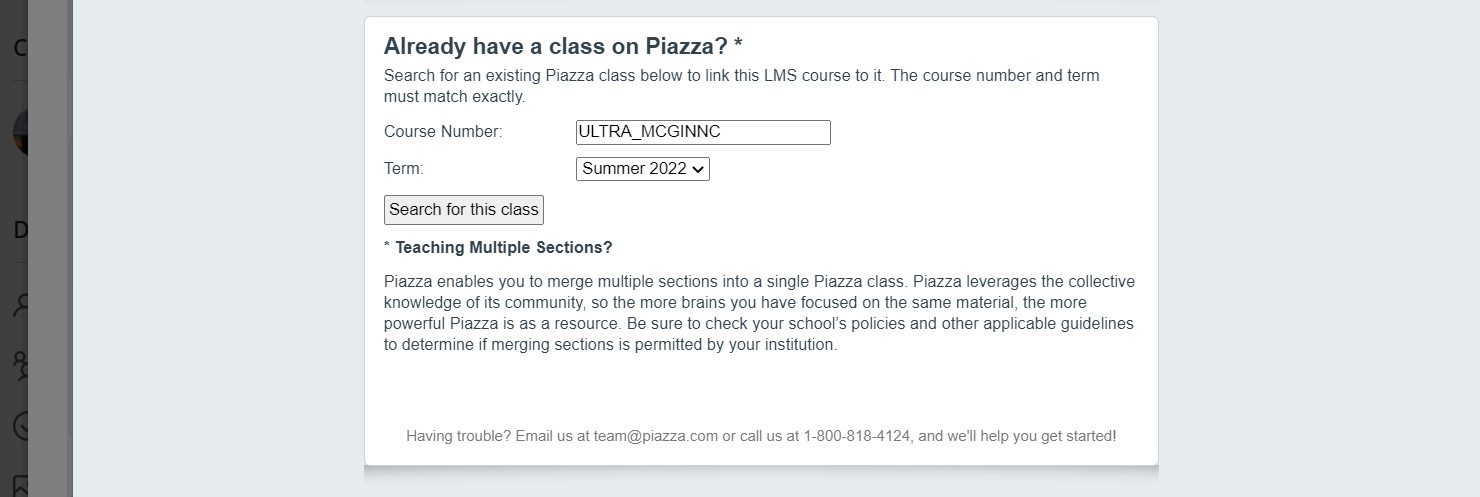
- If you are connecting an existing course, skip the second section and fill out the third section and click Search for this class to find the class that you have already set up on the Piazza site.
- Connecting a new or existing Piazza class to your Blackboard course will add the Piazza Tool item to your Course Content page, which you can move and edit like other LTI items.
Connecting Piazza to Your Blackboard Original Course
Piazza can be integrated with Blackboard as a means for creating a cohesive experience for students between your course’s online resources.
- Navigate to your Blackboard course site’s Content page by clicking “Content” on the left navigation menu.
- Select the Tools dropdown at the top of the page to open a menu of tool options.
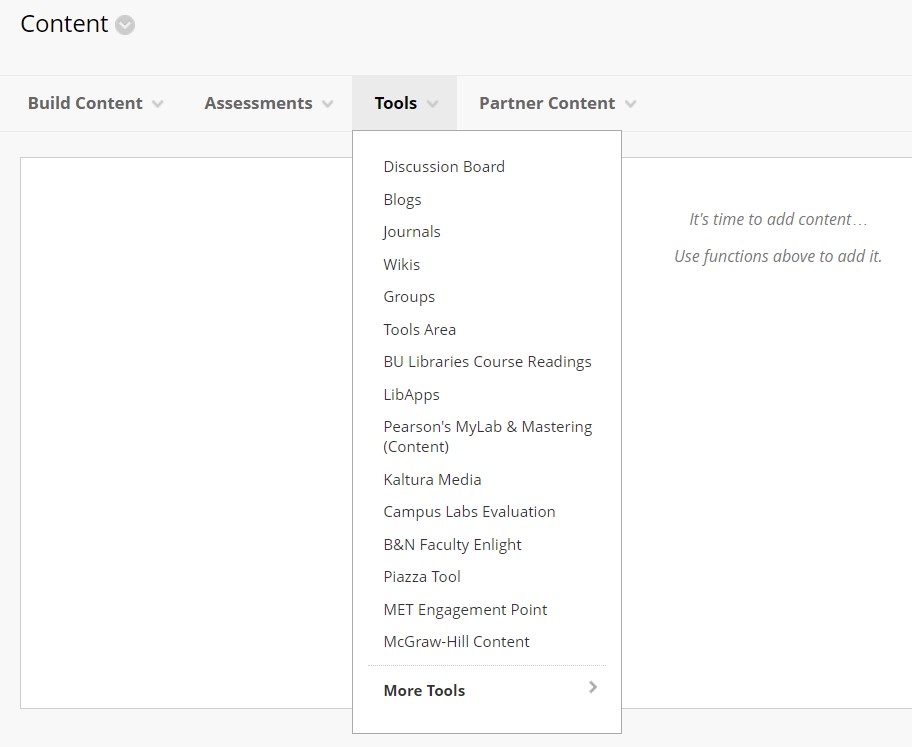
- Select Piazza Tool from the dropdown to open up the Create Piazza Tool page.
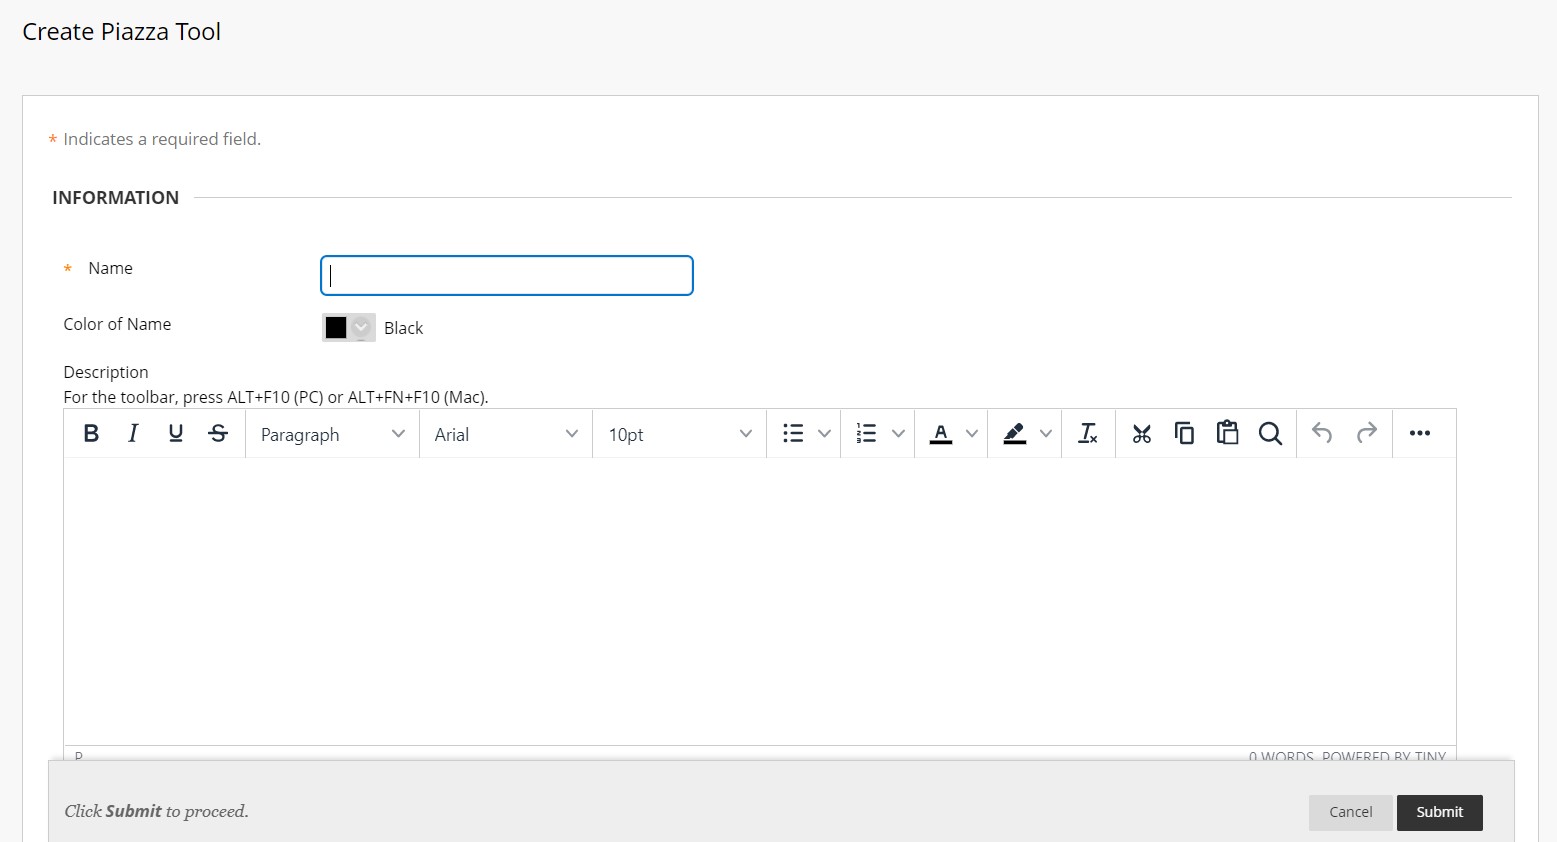
- Type a name that you’d like the item to display on your course’s Content page (such as “Piazza”) and optionally add a description. Scroll down the page to view additional options.
- Click Submit to add the tool to your Content page.
- Back on the Content page, click the name of the Piazza Tool to begin connecting to your Piazza class
- If you wish to create a new course through the LTI, fill in the respective fields of the second section, and click Create New Piazza Class.
- If you are connecting an existing course, skip the second section and fill out the third section and click Search for this class to find the class that you have already set up on the Piazza site.
- Your Piazza tool is now available to be accessed on the Content page and can be edited and moved the same as other items.
Configure Your Course Site and Enroll Students
Once you’ve created your Piazza class, follow this guided setup to get your class started.
1. Confirming basic class information
To begin, fill out a few basic details. Add your course start date, then select whether you’d like instructor self-signup enabled or disabled. By default, instructor self-signup is disabled. If you’d like other instructors to self-enroll in your class, you can enable this setting.

2. Configuring your class Q&A settings
In this section, you can decide how you wish to set up your class Q&A.
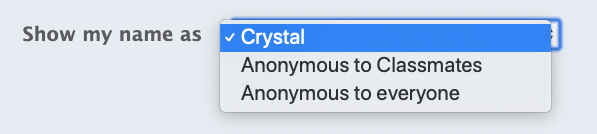
If you would like to allow students to post anonymously from instructors (which can be a great way to elicit participation from the shy students), keep anonymous posting enabled. If you do not wish to allow students to post anonymously from instructors, disable this setting. Students can still choose to post anonymously from their classmates.
![]()
Note: You will always have the ability to ban individual students from posting, who may be abusing their anonymous posting privileges. You can do so via the Ban User Console that lives at the top of each post.

If you would like students to be able to add posts that are private only to instructors, enable private posts. If you prefer that students only be able to make public posts on Piazza (visible to their entire class), disable this setting. Note that you can always turn a private post into an anonymous public post if you think other students in your class can benefit from this post.

In addition to these two settings, you can configure additional class Q&A settings from your ‘Manage Class’ tab.
3. Configuring Class Folders
Folders are a great way to keep your class content organized. When students and instructors add a new post, they will be required to select at least one folder for their post. This makes it easier for other students to search these posts, reducing the number of duplicate questions asked in your class.
Here, you will see a set of default folders – homework 1 through homework 10, logistics, exam, so on. You can keep these default folders, or use the edit and/or delete actions to modify these default folders. You can create your own folders as well. Select the numbered checkbox if you wish to create multiple numbered folders like quiz 1, quiz 2, so on. Finally, you can reorder folders using the drag and drop icon so they appear in the order you like.

If you’re not ready to configure your class folders, you can do this step later from your ‘Manage Class’ tab. You can also modify your folders at any time from ‘Manage Class’.
4. Navigating between ‘Manage Class’, ‘Q&A’, ‘Resources’, ‘Statistics’
Piazza has four tabs in your top bar that helps to familiarizing yourself with. ‘Q&A’ will be your primary place for discussion.

The ‘Manage Class’ tab is where you’ll be able to make any changes to settings you’ve configured on this page, in addition to selecting other preferences.
You can add class resources and announcements under your ‘Resources’ tab. View your students’ participation as well as download an excel file of their participation stats from the ‘Statistics’ page.
5. Introducing Piazza to your students
It is recommended that you add a post to introduce Piazza to your students. It is also recommended that you add this blurb to your syllabus, which will help introduce Piazza to your students for class discussion.

6. Tips & tricks for a successful Piazza class
Once you’re done with setup, you will be taken to the Q&A tab of your Piazza class. There, navigate to your feed on the left where you’ll see a few default posts. Check out the ‘Tips & Tricks for a successful class’ default post to see how other professors have successfully introduced Piazza into their classes.

Finally, if you’re already familiar with Piazza and prefer to set up your class via the ‘Manage Class’ tab, you can “skip this setup” in the banner at the top of the page.

How to Enroll Your Students on Piazza
- Click on the Manage Class button:

- Click on the Manage Enrollment tab:

- If you share your class signup link, students and instructors will be required to enter a valid school email address when signing up for your class.
If you prefer to have an additional level of control, you can add an access code. Students and instructors will be prompted to enter this access code when signing up for your class.

For adding students manually, under the Enroll Students header, copy and paste your student roster (emails will be parsed out):
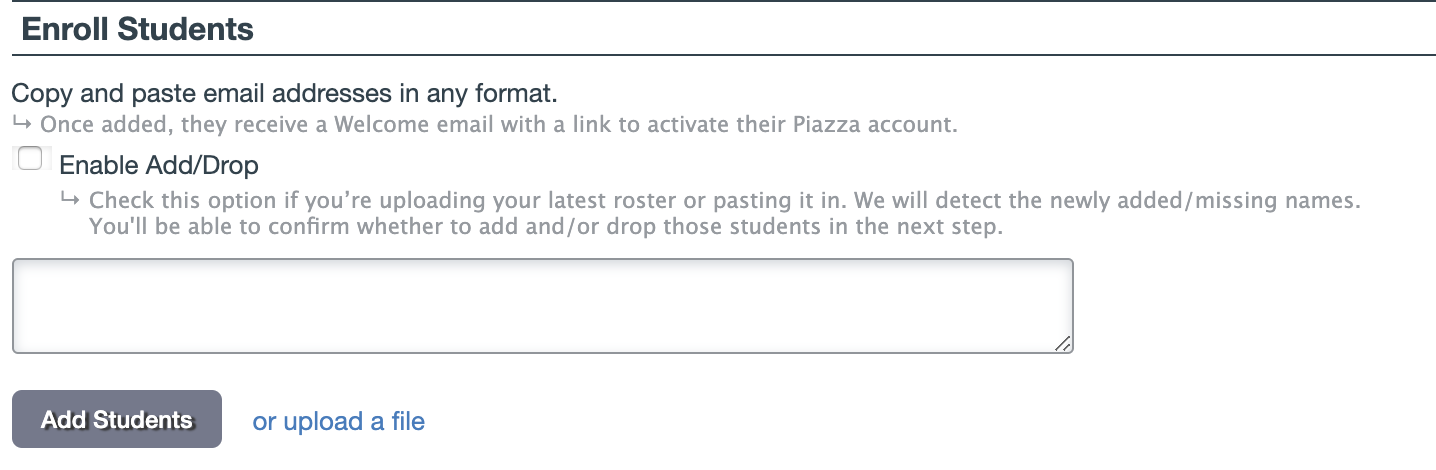
Or upload a .txt or .csv file with your roster:

- You can update your class roster by clicking on Enable Add/Drop. Newly added/missing names will be detected and you’ll be able to confirm whether to add/or drop students.

Add Course Information, Resource Files, and Links
Edit Course Information and Add a Syllabus
Share relevant course information with your students on Piazza with our Resources tab.
- Click on the Resources tab:

- In the Course Information tab, add your class description, website, etc.:

- Upload a syllabus in PDF or Word format:

Steps for Managing the Resources Section
Upload course-related files or share links for your students to access in the Resources section.
- Click on the Resources tab in the topbar menu:

- Click on the Resources tab in the lower menu:

- The four default sections are
- Homework
- Homework Solutions
- Lecture Notes
- General Resources
Under each section you can Add Links or Add Files:
- You can also add custom section headers by clicking Edit Resource Sections:

- Rearrange your section headers by dragging the list icons, or add a custom section:

- Once you’ve added resources, you can add due dates, rearrange them, or post a note of the file to the Q&A forum:

Create Custom Folders and Groups
How to Create Folders to Organize Posts
How do folders work?
Folders are a way of keeping your class content organized. Instructors can create, rearrange, edit, or delete folders, as well as disable folders altogether. Folders appear in the top bar based on the order decided by the professor. By default, students are required to select relevant folders when creating a post.
- Click the Manage Folders header, and find the Configure Class Folders section:

- You can simply keep the default folders, edit them and create custom folders, or disable folders all together.

- When creating new folders, first type the title of the new folder in the Add a folder text box and then click Add folder(s).

- You can also customize how you’d like to number your folders. For example, you could create several numbered folders with the same topic, such as hw. (without a pre-set suffix).

- You can sort the order in which you’d like folders to appear in the Q&A top bar by clicking and dragging on these icons.

- For further organization, you can create subfolders by using the Create Subfolder button next to any folder.

- Rename the folders by clicking edit folder name. This will rename the folder for every post associated with the original folder name.

- To delete a folder(s), check the small box to the left of the folder’s name, and then click Delete selected folders. Please note if you choose to enable the folders feature, your class will need at least one folder.

- Once created, students and instructors can post within the folder(s). Instructors can also manage and reorder folders when making a post, which will open Manage Class in a new tab.

Group Based Discussion allows instructors and students to post to a subset of students in the class, suitable for when your class consists of multiple sections or project teams.
- Click on the Manage Class button:

- Click on the Create Groups tab:

- You can either configure groups in your class using a CSV file, or create groups manually.
- To create groups using a CSV file, create a CSV file with one row per student or instructor; the first column is the student or instructor’s email address, followed by the groups the user should be enrolled in (see example below).

- Then, click ‘Create groups from a CSV file’ to upload your group configuration.

- A user must already be enrolled in your class in order to be added to any group; emails that do not belong to an enrolled user will not be added to a group. You can see which students are not enrolled in your class in the confirmation modal next to the line “Following users not enrolled, unable to assign to groups”

- New groups detected in your CSV file are automatically created (once you click Confirm group assignments button).

- If you already have groups configured, you will be able to specify if you want this CSV upload to
- update existing groups and group assignments, or to
- create new groups and group assignments (this resets all existing groups and group assignments)
- To create groups manually, first click on Manually create groups:

- You can create numbered groups (Team 1, Team 2, etc.) or custom groups. You are also able to edit the group names:

- Once you have created your groups you can assign students to groups by clicking on the group title:

- Enroll students by pasting their email addresses into the field. Instructors are automatically enrolled in every group:

- You can also allow students to join groups themselves. To do this, select Yes next to Allow students to join groups:

- Students will then be able to join groups via the Resources page.
- Once added to a group, students and instructors can post to members of their group by choosing Class Group in the Post to options on a new post:

- The group post will be labeled in the feed, and only visible to members of that group:

Post an Instructor Note or Question
Steps for Instructors on How to Post a Note
- Click on New Post:

- Select the Post Type:

- Next to Post to, select the audience for your post. You can post to the entire class, a class group, or individual students and instructors:

- Select the folder(s) to post in:

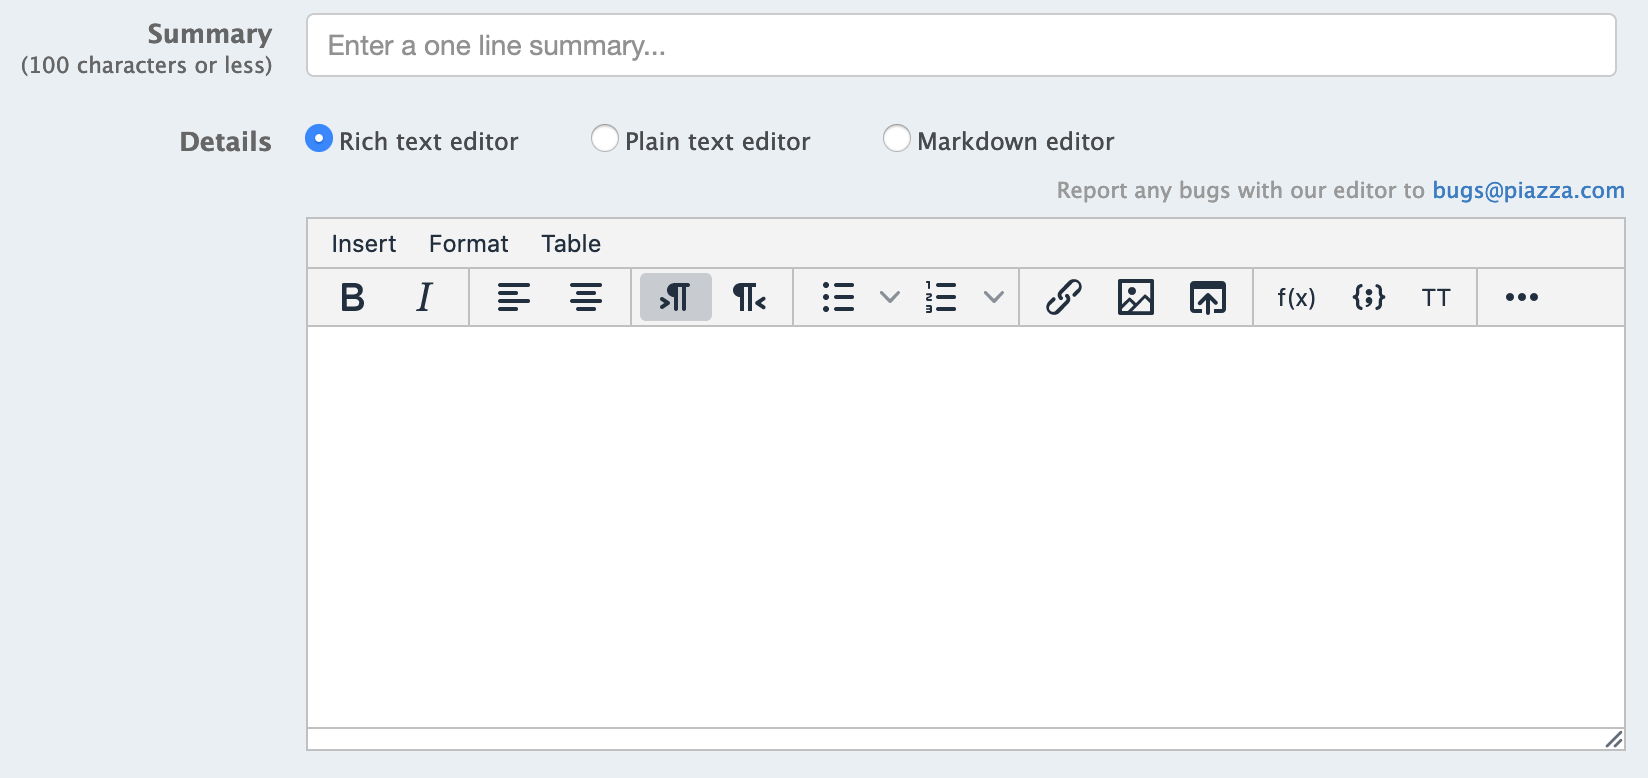
- Fill out the contents of your post:

- (Optional) Next to Posting Options, select if you want to make your note an announcement so that it appears in the Resources tab; send an email notification about your post immediately, bypassing students’ email preferences; or add your post to the students’ reading lists.

- Finally, click Post My Note!
Steps for Instructors on How to Post a Question
- Click on the New Post button:

- Next to Post Type, select Question:

- Next to Post to, select the audience for your post. You can post to the entire class, a class group, or individual students and instructors:

- Select the folder(s) to post in:

folder selection
- Fill out the contents of your post:

- (Optional) Next to Posting Options, select if you want to send an email notification about your note immediately, bypassing students’ email preferences; or add this post to your students’ reading lists.

- Finally, click Post My Question!
Post an Announcement or Poll
Steps for Posting an Announcement to the Course Page and Q&A forum
- Click on the Resources button:

- Click the Add button to post an announcement:

- Complete your announcement, then post. It will appear as a post in the Q&A forum, and an announcement in the Course Page:

Note: You can check the second box to send an email notification immediately to the entire class, bypassing students’ email preferences.
Steps for Instructors on How to Post A Poll
Each poll supports one question. Polls can be used during lecture to check understanding of class material, or can be used to decide class logistics such as when office hours should be held.
- In the Q&A forum, click the New Post button:

- Select Poll as the post type:

- Select folder(s) to post in:

- Fill out the contents of your poll:

- Enter your poll’s answer choices. You can re-order and re-name poll choices after adding :

- (Optional) Submit an explanation or correct answer:

- You can allow students to select one or multiple answer choices:

- Select how long you want the poll to remain open:
 Options: 2 hours, 6 hours, 1 day, 2 days, or 7 days
 - Select when you would like poll results to be visible to students, or never:

- Select whether students can revote or not:

- Choose the anonymity settings for the poll:

- Choose when to publish your poll to the class, and whether to send students an email notification of the poll:

- Once published, instructors will see a poll admin panel (shown below):
→ Close (and reopen) the poll at any time
→ Download a CSV of poll statistics
→ Clone an identical copy of the poll and its settings
→ Hide poll results from the class
- Poll results will display in a bar graph:

Endorse a Student Question, Answer, or Followup
How to Endorse a Student Question, Answer, or Followup
- At the bottom of the post, click good question:
 Or good answer:
- The students’ instructor-endorsed answer will be labeled in green:

- Students will be able to see which questions have an instructor-endorsed students’ answer in their feed:

- To endorse a followup comment, click helpful! below the post:

- An endorsed followup comment will be labeled in green underneath the comment, and the number of endorsed comments will appear in the top righthand corner:

- Students will be able to see if the followup section has instructor-endorsed comments in their feed:

Disable Student Anonymity and Private Posting
How to Prevent Students from Making Anonymous or Private Posts
Disabling Anonymity
- Click on the Manage Class button:

-
Under the Q&A Settings header, click on Disable next to Posting Anonymously. Make sure to click Save.

Note: Students will always have the ability to post anonymously to their classmates.
Disabling Private Posting
- Click on the Manage Class button:

- Under the Q&A Settings header, click on Disable next to Private Posts. Make sure to click Save.
