The Kaltura MyMedia area is a private space where media content may be uploaded and managed. From the MyMedia area you may edit your videos’ options, create clips from your videos, delete videos, and more. For more information, see Kaltura MyMedia.
![]()
MyMedia is the Boston University cloud based video streaming service that allows management of audio visual assets and delivery via streaming media. Students can upload content to MyMedia via their Blackboard courses which have integrated with this service. Faculty and staff can upload content directly at mymedia.bu.edu.
The terms MyMedia and Kaltura will sometimes be used interchangeably throughout TechWeb documentation, but a good thing to remember is that MyMedia is the Boston University service and Kaltura is the official third-party product used in MyMedia.
Faculty Guides to My Media
- Intro to using MyMedia with Courses and Assignments.
- What is the difference between MyMedia and Kaltura?
- What file types can be uploaded to MyMedia?
- How to use the Kaltura Mashup Media Tool.
- How to obtain share and embed codes in MyMedia v7.
- How to use the Kaltura Course Media Gallery in Blackboard.
- How to enable moderation for the Media Gallery Widget.
- How to work with channels in MyMedia.
- How to manage Kaltura video permissions.
- How to use Kaltura Capture.
- How to Create and Work with Interactive Video Quizzes
- How to use Captions and Access Transcripts in MyMedia.
- How to replace a video in MyMedia.
- How to upload video from your mobile device to your MyMedia course.
- How to download your MyMedia content.
Tutorials
Videos Guides and Additional Tutorials
Be sure to visit our MyMedia Video Tutorials page for an array of helpful “How-To” videos:
Looking for additional tutorials? Be sure to check out:
Accessing MyMedia in Blackboard
To get started with MyMedia and access your own MyMedia collection (called the MyMedia Repository) available to you in Blackboard:
- Login to Blackboard with your BU username and password.
- Click Tools in the left-side navigation bar.
- Select the MyMedia card from the list.

You can also access your MyMedia Repository from inside your Blackboard course, the instructions to do so are listed in the sections below depending on your Blackboard.
Adding a Video to MyMedia
- Login to Blackboard with your BU username and password.
- Click Tools in the left-side navigation bar.
- Select the MyMedia card from the list.
- From within the MyMedia Repository, you will see a blue button at the top right that says “+ Add New”. Clicking this will show a dropdown of three options: Media Upload, Kaltura Capture, and Video Quiz.
- Select Media Upload
- On the upload page, you can either drag and drop a video file from somewhere else on your computer, or you can click the Choose a file to upload button
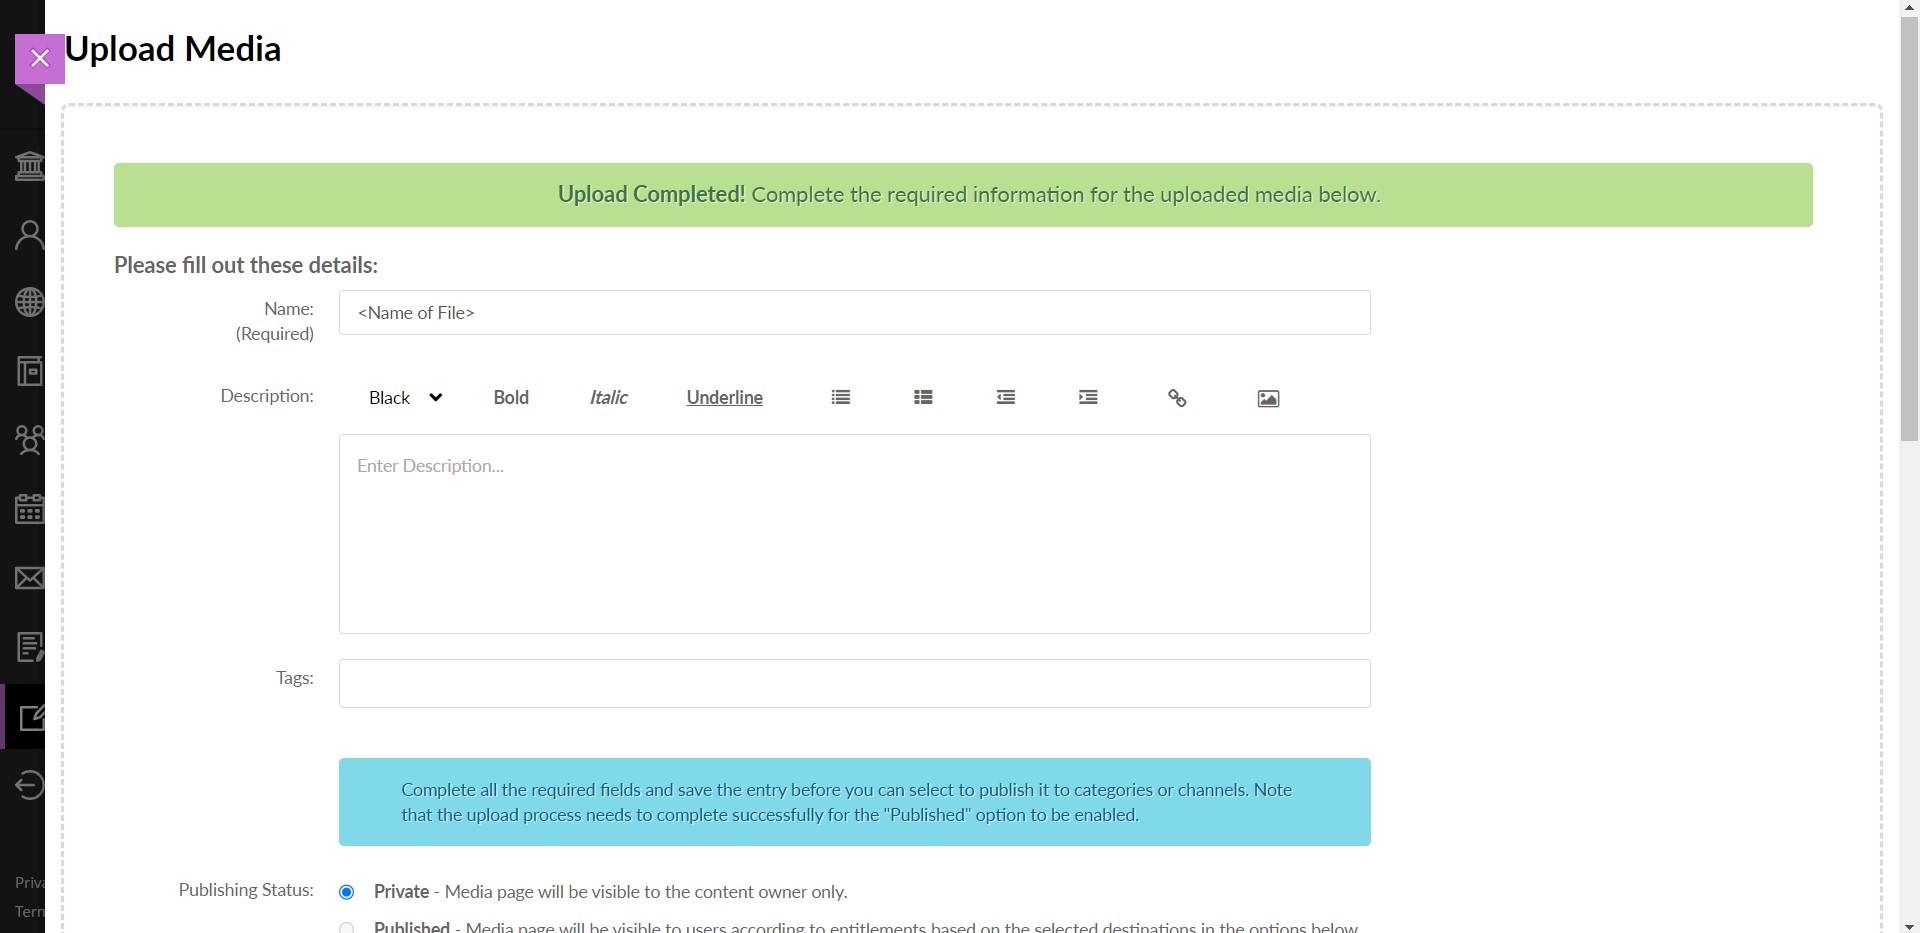
- After selecting the video that you want to bring into MyMedia, the upload process will begin automatically. This can take a couple of minutes depending on how long your video is and the size of the file. Once completed, there will be a green confirmation banner at the top of the page and a set of fields that you can fill in with the video details:
- Name: automatically generated based on the name of the file you uploaded, you can change this
- Description: you can provide a description of what the video is if this would be helpful to your viewers
- Tags: you can add tag words that may help you locate this video later (helpful if you have many videos you’re uploading)
- Publishing status: Private (m
- Click Save to save the media upload.
- From there you can either view your media, go back to the MyMedia repository, or upload another media item with the section at the bottom of the page.
Editing a Video in the MyMedia Video Editor
The MyMedia Video Editor is where edits can now be made directly in the MyMedia interface to the videos that you upload. This is a powerful tool to provide all the instructional creator power you need for your videos.
The MyMedia Video Editor allows you to:
- Create and edit quizzes in your media
- Clip, trim, chop, and splice media (removing segments)
- Add hotspots to your media
Note: The Video Editor is recommended for short videos and not recommended for precise edits/cuts. For videos longer than 3 minutes, a different video editor should be used to make precise edits before uploading to MyMedia.
Accessing the MyMedia Video Editor
- Log into MyMedia or Blackboard using your Kerberos credentials.
- From the MyMedia website: select your name at the top right and click My Media.
- From Blackboard, click Tools in the left-side navigation bar and select the MyMedia card from the list.
- Once in your media repository click the name of the desired media to open that media.
- If you have not uploaded any media yet, click the Add New button and add your media.
- On the media page, click the Actions dropdown on the right side of the page under the media and select Launch Editor.
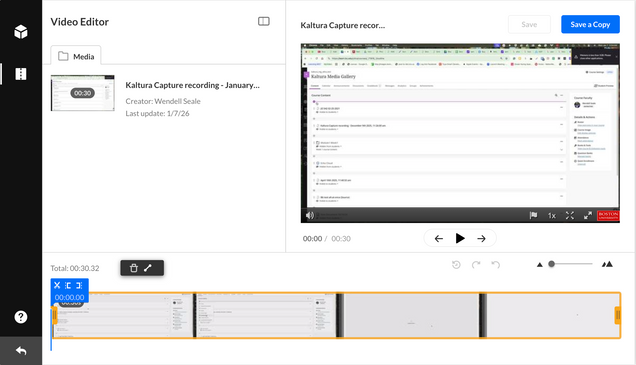
Inside the Editor
- Right pane – Consists of:
- Media Player – Use to Preview your timeline modifications.
- Real-Time Input
- Play/Pause/Skip to start/Skip to end Buttons
- Bottom pane – Includes the Timeline. The Timeline can be zoomed in/out to allow improved granulation of the time line, and fine-tuning, and give a broader perspective when zoomed out.
The Timeline includes the following icons and tools:- Redo icon – retracts to the the last action you performed on the Timeline
- Undo icon – undoes the last action you performed on the Timeline
- Reset icon – resets the Timeline to its last saved state
- Real Time Marker, with Quick Action and Time Code
- Set In/Out – use to set cue points on your time line.
- Split – use to cut your segment at the selected point
- Fade In/Out icon – use to set fade in/out cue points on your selected segment
- Delete icon – use to cut the selected segment
- Zoom marker – use to enlarge the timeline display granularity
- Handlebars – Use to snap to a certain point on the video segment
- Show/Hide Audio – show or hide the audio tracks on the timeline
- Total amount of the video duration – indicates the total amount of time of the video
Using the Editor
To zoom in/out and reset the Timeline
- Drag the Zoom marker to the level of granularity you want to see. This naturally will increase the length of the visible Timeline, since more frames will be view able.
- Click the Reset Icon – to reset the Timeline to its last saved state.
To show/hide audio tracks on the Editor timeline
- Click the Show /Hide Audio icon on the timeline. The audio display is removed from the timeline.
To advance/go back in small increments on the Editor timeline, use the following keys:
- 1 Second Forward – Right arrow
- 1 Second Backward – Left arrow
- 10 Seconds Forward – Alt + Right arrow
- 10 Seconds Backward – Alt + Left arrow
To trim media or to create a clip, you must first define the range you want to keep or make a clip from, by doing one of the following:
- Drag the handlebars of the start or end points with your mouse to set the range.
- Enter a start time or end time in the Real-Time Input field, and press Enter. The Real-Time marker will position itself on the timeline at the manually set time. You can then drag either handlebar on the Timeline edge to snap it to the real time marker.
- Click anywhere on the Timeline, the Real Time Marker will position itself there. Drag either Timeline edge to snap it to the real time marker.
- Play the media, and pause on desired time. the Real-Time Marker will position itself at that time. Drag either Timeline handlebar to snap it to the real time marker.
When arrows are displayed on the Real-Time Marker, you can move the Real Time Marker on the timeline to a different position, either backwards or forwards.
Adding Collaborators to Video in Blackboard
After uploading a video to your MyMedia repository or creating a video quiz, you may then add collaborators to your media, including co-editors, co-publishers, co-viewers and Webcasting moderators.
- Login to Blackboard with your BU username and password.
- Click Tools in the left-side navigation bar.
- Select the MyMedia card from the list.
- Click the pencil icon next to the desired media to open the editing menu.
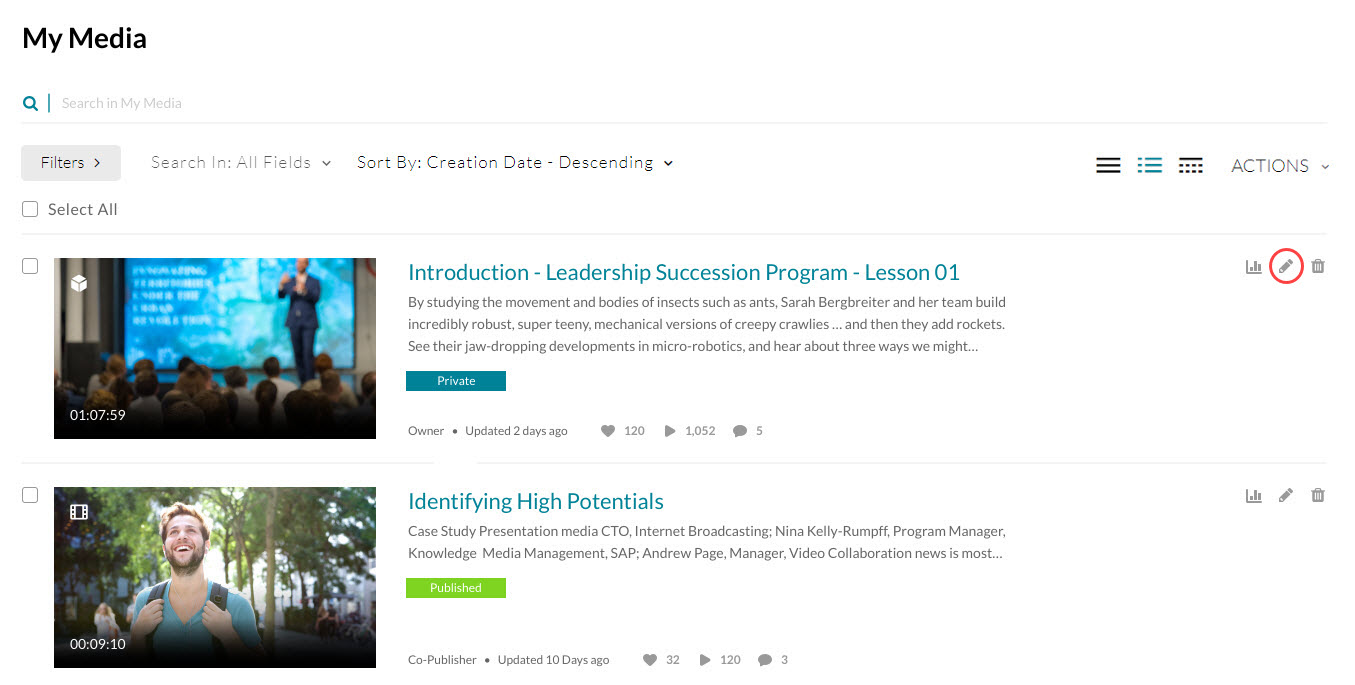
- From within the Edit Media page, select the Collaboration tab.
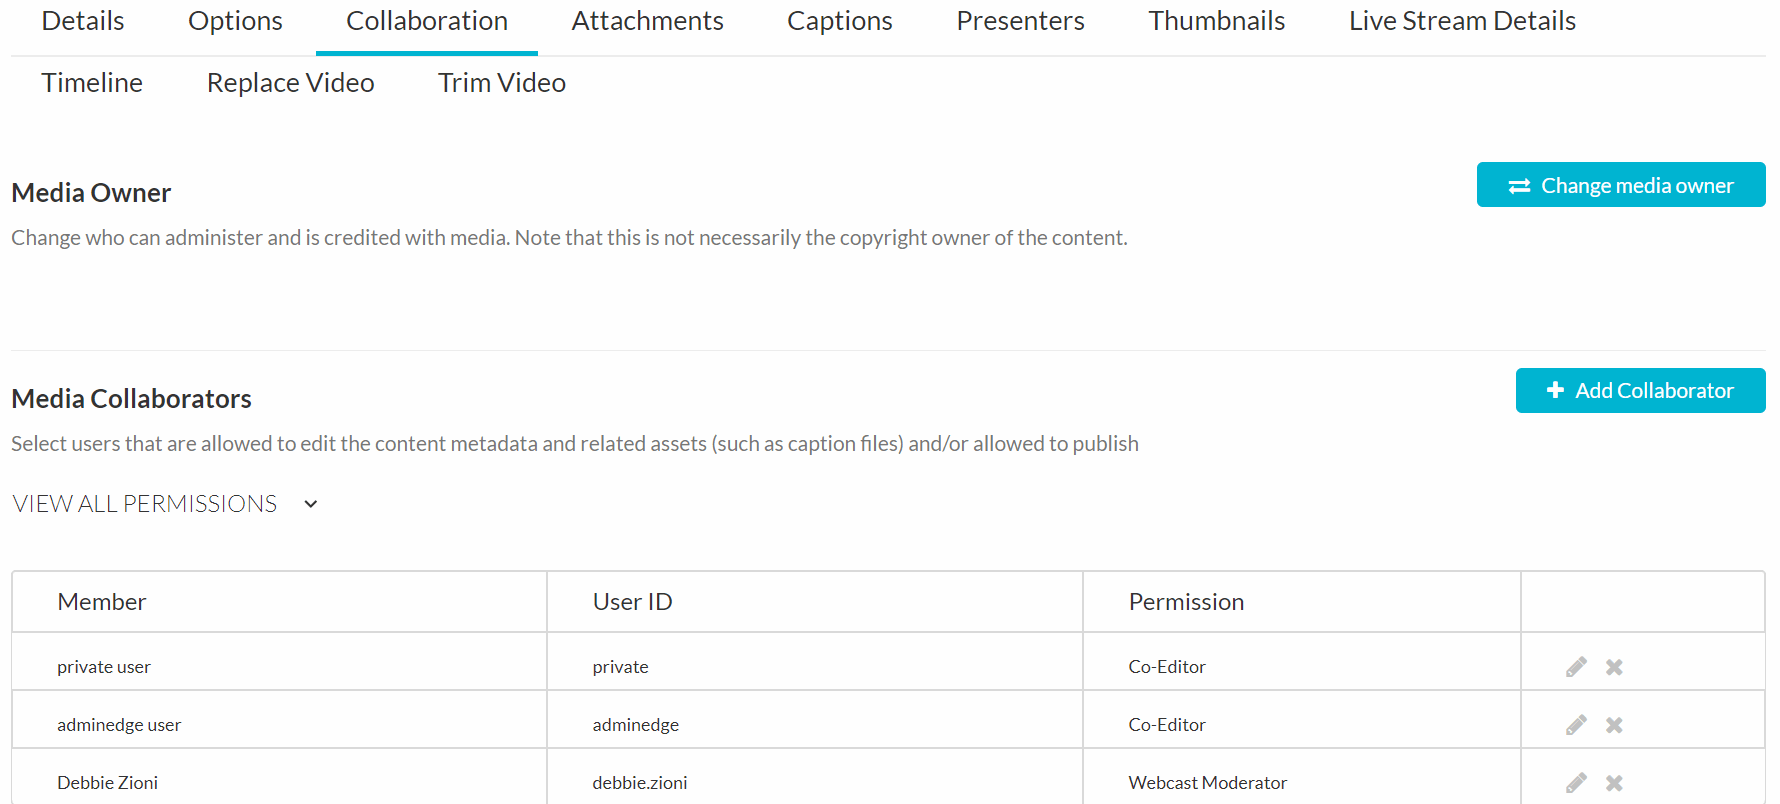
- Click Add Collaborator and the Add Collaborator window is displayed.
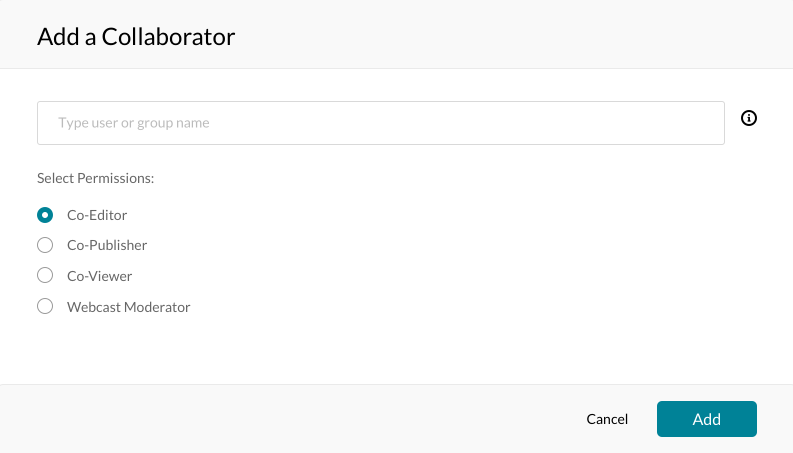
- Enter the collaborator’s user name or ID or the group’s name or ID if Blackboard groups are enabled. You can also use the auto-complete function (from 3rd letter and on).
- Check the type(s) of permissions for the collaborator you are adding to the media post.
- Co-Editors – can edit the post’s details and metadata, trim media, replace media, edit captions, edit chapters and edit slides. Co-editors cannot delete media or add new co-editors and co-publishers. Co-editors can see the analytics page for the media they co-edit.
- Co-Publishers – can publish media to their entitled Categories or Channels. This option must be enabled by your KMS administrator for this tab to display. Group support may be enabled for the Media Collaboration features. When enabled, you can select groups that may be assigned as co-editors/publishers for an entry.
- Co-Viewers – are only able to view media and do not have editing permissions, nor are they allowed to view unlisted entries, unless they are also co-publishers or co-editors of that post.
- Kaltura Webcasting Moderators – are also added through the Media Collaboration Tab. Only Media Owners can assign Webcasting Moderators for a Kaltura Webcasting event. Only after a Webcasting Moderator is assigned as a collaborator, the Moderator View may be launched through the Actions menu in the Webcast Event URL. Webcast Moderators may send announcements, respond to questions, mark questions in queues, and answer on air.
- Click Add.
- To view the collaborators’ permissions click View all Permissions and select the type of collaborator.
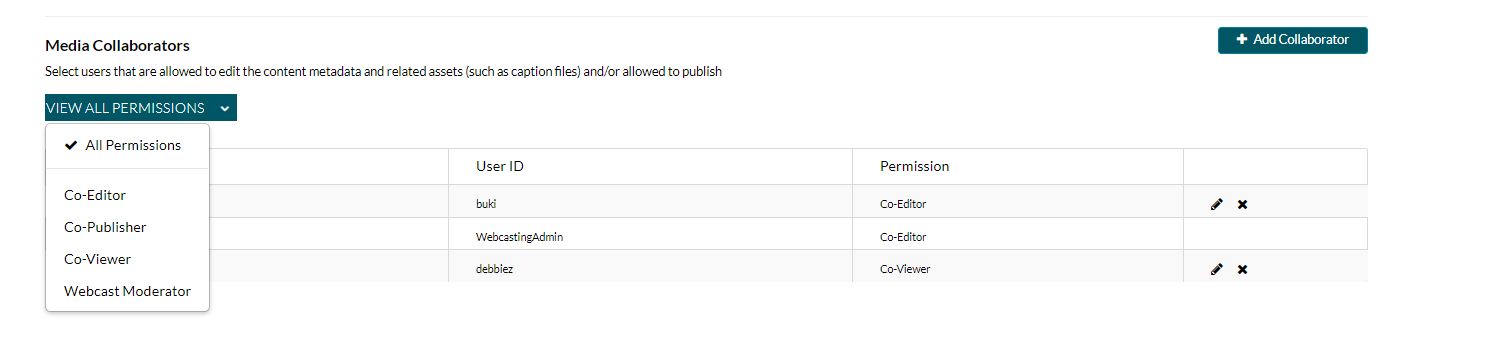
- Use the editing options/icons in the Actions column to edit/delete the collaboration options.
Creating a MyMedia Video Quiz in Blackboard
- Login to Blackboard with your BU username and password.
- Click Tools in the left-side navigation bar.
- Select the MyMedia card from the list.
- From within the MyMedia Repository, you will see a blue button at the top right that says “+ Add New”. Clicking this will show a dropdown of three options: Media Upload, Express Capture, Kaltura Capture, and Video Quiz.
- Select Video Quiz to create a new quiz.
- Click the Select button next to an existing media you want to create a Quiz from or click Upload New Media to upload a new media for your Quiz.
- The Kaltura Editor is launched, and the Quiz tab is selected with your chosen media.
- Use the Expand/Minimize icon to minimize/expand left pane to allow a cleaner view.

- The quiz is created with default settings, but you are able to make additional changes with the following steps.
- Click the Details tab to edit the following details from their default values (you may Revert to defaults at any time).
- Quiz Name
- Welcome Message
- Allow Download of Questions List
- Instructions
- Click the Scores tab to set or modify the scoring options from their defaults (you may Revert to defaults at any time).
- Do Not Show Scores
- Show Scores
- Include Answers
- Click the Experience tab to set or modify the experience options from their default values (you may Revert to defaults at any time).
- Allow answers change
- Allow Skip
- Do not allow skip
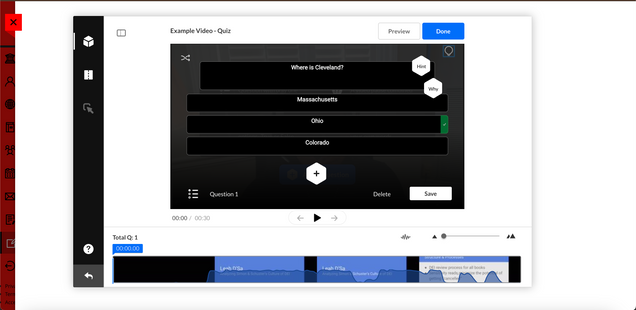
Adding Questions and Answers to Your Quiz
After you click the Start button or select to edit an existing quiz, the quiz question icon and text Add a Question is displayed on the player.
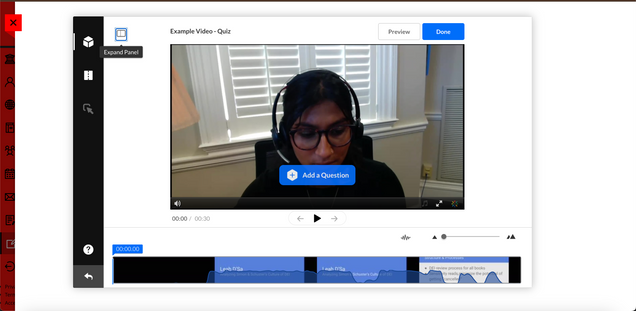
- Click Add a Question to select the question type, create hints, and create rational (why).
- Play the video or move the media’s real time marker to the desired point in the video’s timeline.
- Select a question type. The following question types are available:
- Multiple Choice – Question with only one correct answer

- True/False

- Reflection Point

- Open Question – allows you to present the quiz taker with the option to add free text. After the quiz is submitted, the quiz owner can look at the written response and write notes. An Open Question is not gradable and is considered in the same way as a Reflection Point is considered. Both question types have no impact on the grade.
- Multiple Choice – Question with only one correct answer
- Enter the question text. You can add links to question text if desired.
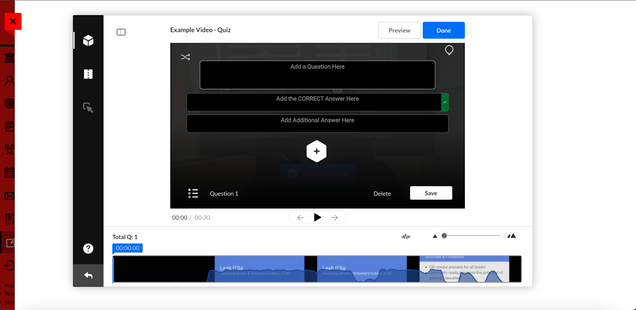
- In the Add the CORRECT Answer Here field – enter the correct answer.
- In the Add Additional Answer Here field– enter other possible answers to choose from. Two answers are mandatory. Click the Plus sign to add more answers. You may add up to four answers (maximum).
- Use the Shuffle icon to shuffle the order of the answers, or hover over the three dots in the answers to manually drag the answers to re-order them. Shuffling your answers will ensure that the correct answer is not presented at the same order every time. The correct answer displays a check mark at the right end of it.

- To delete an answer, click on the x near the answer. The correct answer cannot be deleted, only modified.
- Before you save the question, you may add a hint to the correct answer. When you finalize the quiz, you may add the Why rational (the rationale of the correct answer, which can explain your users why this is the correct answer).
- If including a hint, click Hint and enter the hint text. Click Apply or Remove. If the question has a hint a small ‘V’ icon is displayed in the Hint icon.
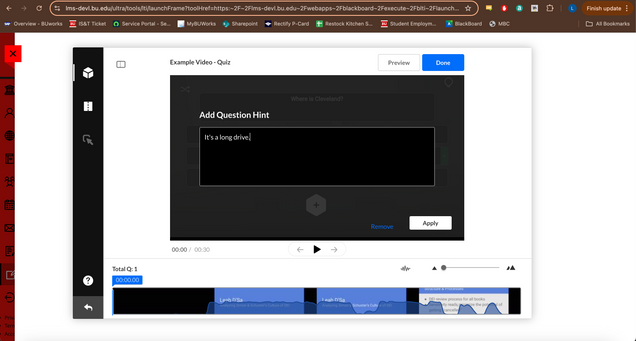
- If including an answer rationale, click Why and enter the rational. Click Apply or Remove. The Why comes up only at the end of the quiz and only when the option to Include Answers is checked in the Scoring tab.

- Click Save to save the question or Delete to delete the question. The question is saved with the question indicator on the timeline. An animation is displayed pointing to the cue point in the time line where the question will be displayed.

- Click Done when done. The Editor screen is displayed with the quiz questions displayed as cue points on the timeline.
Troubleshooting
A common error results in an “access denied” message for students uploading assignments or loading the MyMedia interface in Blackboard. The most common cause of this is an outdated browser or operating system.
Resolution
1. Update the browser to the latest version to ensure compatibility with Blackboard and Kaltura MyMedia.
2. Verify that the computer’s operating system is updated to the latest version to address potential security or connectivity issues.
3. Use Firefox as the preferred browser, as it is optimized for compatibility with educational technology platforms and offers enhanced security features.
Causes
This along with other things might cause the issue The “Access Denied” error with Kaltura in Blackboard on Chrome/Safari usually means your browser’s security settings are blocking necessary connections, especially third-party cookies or scripts; the fix involves enabling third-party cookies, allowing JavaScript, clearing cache, disabling extensions, or sometimes just logging out/restarting your browser to refresh the connection. For Safari, you’ll need to turn off “Prevent cross-site tracking,” while Chrome often needs third-party cookies allowed.
Blackboard Original
Accessing MyMedia Repository & Gallery in Blackboard
To get to the general MyMedia collection (called the MyMedia Repository) available to you in Blackboard:
- Login to Blackboard with your BU username and password.
- Click Tools in the left-side navigation bar.
- Select the MyMedia card from the list.
You can also access your MyMedia Repository from inside your Blackboard course.
- Login to Blackboard with your BU username and password.
- Select Courses in the left-side navigation bar.
- Open your course from the list of courses.
- Select Course Tools in the left navbar of your course to see the list of available tools and click Media Gallery.
- In the Media Gallery tool, click the Add Media button on the right side of the page to open your full repository of media.
Adding MyMedia videos to Your Course
To add videos to your MyMedia Repository:
- Login to Blackboard with your BU username and password.
- Click Tools in the left-side navigation bar.
- Select the MyMedia card from the list.
- From within the MyMedia Repository, you will see a blue button at the top right that says “+ Add New”. Clicking this will show a dropdown of three options: Media Upload, Kaltura Capture, and Video Quiz.
- Select Media Upload to add videos to your course from your device.
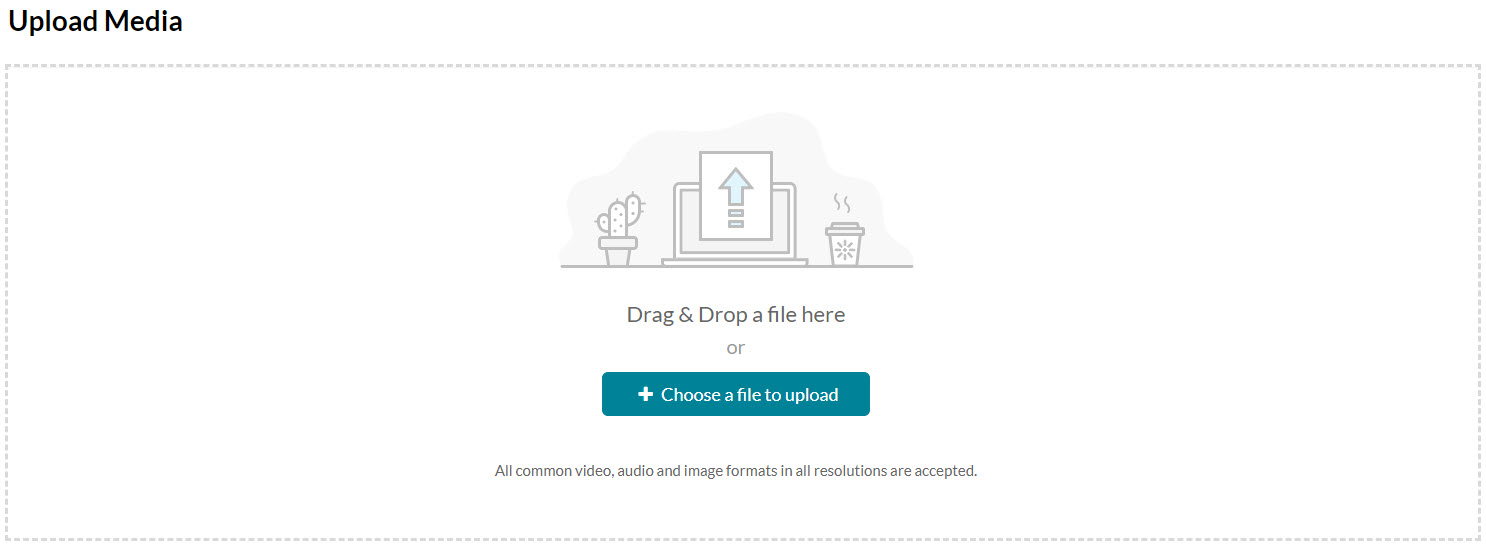
- Drag and drop your file or select Choose a file to upload.
- Select a media file to upload and click Open.
- While the file is uploading, on the Upload Media page you can:
- Enter metadata information about the media.
- Click Cancel to cancel the upload.
- Click Choose another file to upload additional files.
You can then access your MyMedia Repository from within your Blackboard Ultra course to add videos that you can provide to your students or implement into an assessment.
- Login to Blackboard with your BU username and password.
- Select Courses in the left-side navigation bar.
- Open your course from the list of courses.
- Navigate to the Content page with the navigation on the left side of the page.
- Under the “Content” title select the Build Content dropdown
- This will open up a panel of your MyMedia Repository, where you can embed videos that you have already made or you can create a new one by clicking “Add New” and following the steps above.
- Clicking the Embed button to the right of any MyMedia items will insert the item
Adding a Media Gallery to Your Course
You can create a Media Gallery by adding a link to the MyMedia Gallery inside your Blackboard Original course.
- Login to Blackboard with your BU username and password.
- Select Courses in the left-side navigation bar.
- Open your course from the list of courses.
- Select the + symbol at the top of the grey rectangle on the left side of the page, opening up a drop down menu.
- Select “Tool Link” from the menu that appears.
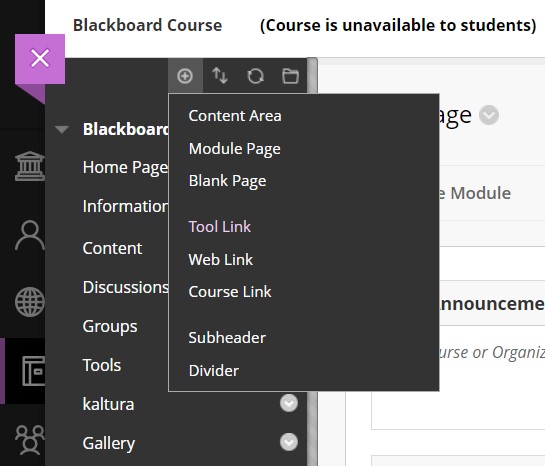
- Within the Add Tool Link box that opens, three fields are available:
- Name: Enter the name that your gallery will be titled (e.g. “Media Gallery”, “Lecture Recordings”, etc)
- Type: Select “Kaltura Media Gallery” from the drop down menu
- Check the box saying “Available to all users” so that students can access this tool item
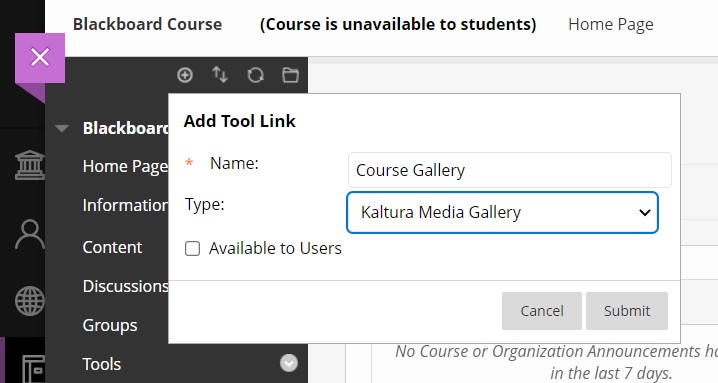
- Click “Submit” and the media gallery tool link will automatically be placed in the navigation on the left side
- The Kaltura Media Gallery will now be available to students in that side navigation.
- Opening the gallery link will allow you to add videos to the course gallery at any time.
You can also insert a Media Gallery by directly adding it in the Content page as you would with other content.
- Go to the Content page of your Blackboard course using the course’s left side navigation.
- Select the “Tools” dropdown at the top of the page and click “More Tools“.
- Click “Kaltura Media Gallery“, opening the tool link customization page.

- Enter the name that your gallery will be titled (e.g. “Media Gallery”, “Lecture Recordings”, etc) and the text color.
- Optionally, create a description for your gallery link.
- Use the option below the description box to let the link to be “Available” so that students can access this tool item.
- Review the other optional settings and click “Submit“. The media gallery tool link will automatically be placed on your Content page.
- The Kaltura Media Gallery will now be available to students on this page.
- Opening the gallery link will allow you to add videos to the course gallery at any time
Students will also have access to the course Media Gallery through the Tools page if it’s available to them and if the link to the Kaltura Media Gallery is not hidden (both the Tools page and the Kaltura Media Gallery are visible by default).
Creating an Assignment for Student Video Submissions
Similarly to other gradable items in Blackboard Learn courses, you are able to create assignments that allow students to submit their own videos using the MyMedia system. The main difference in assignments that allow video submissions is you providing instructions to students to upload their video(s) through MyMedia.
- Login to Blackboard with your BU username and password.
- Select Courses in the left-side navigation bar.
- Open your course from the list of courses and use the left side navigation to go to the Content page.
- Click on the “Assignments” dropdown at the top of the page and click “Assignment“.
- On the Create Assignment page, add a name for the assignment and click inside the Instructions area below.
- Inside the Instructions box, provide the specific directions for your assignment and instruct students to:
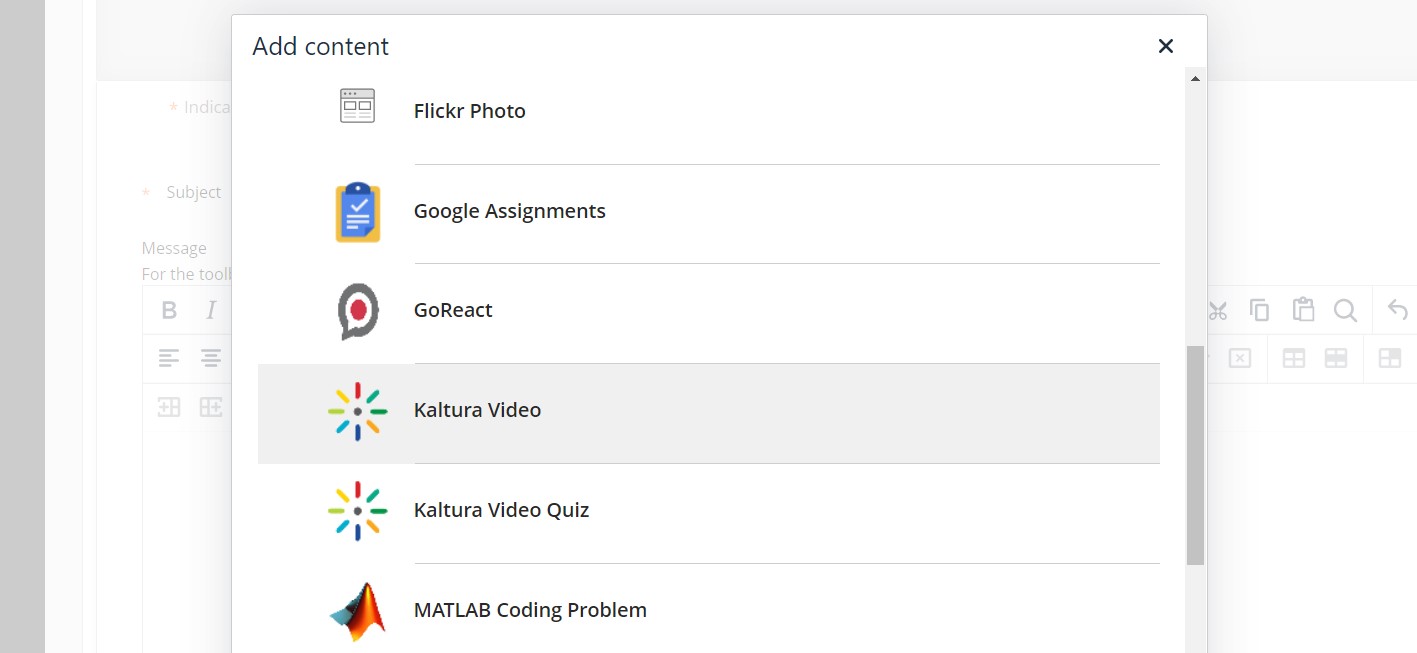
- Click “Write Submission“, use the Add Content (+) button inside of the editor, and find Kaltura Video in the list to open the MyMedia Repository.

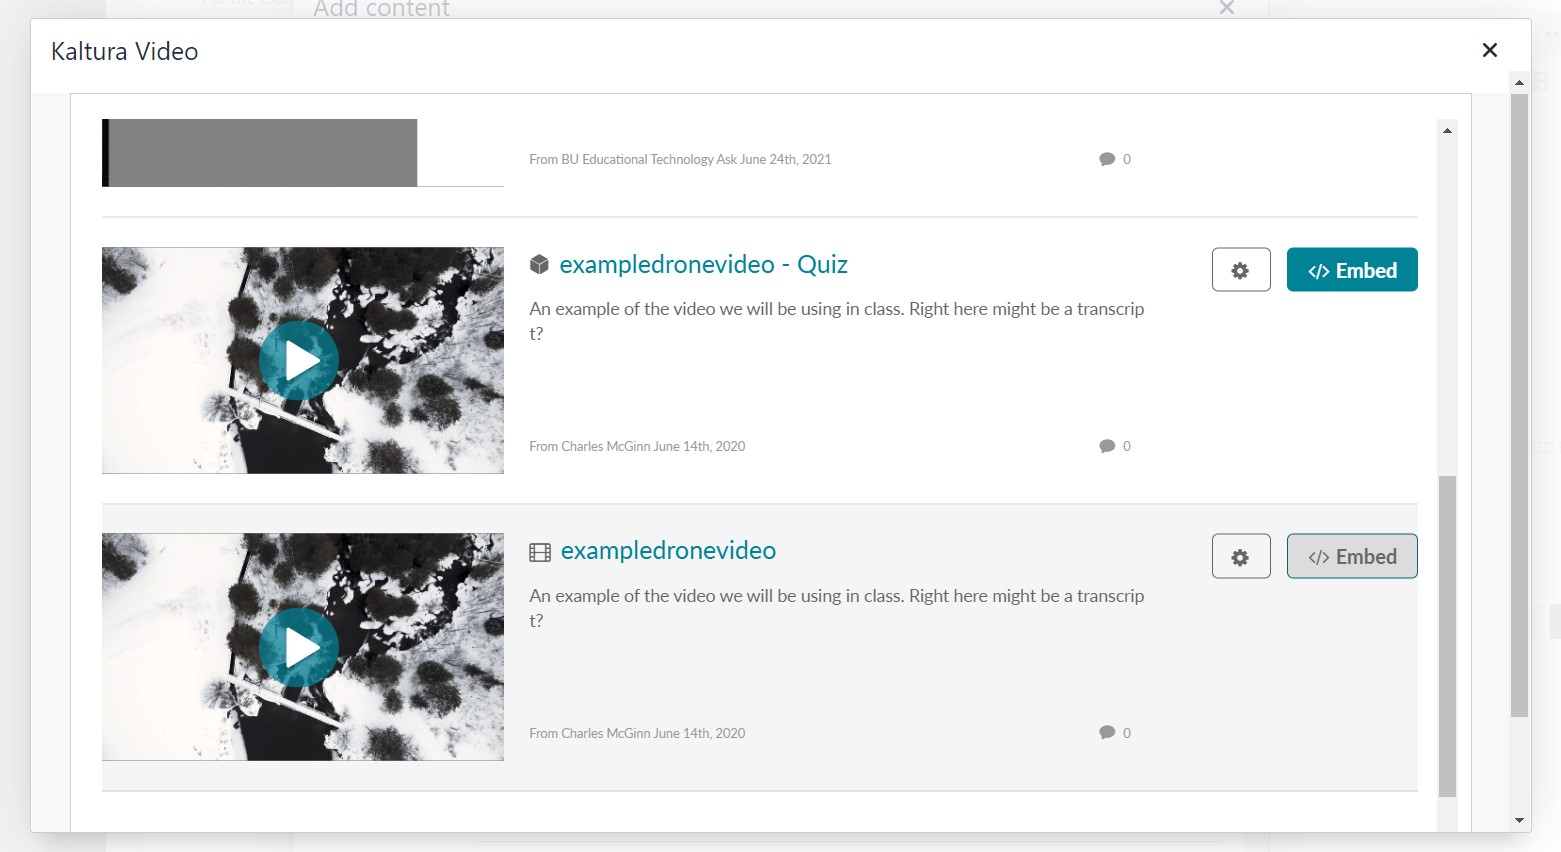
- On the page that appears, students can select existing media or upload a new video to select by clicking “Add New” and then “Media Upload“. To attach the video to the assignment, students must click the Embed button. The previous steps can be repeated if additional media needs to be attached to the assignment submission.
- Click “Write Submission“, use the Add Content (+) button inside of the editor, and find Kaltura Video in the list to open the MyMedia Repository.
Insert Videos into Discussion Board Posts
Including a video as part of an post or reply to a discussion board on Blackboard can be useful for getting feedback on the video or facilitating discussion on visual content.
- Login to Blackboard with your BU username and password.
- Select Courses in the left-side navigation bar.
- Open your course from the list of courses and use the left side navigation to go to the Discussions page.
- From within an existing discussion board, students and faculty can click “Create Thread” as they would to normally create an post to the discussion board.
- Inside of the thread, to include a video in the discussion board post, click inside the Message box to show the editor tools. Use the Add Content (+) button inside of the editor, and find Kaltura Video in the list to open their MyMedia Repository.

- On the page that appears, select existing media or upload a new video to select by clicking “Add New” and then “Media Upload“. To attach the video to the post, click the Embed button.
- The media should appear inside the Message box alongside any other text or content already there.

- Clicking the Submit button creates the thread with the video that can be played by others within the discussion board while viewing that post.
To include a video in a reply to a thread, the same procedure is used as above after clicking the Reply button under the content of the post.
Adding a MyMedia Video Quiz as Course Content
Once you’ve created a MyMedia Video Quiz, you can then access your MyMedia Repository from within your Blackboard Ultra course to add video quizzes as standalone items in your course or implement into an assessment.
- Login to Blackboard with your BU username and password.
- Select Courses in the left-side navigation bar.
- Open your course from the list of courses and navigate to the Content page.
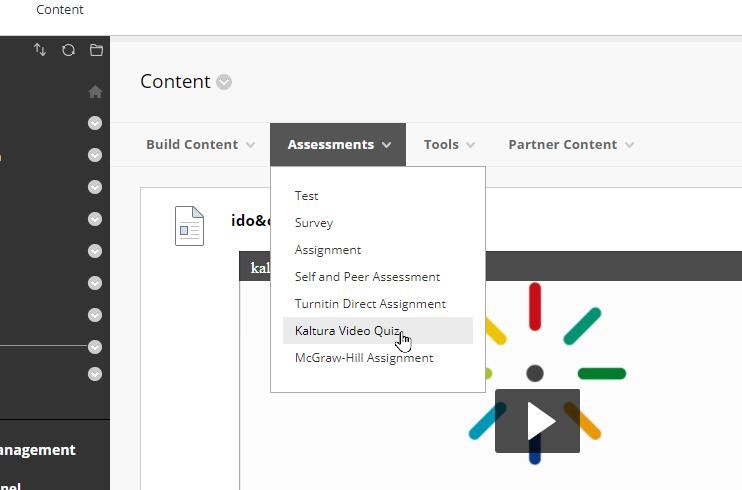
- At the top of the page under “Content” select the Assessments dropdown menu and select Kaltura Video Quiz.
- This will open up a panel of your MyMedia Repository, where you can embed videos and video quizzes that you have already made or you can create a new one by clicking “Add New” and following the steps above.
- Clicking the Embed button to the right of any MyMedia items will insert the item where you clicked the plus sign in your Course Content page.
Note: Following the above steps will automatically create a grade center grading column for this video quiz and grades will be automatically entered as students take the quiz. If you were to add your quiz using the “Add Content” feature of the Content Editor, a grading column will not be created.
Blackboard Ultra
Accessing MyMedia Repository in Blackboard
To get to the general MyMedia collection (called the MyMedia Repository) available to you in Blackboard:
- Login to Blackboard with your BU username and password.
- Click Tools in the left-side navigation bar.
- Select the MyMedia card from the list.
You can also access your MyMedia Repository from inside your Blackboard Ultra course.
- Login to Blackboard with your BU username and password.
- Select Courses in the left-side navigation bar.
- Open your course from the list of courses.
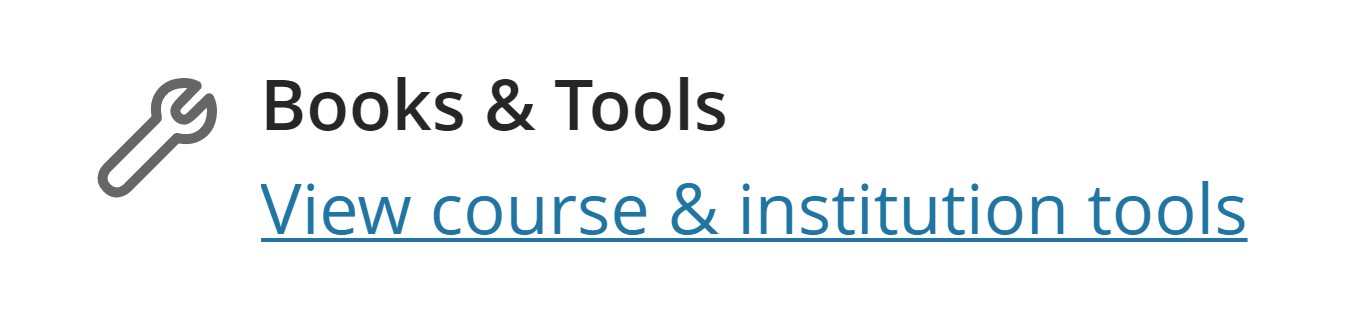
- Select “View course & institution tools” under Books and Tools in the Details & Actions section on the left.
- In the panel that opens on the right, scroll to the bottom and select “Browse all course tools”.

- In the panel that opens, scroll through the list of available tools and select the card that says Kaltura Video.
- This will open up a panel of your MyMedia Repository where you can access your videos and video quizzes or create new ones.
Adding MyMedia videos to Your Course
To add videos to your MyMedia Repository:
- Login to Blackboard with your BU username and password.
- Click Tools in the left-side navigation bar.
- Select the MyMedia card from the list.
- From within the MyMedia Repository, you will see a blue button at the top right that says “+ Add New”. Clicking this will show a dropdown of three options: Media Upload, Kaltura Capture, and Video Quiz.
- Select Media Upload to add videos to your course from your device.
- Drag and drop your file or select Choose a file to upload.
- Select a media file to upload and click Open.
- While the file is uploading, on the Upload Media page you can:
- Enter metadata information about the media.
- Click Cancel to cancel the upload.
- Click Choose another file to upload additional files.
You can then access your MyMedia Repository from within your Blackboard Ultra course to add videos that you can provide to your students or implement into an assessment.
- Login to Blackboard with your BU username and password.
- Select Courses in the left-side navigation bar.
- Open your course from the list of courses.
- Select “View course & institution tools” under Books and Tools in the Details & Actions section on the left.
- In the panel that opens on the right, scroll to the bottom and select “Browse all course tools”.
- In the panel that opens, scroll through the list of available tools and select the card that says Kaltura Video.
- This will open up a panel of your MyMedia Repository, where you can embed videos that you have already made or you can create a new one by clicking “Add New” and following the steps above.
- Clicking the Settings Gear opens up the Embed Settings for your media selection. Here you can choose the size of the embedded video (400×285, 304×231, 720×576) in the course, set a thumbnail preview, choose a start time other than 0:00, and save the settings as default.
- Clicking the Embed button to the right of any MyMedia items will insert the item at the bottom of your Course Content page.
You can also insert a video by directly adding content in the Course Content page as you would with other content.
- Login to Blackboard with your BU username and password.
- Select Courses in the left-side navigation bar.
- Open your course from the list of courses to access its Course Content page
- Hover above or below the item where you would like your video to be placed and select the plus sign that appears.
- Select Content Market from the list that appears.
- In the Content Market panel that opens, scroll through the list of available tools and select the card that says Kaltura Video.
- This will open up a panel of your MyMedia Repository, where you can embed videos that you have already made or you can create a new one by clicking “Add New” and following the steps above.
- Clicking the Settings Gear to the right of any MyMedia items opens up the Embed Settings for your media selection. Here you can choose the size of the embedded video (400×285, 304×231, 720×576) in the course, set a thumbnail preview, choose a start time other than 0:00, and save the settings as default.
- Clicking the Embed button to the right of any MyMedia items will insert the item where you clicked the plus sign in your Course Content page.
Adding a Media Gallery to Your Course
You can create a Media Gallery by accessing your MyMedia Repository from within your Blackboard Ultra course.
- Login to Blackboard with your BU username and password.
- Select Courses in the left-side navigation bar.
- Open your course from the list of courses.
- Select “View course & institution tools” under Books and Tools in the Details & Actions section on the left.
- In the panel that opens on the right, scroll to the bottom and select “Browse all course tools”.
- In the panel that opens, scroll through the list of available tools and select the card that says Kaltura Media Gallery.
- This will open up a panel of your Kaltura Media Gallery, where you can add media from your MyMedia Repository by clicking “Add Media” and selecting which items you want to include in the gallery for students.
- The Kaltura Media Gallery will now be available to students at the bottom of the Course Content page.
You can also insert a Media Gallery by directly adding it in the Course Content page as you would with other content.
- Login to Blackboard with your BU username and password.
- Select Courses in the left-side navigation bar.
- Open your course from the list of courses to access its Course Content page
- Hover above or below the item where you would like your video to be placed and select the plus sign that appears.
- Select Content Market from the list that appears.
- In the Content Market panel that opens, scroll through the list of available tools and select the card that says Kaltura Media Gallery.
- This will open up a panel of your Kaltura Media Gallery, where you can add media from your MyMedia Repository by clicking “Add Media” and selecting which items you want to include in the gallery for students.
- The Kaltura Media Gallery will now be available to students where you clicked the plus sign on the Course Content page.
Creating an Assignment for Student Video Submissions
Similarly to other gradable items in Blackboard Ultra courses, you are able to create assignments that allow students to submit their own videos using the MyMedia system.
- Login to Blackboard with your BU username and password.
- Select Courses in the left-side navigation bar.
- Open your course from the list of courses to access its Course Content page
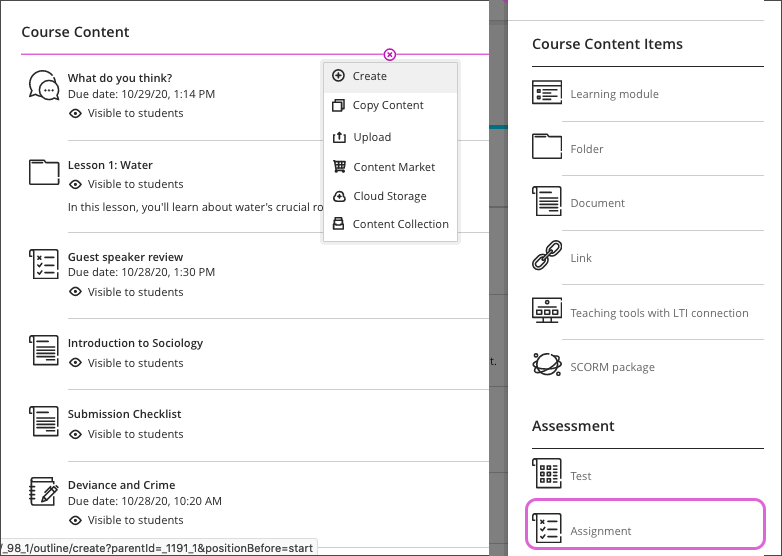
- Hover above or below the item where you would like your video to be placed and select the plus sign that appears.
- Select Create from the dropdown menu and then select Assignment from the sidebar list of content items.
- Upon creating this new assignment, you may customize what displays on your assignment page and change a variety of settings. Visit the Creating Content for Blackboard Ultra Courses tutorial page for more information on these controls.
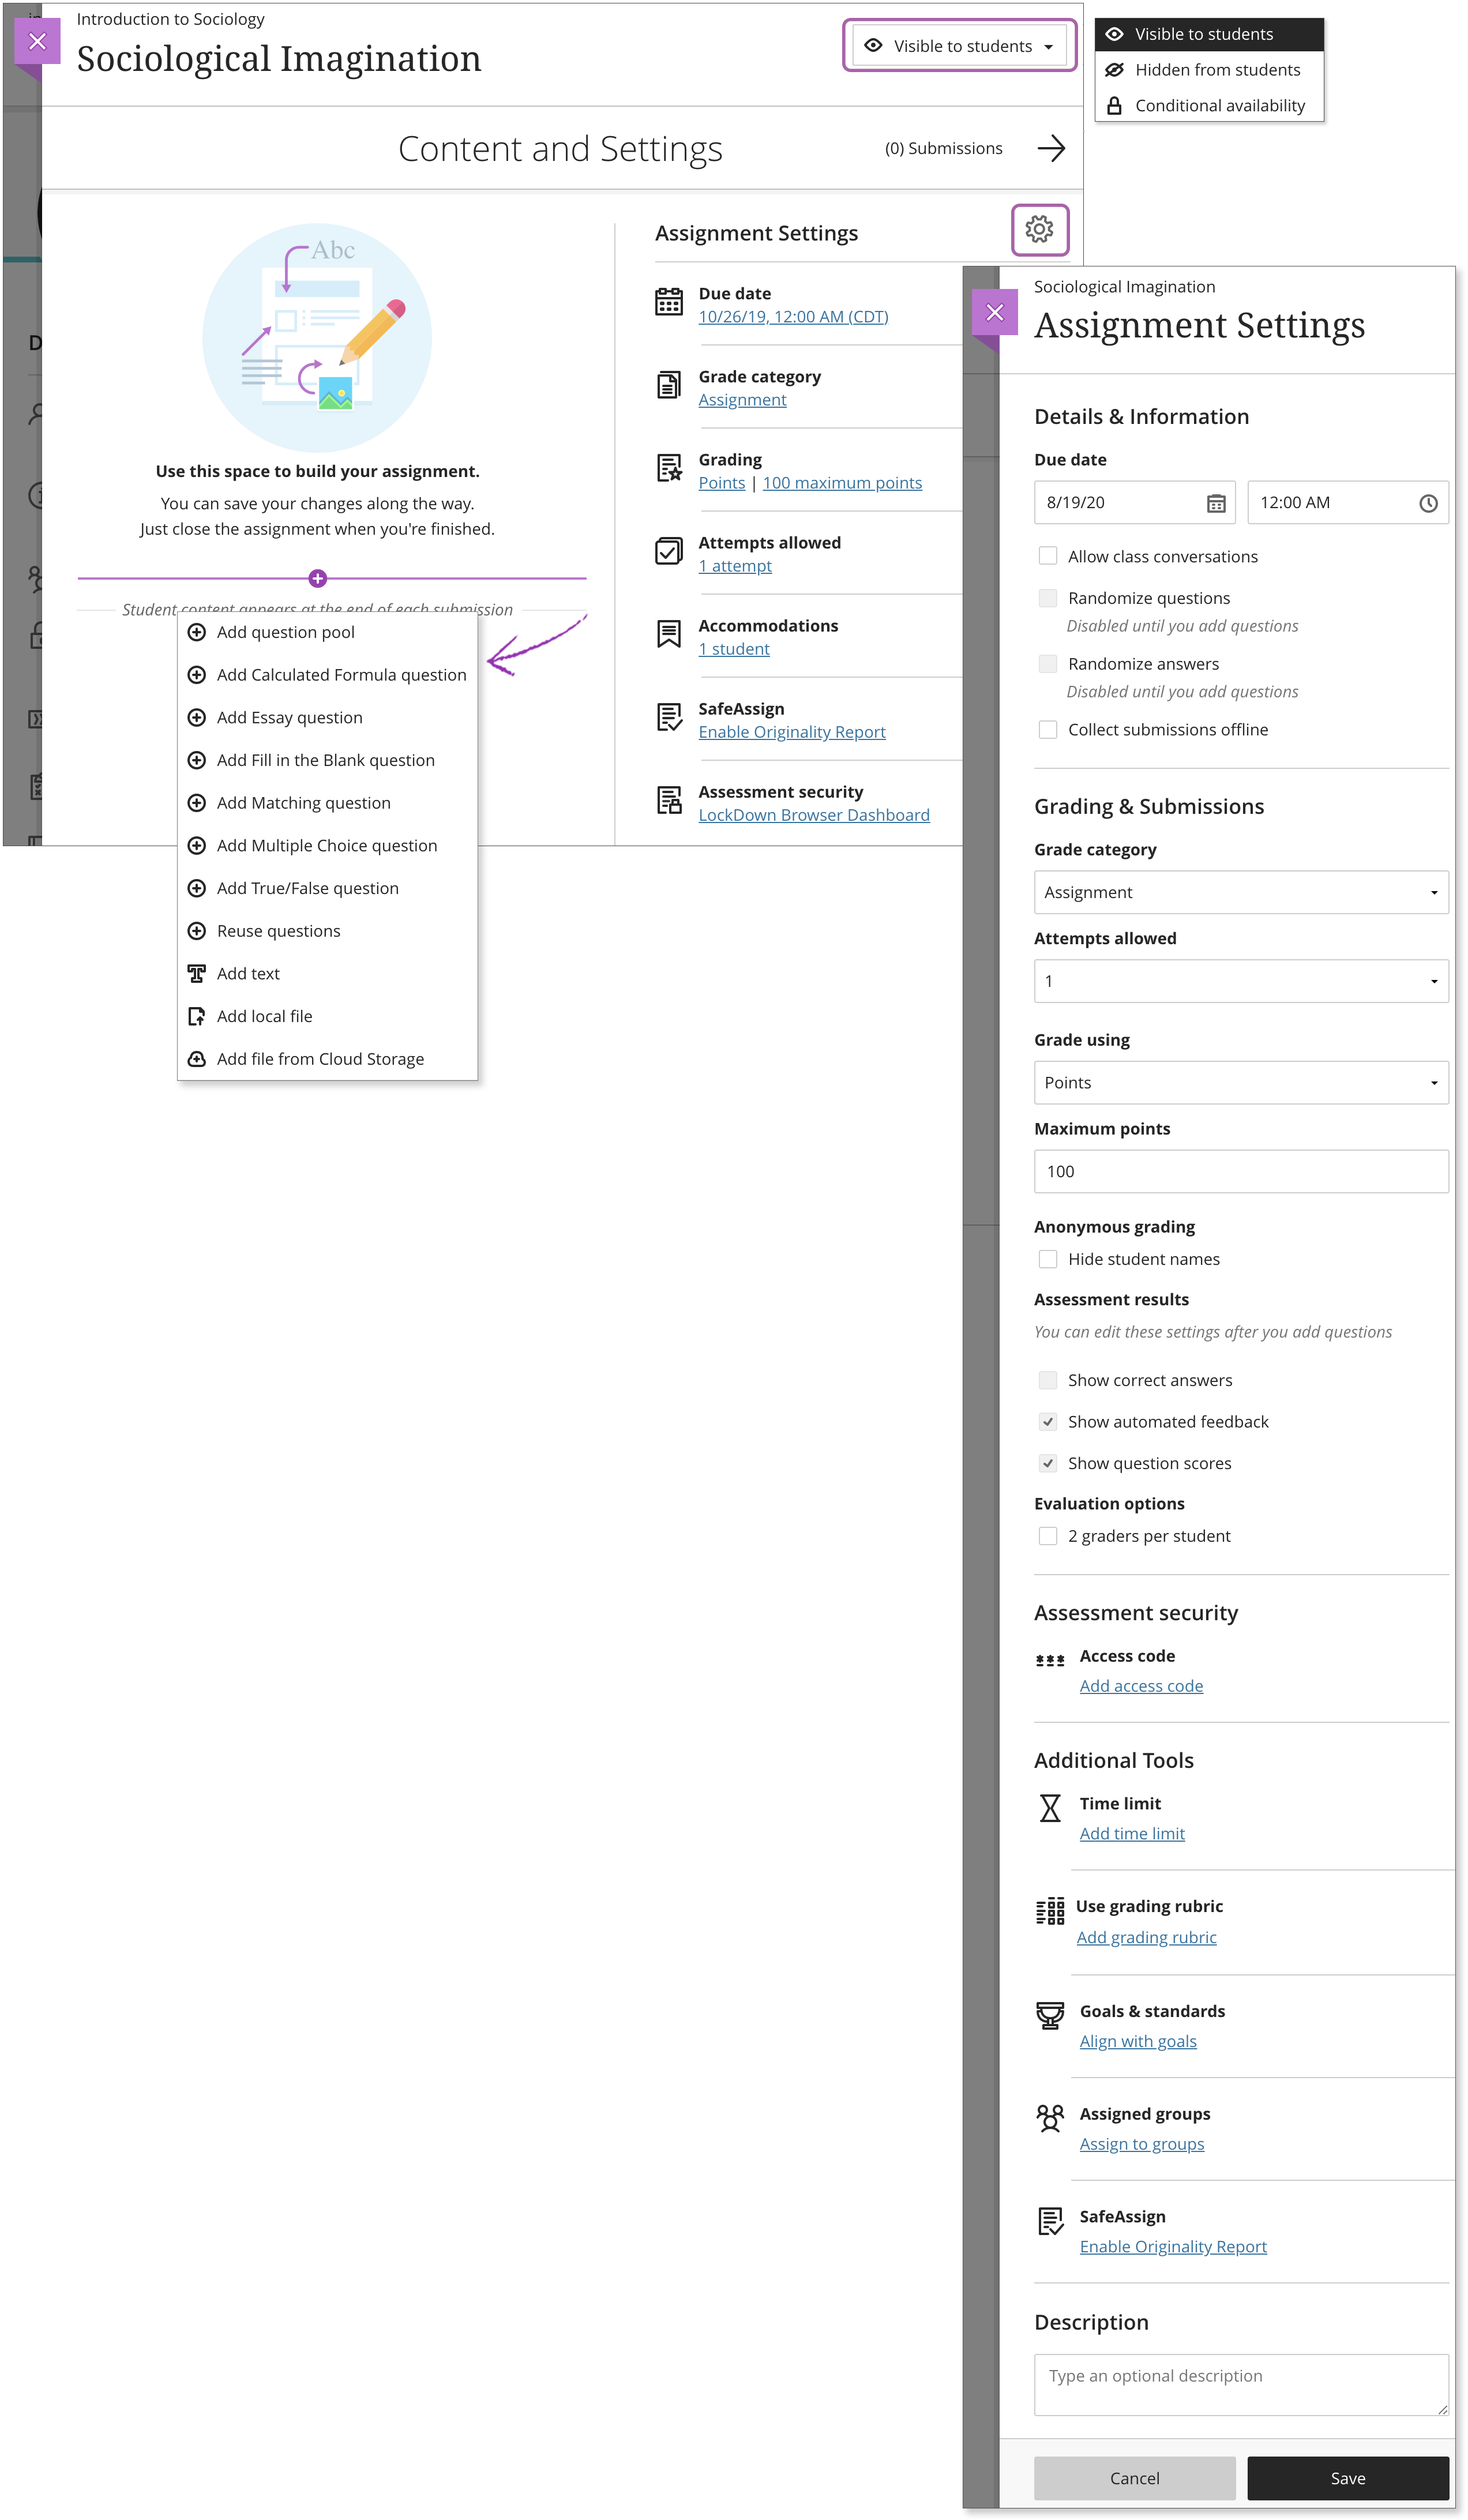
- Assignments automatically allow open-ended submissions for students, so as soon as the assignment’s page content is satisfactory (including directions for students, context, graphics, etc) the assignment can be made visible to students and they will be able to add MyMedia content to their submissions.
Upon opening the assignment, students are able to select the Add Content button that appears at the bottom of the page to start the process of adding a video to their submission.
- In the new content editor that opens, students must select the Plus button on the right side of the top tool bar to open the menu of content items they can insert.
- The student must then choose LTI Item from the menu, which opens the Content Market of content items.
- Then selecting Kaltura Video will open up the MyMedia media repository.
- The repository that students see is identical to the interface that instructors see. To add the video that they want to submit, the student must click Embed on an existing video or select Add New to upload a new video that can be embedded.
- The student is then brought back to the assignment page where they can view the embedded video and choose to Submit the assignment.
Insert Videos into Discussion Board Posts
Including a video as part of an post or reply to a discussion board on Blackboard can be useful for getting feedback on the video or facilitating discussion on visual content.
- Login to Blackboard with your BU username and password.
- Select Courses in the left-side navigation bar.
- Open your course from the list of courses and on the Course Content page either click on an existing discussion or create a new one the same way you would add other content (clicking the “+” button and select Create to make a discussion board).
- You can also click “Discussions” in the navigation bar at the top of your Blackboard course to see all existing discussion boards.
- Inside of the discussion board, you and your students can enter responses to the discussion board topic by clicking the “Type a response” box underneath Responses. Once you start your response, you can use the content editor just like you would in other forms of content to add MyMedia videos.
- Click the “+” symbol on the right side of the editing tools bar to insert additional content. A dropdown will appear.
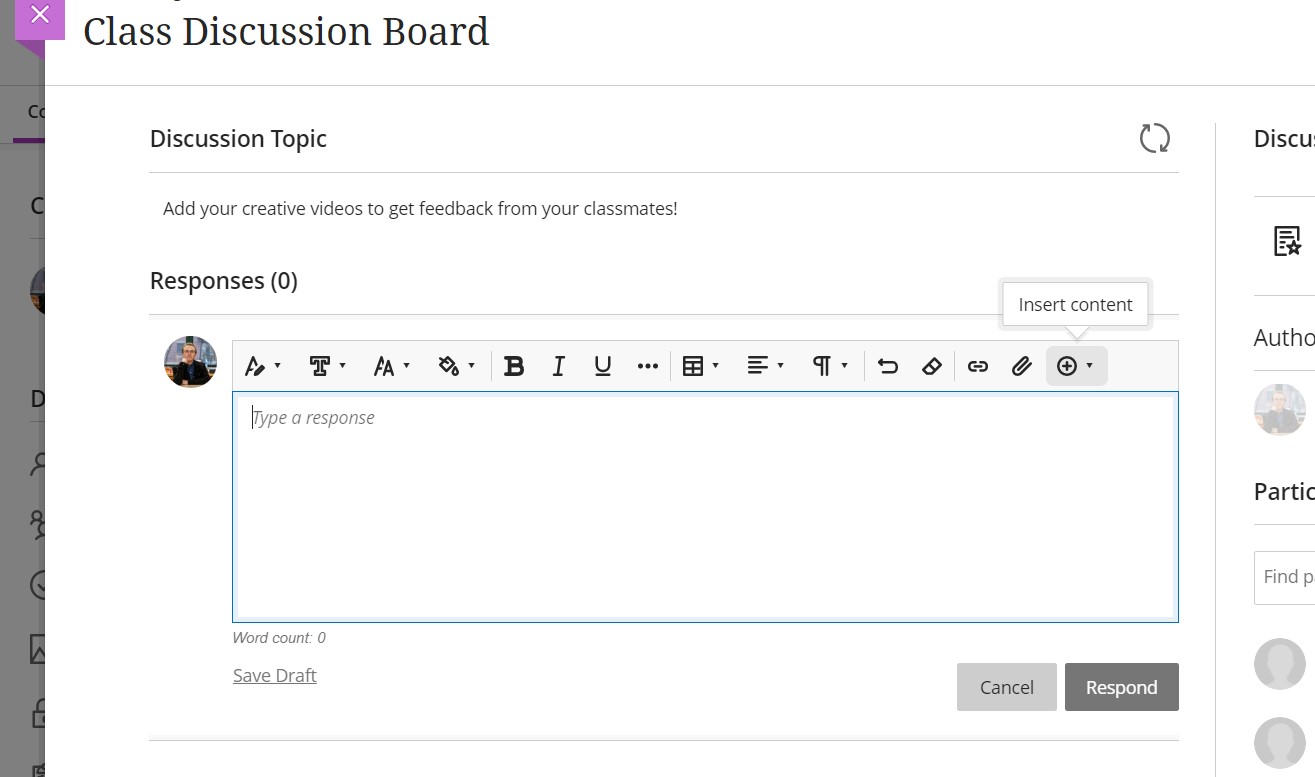
- From the dropdown, click Content Market at the bottom of the list. This should open the Content Market panel with a variety of LTI items to choose from.
- Scroll until you find Kaltura Video and select that.
- On the page that appears, select existing media or upload a new video to select by clicking “Add New” and then “Media Upload“. To attach the video to the post, click the Embed button.
- Click the “+” symbol on the right side of the editing tools bar to insert additional content. A dropdown will appear.
- The media should appear inside the Message box alongside any other text or content already there.
- Clicking the Respond button posts the response with the video that can be played by others within the discussion board while viewing that post. Clicking “Save draft” instead saves the response draft that you can return to later to post if you aren’t ready to post your response yet.
Replies to responses can also have media attached to them: the same procedure is used as above after clicking the Reply button under the content of the response.
Adding a MyMedia Video Quiz as Course Content
Once you’ve created a MyMedia Video Quiz, you can then access your MyMedia Repository from within your Blackboard Ultra course to add video quizzes as standalone items in your course or implement into an assessment.
- Login to Blackboard with your BU username and password.
- Select Courses in the left-side navigation bar.
- Open your course from the list of courses.
- Select “View course & institution tools” under Books and Tools in the Details & Actions section on the left.
- In the panel that opens on the right, scroll to the bottom and select “Browse all course tools”.
- In the panel that opens, scroll through the list of available tools and select the card that says Kaltura Video Quiz.
- This will open up a panel of your MyMedia Repository, where you can embed video quizzes that you have already made or you can create a new one by clicking “Add New” and following the steps above.
- Clicking the Settings Gear button to the right of any MyMedia items opens the Embed Settings for your media selection. Here you can choose the size of the embedded video (400×285, 304×231, 720×576) in the course, set a thumbnail preview, choose a start time other than 0:00, and save the settings as default.
- Clicking the Embed button to the right of any MyMedia items will insert the item at the bottom of your Course Content page.
You can also insert a video by directly adding content in the Course Content page as you would with other content.
- Login to Blackboard with your BU username and password.
- Select Courses in the left-side navigation bar.
- Open your course from the list of courses to access its Course Content page
- Hover above or below the item where you would like your video to be placed and select the plus sign that appears.
- Select Content Market from the list that appears.
- In the Content Market panel that opens, scroll through the list of available tools and select the card that says Kaltura Video.
- This will open up a panel of your MyMedia Repository, where you can embed videos and video quizzes that you have already made or you can create a new one by clicking “Add New” and following the steps above.
- Clicking the Settings Gear button to the right of any MyMedia items opens the Embed Settings for your media selection. Here you can choose the size of the embedded video (400×285, 304×231, 720×576) in the course, set a thumbnail preview, choose a start time other than 0:00, and save the settings as default.
- Clicking the Embed button to the right of any MyMedia items will insert the item where you clicked the plus sign in your Course Content page.
Additional Support
Further questions? Explore Kaltura’s Knowledge Center or submit a help ticket.