AV in Conference Rooms
For use in CDS Conference Rooms:
1324, 1424, 1526, 1635, 1646, 1700, 1701
First, Find the Touch Screen which is on the Wall Nearest to the Projector. In Room 1646 the Touch Screen is on the wall adjacent to the main entry door.
Start by tapping anywhere on the touch screen to wake up the system.
Select “Computer Sources” from the bottom row, and choose whether you will connect via HDMI (Laptop) or Wireless. Once you choose, the projector screen will come down.
If you are connecting via HDMI/ Laptop (This is required for Room Camera and Sound):
- Start by tapping anywhere on the touch screen to wake up the system.
- Select “Computer Sources” from the bottom row, and choose “Laptop”, so that you can connect via the provided HDMI on the conference room table.
- Once you select “Laptop”, the projector screen will come down.
- You should see the following screen until your laptop is connected via the provided HDMI cord.

- Plug in your laptop using the HDMI cord on the table, the connection is sometimes slow so be patient, you will soon see the screen change to your desktop.
- If you intend to use the room Camera or Audio system, please also plug in the provided USB cable.
- Once connected, you should see your laptop screen on the projection.
If you run into any trouble please text or call Rachelle Regan at 857.283.6483; or send a Teams message (rmregan@bu.edu) so that I can find help.
Do not attempt to move, unplug, or change the location of any cables!
Please Note:
Should you require sound or video for remote attendees or recording, please connect your laptop via USB using the provided cable for Audio/Camera, next to the HDMI Cable for Visual. Once you start the Zoom session, for sound input and output choose TesiraFORTE. For Video, choose Easy IP Decoder.
If you are connecting via Wireless (Instructions for Mac Users):
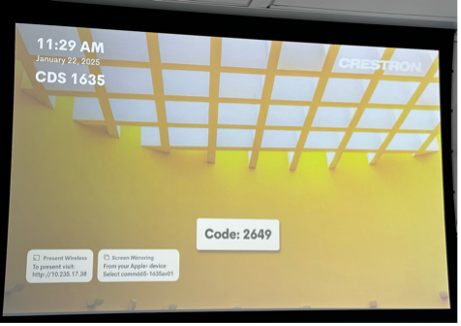
You should see the screen in the photo below –

If not, please tap Laptop on the touch screen and then tap Wireless again to reset the system for the desired connection.

Open any internet browser, and type in the http address showing in the bottom left corner under “Present Wireless”
Once the Crestron Air Media website loads, it will detect whether Air Media is already installed on your computer, if not click download. If Air Media is already installed, skip ahead.
Once downloaded, find the file, and open the .dmg file, and then open the Crestron Air Media file.
A prompt will ask for a 4-digit code that will show on the screen. Once the code is recognized, a new prompt will show you how to complete connection through AirPlay or Screen Mirroring.

Find the icon that looks like two bars, with a dot at either end of each bar 
Click this to bring up screen mirroring settings.
Click on screen mirroring and then on the screen shown on the prompt within screen mirroring. You should now be connected.
If you are connecting via Wireless (Instructions for Lenovo Users):
You should see the screen in the photo below –
If not, please tap Laptop on the touch screen and then tap Wireless again to reset the system for the desired connection.
Open any internet browser, and type in the http address showing in the bottom left corner under “Present Wireless”
Once the Crestron Air Media website loads, it will detect whether Air Media is already installed on your computer, if not click download. If Air Media is already installed, skip ahead.
Once downloaded, find the file, click keep and then open the file from downloads (if you get an error here or request for admin password, skip this step and just open the file
Choose “Ask Me” for the Session Delegation Prompt

A prompt will ask for a 4-digit code that will show on the screen. Type in the code in click connect.
When you see a prompt for Windows Security, asking “Do you want to allow public, private and domain networks to access this app? Click Cancel, this step is unnecessary.
You are now connected.
Additional Notes:
Should you need adapters, or additional help, please do not touch any of the cables, instead call or text Rachelle Regan at 857.283.6483 for assistance.
Should you require sound, please connect your laptop via USB using the provided cable for Audio/Camera, next to the HDMI Cable for Visual. Once you start the Zoom session, for sound input and output choose TesiraFORTE. For Video, choose Easy IP Decoder.
If you are using the room cameras, please connect your laptop via USB using the provided cable for Audio/Camera, next to the HDMI Cable for Visual. Adjust camera angle using touch screen on the wall.