AV Instructions ~ 1750
Projection (West Projection Screen is Currently Broken):
Start by locating the touch screen for controls which is on the wall at South West Corner. Tap anywhere on the touch screen to wake up the system. You will see the following screen:

First you need to Select the Source in order to have the desired screens and projectors come down from the ceiling. For HDMI connection you will be choosing from the Floor Boxes at the west end of the room or the Wall Plate at the East end of the room. The left Floor Box is near the south west entry doors, and the Right Floor Box is near the North West windows. The Wall Plate is on the wall next to the South East entry doors. This choice depends on your room layout. For Wireless Connection, you will choose, Wireless 1. Please note: a BU connection to the Eduroam Wifi is required. Once these are chosen, the screen will look something like this:
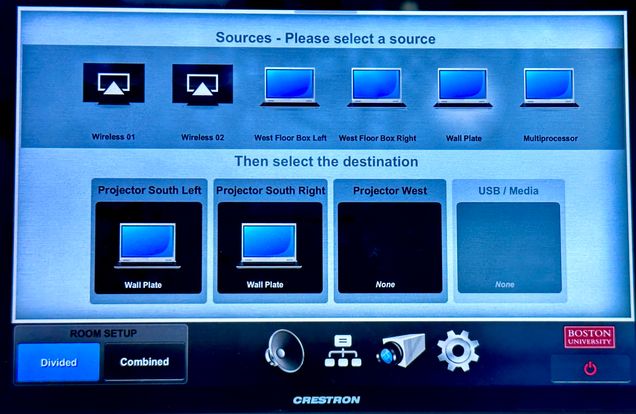
For the South Side Projectors, with the podium near the South West entry doors, you will choose West Floor Box Left. To select the Source, you will touch the logo for West Floor Box Left, and then touch Projector South Left; repeat the process for the second screen: touch the West Floor Box Left logo followed by Projector South Right. You will begin hearing/seeing the projectors come down as well as the screens. If for some reason a screen or projector does not come down, there are labeled remote controls in the AV closet, which is just outside the West entry doors to the left. The screen remotes are specific and labeled for each screen, the projector remotes go to any projector, just stand below it and point at the projector that is desired. It is the black closet on the right as you walk towards the catering kitchen. In this closet, you will also need to grab an HDMI cable.
The AV Closet is just outside of the West Entry Doors, in the hallway leading to the kitchen, it is 1st black door on the right. The closet should be open and unlocked – ask custodial person if not. 8 microphones available, on the shelf, lapel or hand held. HDMI + Assorted Cables and adapters are in buckets, or handing on microphone stand. Please make sure anything used for your event finds it's way back into the closet. The remotes for projection screens are hung on the wall, each goes to specific screen.
Microphones are on the shelf in the AV Closet and are pre-programmed to work with the Room Audio. Most of the time, you simply need to turn on the microphone you choose without further adjustment. If you do not hear sound at all, you can either try another one, or use the touch screen sound bar to check the volume. Microphones are labeled 1-8, and are coordinated as such in the touch screen for volume adjustment as needed.
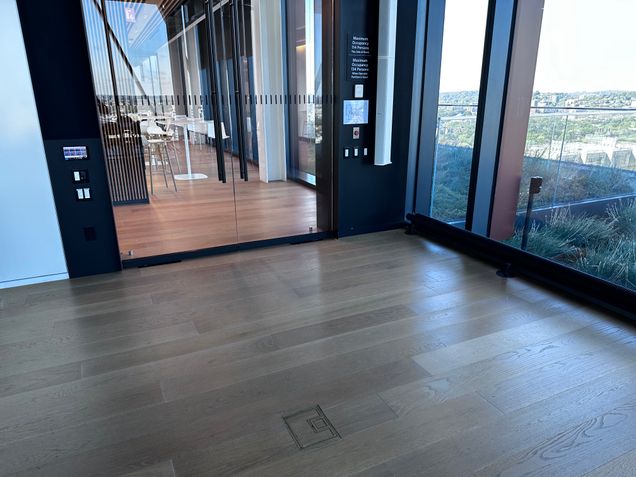
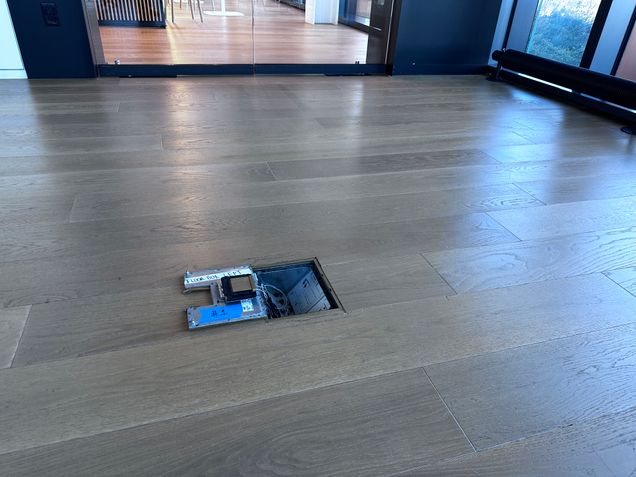
Once the projectors and screens are in place, and you have the HDMI cable, you need to plug it into the correct Floor Box. Floor Box Left is near the South West corner of the space; Floor Box Right is directly across the room (North West corner); and the Wall Plate is on the wall near the South East entry doors. See reference pictures below:
After connecting the HDMI cable into the floor box, connect to your laptop. Please keep in mind that some HDMI cables in the closet have a “Source” end that needs to be plugged into your laptop and a “Display” end that has to go into the Floor Box. Not every cable in the closet does this, but be sure to check based on the cable you choose. There is Gaffer tape also in the closet so that you can tape down any excess cable to avoid trips and falls by attendees or staff walking around.
Music Only:
Find the small silver wallplate to the right of the East entry glass door. By connecting your laptop to this wall plate with an HDMI cable (can be found in AV Closet), you will be able to play music from your laptop.
Shades:
The room has electronic shades controlled from the panel below the AV controls in the southwest corner. All shades run on the same system, with two sets: the top (ceiling to lighting beam) and the bottom (beam to floor).
Each set has two layers—light or blackout. Press a button once to raise or lower; no need to hold. For projection visibility while keeping the view, lower the top set fully and the bottom set halfway, pressing once to start and again to stop at the desired height. Labels indicate light vs. blackout and which set to adjust.
