| April 4, 2018 | BUworks Finance Newsletter | Volume 3 |
- Cash Credit Voucher (CCV) Process Replaced
- ZCASHUPLOAD Transaction Code
- Cashier Upload File
- Next Steps – Print, Backup, Cashier Services
- FAQs – Cashier Entry
- Tips & Tricks – Cashier Entry
In this month’s issue, we’ll again talk about the new SAP transaction code ZCASHUPLOAD – Cashier Upload file. We’ll discuss the entry process, who’s affected, the transaction entry and how to run and review the summary results.
Cash Credit Voucher (CCV) Process Replaced
The cashier transaction upload task replaces the Cash Credit Voucher (CCV) form and the legacy system entry process.
Department administrators responsible for processing and managing revenue transactions and custodians/alternates responsible for processing petty cash transactions should be familiar with this new process.
Go here for more information on the BUworks Cashier upload file process: https://www.bu.edu/tech/support/buworks/help/finance/buworks-cashier-upload-file/.
A user must have the Cashier Submitter Decentralized role (e.fi_cashier_submitter) and Department Submitter Decentralized role (e.fi.department_submitter) to perform the upload in the system.
Talk to your supervisor and DSA (Departmental Security Administrators) to obtain the necessary roles. If you are not sure who your DSAs is, click here to access a listing and more information on DSAs.
ZCASHUPLOAD Transaction Code
You must have the two roles listed above to upload the file into the system. The transaction code ZCASHUPLOAD is located within the “cashier submitter decentralized role.” Two additional transaction codes are assigned to the role: FB03 – Display Finance Document and FBV3 – Display Parked Document.
The entries made through ZCASHUPLOAD are recorded in the University’s accounting system and routed to Cashier Services for approval. Cashier deposit transactions are coded as Document Type “YC” in SAP WebGUI ECC system.
To access the transaction code follow the menu path below:
Menu Path: BUworks Central Portal –> WebGUI tab –> ECC system –> Cashier Submitted Distributed role –> ZCASHUPLOAD – JV Upload for SAP transactions
Go to WebGUI tab within the BUworks Central Portal, then click on the link ECC system to the left of your screen window. A new window “SAP Easy Access – SAP Menu or User Menu will appear. Make sure you are on the “User Menu“, this will allow you to access your assigned roles.
Locate the “Cashier Submitter Distributed” folder to access ZCASHUPLOAD transaction code. Double click on the transaction code and a new window will appear. Your screen should look like the screenshot below captioned “SAP Easy Access – User Menu – role and technical name displayed.”
After opening the folder you may only see the description of the transaction code. The system defaults to only displaying the description and not the transaction code (technical name).
To add the transaction code (technical name), click on the Menu button, locate and highlight Extras and click on Settings. A new window will display, check off the the box labeled “Display Technical Names” and click on the Green Check Mark button o save the settings.
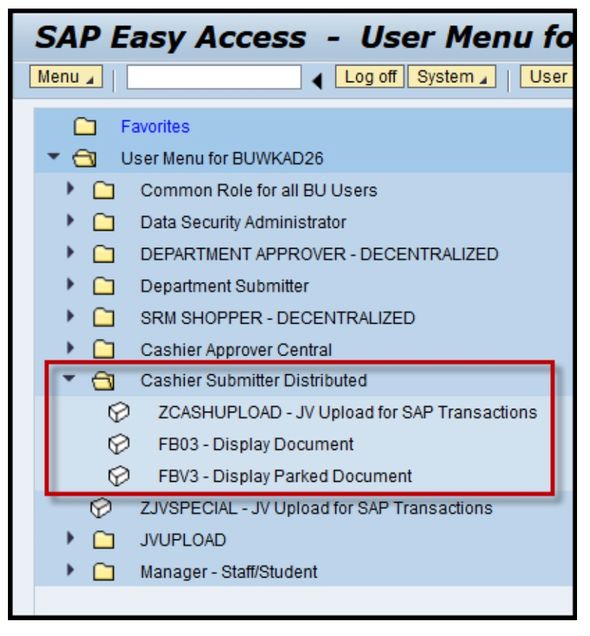
SAP Easy Access – User Menu – role and technical name displayed
If you’re interested in learning more on navigating within WebGUI ECC system and about the common Finance roles sign up for a upcoming training session here.
The BUworks Intro to WebGUI (Finance) training is a introductory training the course description is available here; http://www.bu.edu/phpbin/training/register/index.php?admingroup_id=22&course_id=1331
Cashier Upload File
First, the Cashier upload will need to be created. SAP WebGUI ECC system master data such as Cost Center, Internal Order, and GL accounts are required to be entered on designated cells in the Excel file (template). Additional data such as document “date”, header text, amounts, and line item text are also needed.
The Excel file is then saved as a tab-delimited (text) file and uploaded into the University’s accounting system using transaction code ZCASHUPLOAD.
To access the Template Instruction and sample Excel Template file click on the links provided

Here are some quick instructions on how to use the Excel template worksheet:
- Select the template that represents the type of cashier transaction you are making.
- Next, save a copy of the template file to your local drive. Enter a file name that will help you identify the cashier transaction.
- Then, enter your department’s required master data listed on “Row 1” of the Excel worksheet. The necessary data includes information such as GL Account, Cost Object (CC, IO or WBS), header description, line item description e.g.
- Then, delete “Row 1” of your Excel file and save the Excel file again The name can remain the same.
- The final step, save the file as a tab-delimited type. The name can remain the same. It is recommended you save to your local drive (desktop or document drive) for easy selection access.

You are now ready to access the transaction code ZCashUpload to upload the tab-delimited file you have just finished creating.
Detail instructions can also be found here: https://www.bu.edu/tech/files/2017/08/Cashier-Upload-Template-Instructions.pdf
Click on the drop down, locate your file and click Open button to upload into system. Make sure to click the box marked “Test Mode” before running the file. In the example screen shot, Internet Explorer is used to upload the file.
Please note, when using Firefox and Chrome browser you will need to import the tab-delimited file to your WebGUI File Browser (Z:\drive) to upload the file. Refer to the 2018 – Volume 1 – BUworks Finance Newsletter for more information on WebGUI File Browser Z:\ drive.
Next, click on the Execute button to upload the file into the system. Then review the system results.
- If no errors display, you are ready to upload the file to initiate workflow approval (without “test mode” box checked).
- If the results contain errors, access the “error” file and address and correct the entries, then resubmit again in “test mode” to confirm entries.
Error messages results for various reasons; the most common reason is due to entered master data, or non-formatted cell file data. Typically the error message will provide clues that tie back to the row or data field. Click on the button labeled “Display Errors” to view the message.
Next Steps - Print, Backup, Cashier Services
Print the entry and forward to Cashier Services, Metro Credit Union, or Bank of America to start the approval process. Follow the seven steps below to print the cashier transaction entry:
- Click on “Display successfully processed records” button.
- Click on the “Magnify Glass” Icon next to the Cashier document number.
- Go to the Menu button, select Document and click on Print Preview.
If necessary “Optimize width” to view print layout required for Cashier document entry.
Go to Menu button select Settings then Columns and click on Optimize Width. - Next, go to your internet browser print options.
- Make sure to change orientation to landscape to display entry in one page
- Print the document and attach your supporting documentation.
- Lastly, forward or walk over the printout and supporting documentation to Cashier Services, Metro Credit Union or Bank of America for Cashier Services approval.
FAQs - Cashier Entry
- What if I entered the wrong Internal Order or Cost Center number was entered and uploaded in the tab delimited file? The cashier entry can not be changed by the submitter, therefore you will need to add a note to the print out that will be submitted to Cashier Services for approval. They will be able to make the change on your behalf. When a change is made by Cashier Services, the submitter email notification will note the “Old Value XXXXXXX” and “New Value XXXXXX”.
- Is a notification sent once the cashier document number is assigned? The system generates a system notification message with the SAP Cashier Document number. Included in the notification is a summary of the upload entry; similar to the results displayed when clicking on the button labeled “Display successfully process records.” See screenshot below:
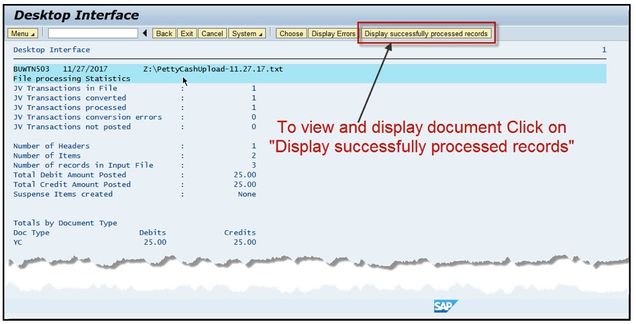
Display successfully processed records
If a changed was made by Cashier Services, on the body of the email notification “Old Value XXXXXXX” and “New Value XXXXXX” will display.
- After I’ve successfully uploaded the file, how do I look up the cashier document number in the WebGUI ECC system? Go to WebGUI ECC system to the cashier submitter role, then click on transaction code FB03 or FBV3 to display the entry. To look up the status of the approval workflow go to your Services for Object button, highlight Workflow and select and click on Workflow Overview status.

Service for Object (Magic) button

Information url view – pending approvers
Tips & Tricks - Cashier Entry
Before uploading the Text file (tab-delimited file):
- It is recommended for changes to be made to the Excel worksheet, to ensure the cell format is not jeopardized.
You will need to re-save the changed Excel file format to Text (tab-delimited) to upload. - Do not delete the first row (template row titles) on your original Excel entry file. It will help ensure you enter the appropriate master data in the correct cells.
- Save a copy of your Excel file for your records.
- Confirm the Excel worksheet cells are in the right format before saving to a tab delimited text file.
- Confirm the leading zeros did not drop when converting to text file .
- Place an ‘(apostrophe) before leading zero (i.e. ‘05092017 – MMDDYYYY or “005 – XXX
- Use NotePad++ to validate and confirm file format: https://notepad-plus-plus.org/.
Help Resources:
- To access the BUworks Cashier Upload File Help Website Content (view of transnational screenshots) click here or copy and paste the URL to your browser: https://www.bu.edu/tech/support/buworks/help/finance/buworks-cashier-upload-file/.
- To register for upcoming training sessions click here.
Contact Us: |
BUworks Finance Trainer Isabel Guillermo 1010 Commonwealth Ave, Suite 100 Boston, MA 02215 617-358-6829 iguiller@bu.edu |