Jump To:
Requirements and Limitations
- Automated captions are enabled by default for all Zoom hosts. See Enabling Automated Captions below for additional information.
- A meeting participant must start automated captions before they can be used. Any conversation produced prior to enabling the feature will not be transcribed.
- Automated caption transcripts will not automatically save with local recordings. You can save them manually, however. Cloud recordings will still generate transcripts as before.
- Automated captions may be generated in English or one of Zoom’s other supported languages. Only one language can be transcribed at a time.
- Translations are not available by default, but may be requested as a premium add-on. To learn more about pricing, please contact us.
Enabling Automated Captions
Automated captions are enabled by default for all meeting hosts. If you wish to verify this setting or turn it off, you may do so at any time by following these steps:
-
- Log in to Zoom Meetings using your BU Login.
- Click the “Settings” link, located on the sidebar to the left of the page.
- Scroll down to “In-Meeting (Advanced)” and locate the “Automated captions” option.
- Turn the Automated captions setting on by clicking the slider, if necessary.
- Check “Allow live transcription service to transcribe meeting automatically,” then click “Save.”

This setting takes effect at the start of your next meeting. Any ongoing meetings must be restarted before captions is available.
Additional Options
In addition to the above option, Zoom allows you to customize your caption and transcription access extensively. You can review the following options on the same page:
- Automated caption languages: Available languages can be added or removed as needed. This affects the list of languages presented when starting captions in a meeting.
- Allow only the following users to enable captions for the meeting: All participants can start captions by default. You can use this option to limit this privilege to hosts and co-hosts only.
- Full transcript: Toggling this option controls whether participants are allowed to see the live meeting transcript. This must be enabled for captions to be saved.
- Save Captions: Allow participants to save the meeting transcript to a file. This can be adjusted to all participants, internal participants, hosts, or hosts and co-hosts to save transcripts as needed. Transcripts must be saved manually.
Starting Automated Captions
Once your meeting has started, participants may start captions at any time. Until it has been started by a participant, captions and the transcript will not be generated.
- From the meeting control bar, click the “Show Captions” button.
- Select the meeting’s language, then click Save. Zoom will begin captioning the meeting immediately.
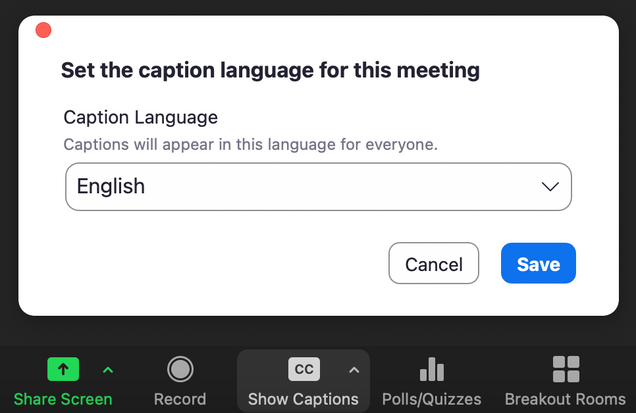
Meeting participants will see a notice that captioning has been enabled. They can view captions as well by clicking the “Show Captions” button.
Starting Captions Automatically
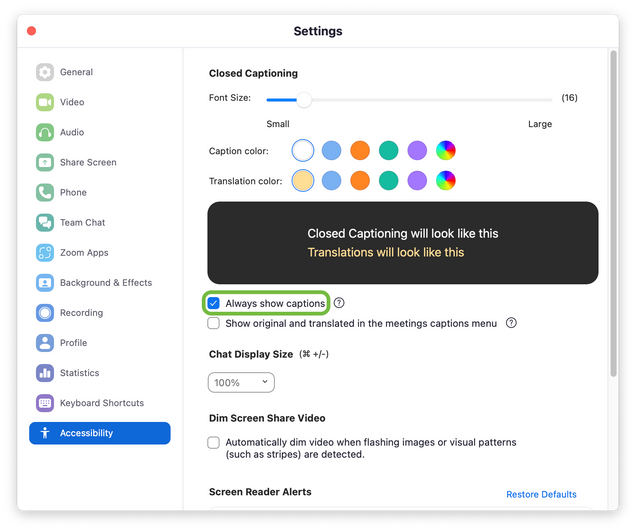
If you would like to always show captions in meetings you host or participate in, you can configure your Zoom app to show them by default.
- Open your Zoom app’s settings.
- Navigate to the Accessibility section and check “Always show captions.”
Viewing Transcripts
After captions have started, participants can view and export a full transcript depending on your settings.
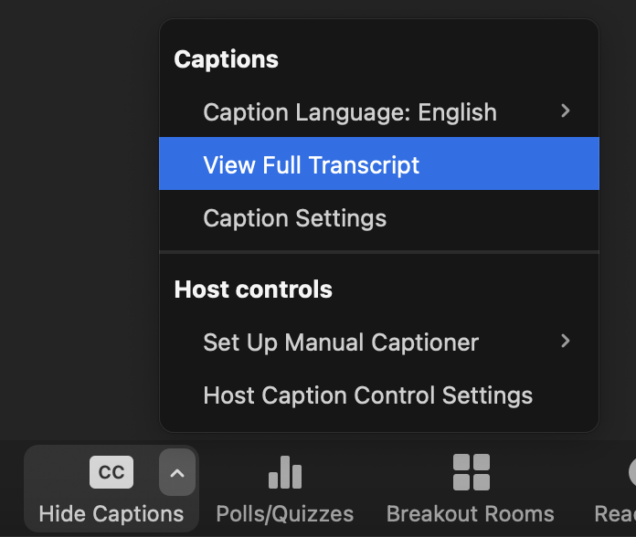
- Click the ^ icon at the top right of the “Show/Hide Captions” button in your meeting control bar.
- Select “View Full Transcript”
Suggestions for Improving Transcript Accuracy
Automated speech recognition (ASR) transcripts often have lower accuracy than those produced by a captioner. To get the most out of a machine-generated transcript, consider the following tips:
- Use a headset or dedicated microphone: Headsets, including the ones that come with most smartphones, or dedicated microphones produce clearer, louder audio than microphones built-in to a laptop. Higher quality speech input will result in more accurate transcripts.
- Take turns or pause between speakers: Zoom will attempt to identify the speaker in the transcript, but rapid or overlapping conversation may result in misattribution. Taking time between speakers can improve accuracy.
- Speak slowly: Speaking slowly can produce more accurate transcripts and allow readers to keep up with the pace of the meeting. Consider enabling Nonverbal Feedback so participants can indicate that they’d like the speaker to slow down.