| February 22, 2018 | BUworks Finance Newsletter | Volume 2 |
- Cashier Upload Process
- Cashier Upload Excel Template Worksheets
- ZCASHUPLOAD Transaction Code
- FAQs and Tips & Tricks – Cashier Upload Process
In this month’s issue, we’ll talk about the Cashier Upload workflow process. We’ll provide guidance on what the new process is, who’s affected, when to utilize it, where to access resources, the transaction code and how to complete the upload file.
Cashier Upload Process Roll-out
The Cashier Upload Process for deposits and petty cash made at Bank of America and Metro Credit Union are already implemented.
However, petty cash and deposit made at the Cashier Services window are not effective until Monday, March 26, 2018.
Recently, Cashier Services has reached out to departments to help users transition to the new process for training. Also, training sessions are scheduled and available. To register, please click here.
Department administrators responsible for processing and managing revenue transactions and custodians/alternates responsible for processing petty cash transactions should become familiar with this new process.
The appropriate roles are required to perform the task. A user must have the Cashier Submitter Decentralized role (e.fi_cashier_submitter) and Department Submitter Decentralized role (e.fi.department_submitter).
Talk to your supervisor and DSA (Departmental Security Administrators) to obtain the necessary roles. If you are not sure who your DSAs is, click here to access a listing and more information on DSAs.
Cashier Upload Process
The Cashier Upload file and workflow process replaces the Cash Credit Voucher (CCV) process which utilized our legacy (UIS/Walker) system. Please note, legacy accounting codes will be replaced with SAP accounting codes for all Cashier transactions.
The Cashier Upload file and workflow process is used to record and account for cash, check, credit card and petty cash transactions made to University accounts. The upload process imports accounting data into the General Ledger system for workflow approval and posting.
Cashier Upload Excel Template Worksheets
The BUworks journal entry upload functionality is utilized to import the cashier transaction data into the University General Ledger system.
The data is entered into an Excel spreadsheet in a specific layout, then saved as a tab-delimited file and uploaded using the BUworks WebGUI ECC system with transaction code ZCASHUPLOAD.
There are Excel template layout samples available to help you walk through the creation of the file.
The template layout examples are:
Charles River Campus
- Bank of America Deposit – Cash & Checks
- Bank of America Deposit – Cash, Checks, & Credit Cards
- Deposit at Cashier Services
- Petty Cash Replenishment
Medical Campus
- Metro Credit Union Deposit
- Petty Cash Replenishment
To access the Template Instruction and Excel Template file click on the links.
Here are some quick instructions on how to use the Excel template worksheet:
- Select the template that represents the type of cashier transaction you are making.
- Next, save a copy of the template file to your local drive. Enter a file name that will help you identify the cashier transaction.
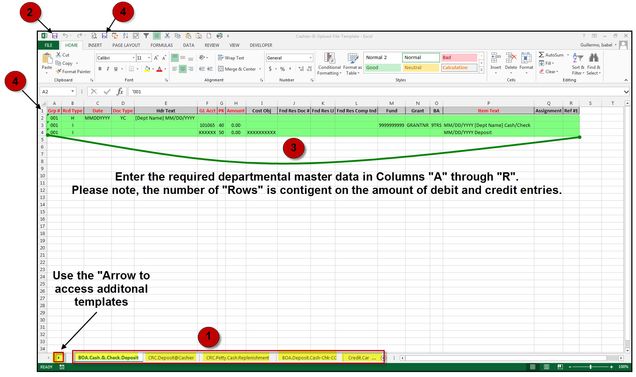
- Then, enter your department’s required master data listed on “Row 1” of the Excel worksheet. The necessary data includes information such as GL Account, Cost Object (CC, IO or WBS), header description, line item description e.g.
- Then, delete “Row 1” of your Excel file and save the Excel file again The name can remain the same.
- The final step, save the file as a tab-delimited type. The name can remain the same. It is recommended you save to your local drive (desktop or document drive) for easy selection access.
Please note, SAP accounting codes are required for uploading the file. If you are not sure of the SAP Cost Objects assigned to your department use the Account XWalk tool available on the BUworks Central Portal. For instructions on the Account XWalk tool, click here.

You are now ready to access the transaction code ZCashUpload to upload the tab-delimited file you have just finished creating.
For more detailed instructions click here, the instructions can also be found on the last worksheet of the Excel template.
ZCASHUPLOAD Transaction Code
The Cashier Submitter Decentralized role (e.fi_cashier_submitter) and Department Submitter Decentralized role (e.fi.department_submitter) are required to be able to access the transaction code necessary to upload the Cashier transaction file created.
If you don’t have the necessary roles, contact your DSA (Departmental Security Administrator) to have them request the role(s). To access a listing of DSAs and for more information on DSAs click here.
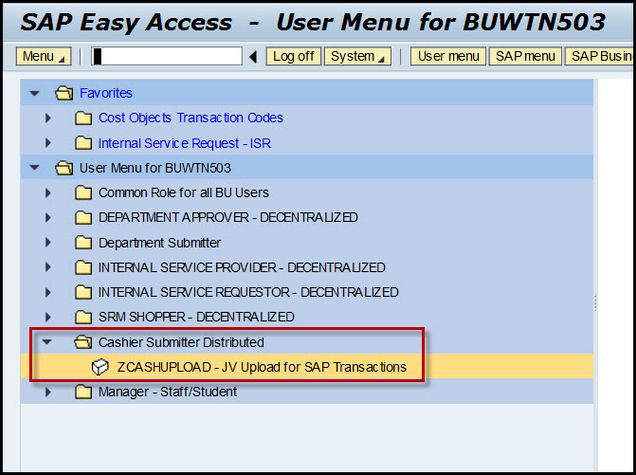
To access the transaction code follow the menu path below:
Menu Path: BUworks Central Portal –> WebGUI tab –> ECC system –> Cashier Submitted Distributed role –> ZCASHUPLOAD – JV Upload for SAP transactions
Go to WebGUI ECC tab within the BUworks Central Portal, then click on the Cashier Submitter Distributed folder to access ZCASHUPLOAD transaction code. Double click on the transaction code and a new window will appear.
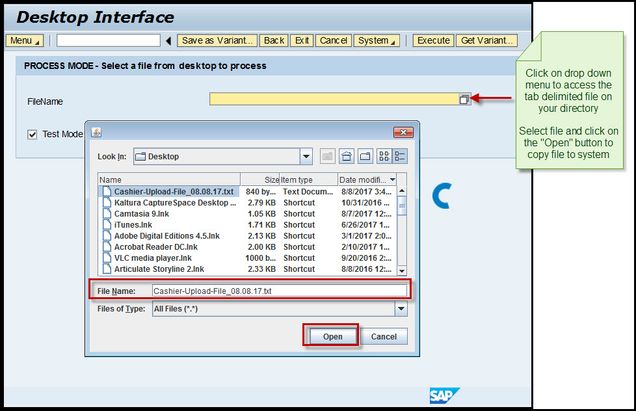
Click on the drop down, locate your file and click Open button to upload into system. Make sure to click the box marked “Test Mode” before running the file. In the example screen shot, Internet Explorer is used to upload the file.
Please note, when using Firefox and Chrome browser you will need to import the tab-delimited file to your WebGUI File Browser (Z:\drive) to upload the file.
Next, click on the Execute button to upload the file into the system. Then review the system results.
If no errors display, you are ready to upload the file to initiate workflow approval (without “test mode” box checked).
If the results contain errors, access the “error” file and address and correct the entries, then resubmit again in “test mode” to confirm entries.
An error message may result for various reasons; the most common reason is due to entered master data, title row not deleted or due to non-formatted cell file data. Typically the error message will provide clues that tie back to the row or data field.
FAQs and Tips & Tricks - Cashier Upload Process
- You mentioned, a typical error message is due to file formatted cells, how can I verify my file is in the right format? Use NotePad++ program to validate and confirm file format. To download the program go here: https://notepad-plus-plus.org/
- How do I access the cashier tab-delimited imported file? Use your Menu button to access WebGUI File Browser option. The file will appear on your Z:\ drive window screen.
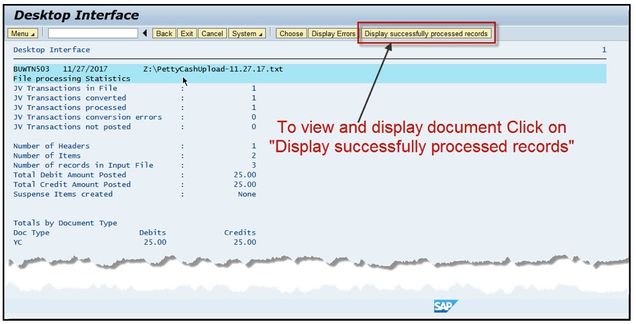
- After I’ve successfully uploaded the file, how do I retrieve the cashier transaction system assigned document number? Click on the button labeled “Display successfully processed records” to view the results and the document number. You can click on the “Magnify Glass” Icon next to the document number to view the cashier journal entry header and line item information and to look at the Workflow Overview status.
Contact Us: |
BUworks Finance Trainer Isabel Guillermo 1010 Commonwealth Ave, Suite 100 Boston, MA 02215 617-358-6829 iguiller@bu.edu |