Boston University implemented a new, more mobile-friendly online campus map in 2019. It has been designed specifically for the Charles River, Medical, and Fenway Campuses and features plenty of engaging, easy-to-use functionality. The map features include:
- three-dimensional renderings of each campus
- a more intelligent search function
- 360-degree views of select campus locations
- a filter accommodating multiple search factors
- accessibility and safety locations such as curb cuts, lactation rooms, and emergency call boxes
Ways to use BU Maps on your Website
Website editors at BU are encouraged to use the new maps on their BU websites. There are three ways to refer to BU maps from your BU website:
- Simply linking to your location on the new map.
- Embedding a static map for a single location.
- Embedding an interactive map for special use and/or multiple locations.
Linking to BU Maps
- Visit maps.bu.edu and use the navigation menu to find your location on the map.
- Select your location — the address will appear in the sidebar.
- Click the Share Location icon at the top of the sidebar. Share options will be displayed in a popup window.
- Copy the “Link to this Location” URL. Use that address to create a simple link to your location on the map.
The new maps application is at “maps.bu.edu” and old web addresses to “www.bu.edu/maps” should be replaced.
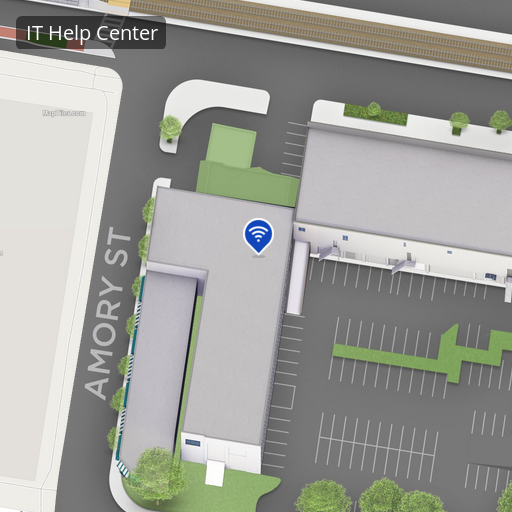
For example, here are old/new links to the IT Help Center:
OLD map: https://www.bu.edu/maps/?id=225
NEW map: https://maps.bu.edu/?id=647#!m/288657
Embedding a Static Map
Static Maps should always be used to highlight a single location.
- Visit maps.bu.edu and use the navigation menu to find your location on the map.
- Select your location — the address will appear in the sidebar.
- Click the Share Location icon at the top of the sidebar. Share options will be displayed in a popup window.
- Copy the “Link to this Location” URL. You will need information from this URL to create a static map link.
- Copy this basic static maps link:
https://staticmap.concept3d.com/map/static-map/?map=647&loc=<MARKER_ID>&scale=1&label=<LABEL_NAME>&zoom=19
- Replace <MARKER_ID> with the unique 6-digit number at the end of the link URL you copied in Step 4.
- Replace <LABEL_NAME> with text you want for the label on your map. Do not use word spaces — if you need a word space, use %20 (for instance: “IT%20Help%20Center” and not “IT Help Center”)
- If you do not want a label, delete &label=<LABEL_NAME> from the link.
- If you want the default label already associated with your location, simply 1) use &label in the URL and 2) delete =<LABEL_NAME>
- scale=1 indicates a standard width of 512px. If you need a wider map change to scale=2 for 1024px wide map, or scale=4 for 2048px wide map.
- zoom=19 is the standard zoom level. Adjust this accordingly to the zoom level you want (e.g. changing to zoom=20 will show a static map with your location zoomed in closer; zoom=18 will show an image zoomed further out, etc.
- Optional: after inserting the image into your web page, you can highlight the image and add a link to the image, so clicking the embedded static map would take your visitor to your location in BU Maps. (The map examples below are linking to the map.)
Examples for the IT Help Center:
https://staticmap.concept3d.com/map/static-map/?map=647&loc=288657&scale=1&label=IT%20Help%20Center&zoom=19
This produces a static map a) with a label; and b) standard zoom level of 19
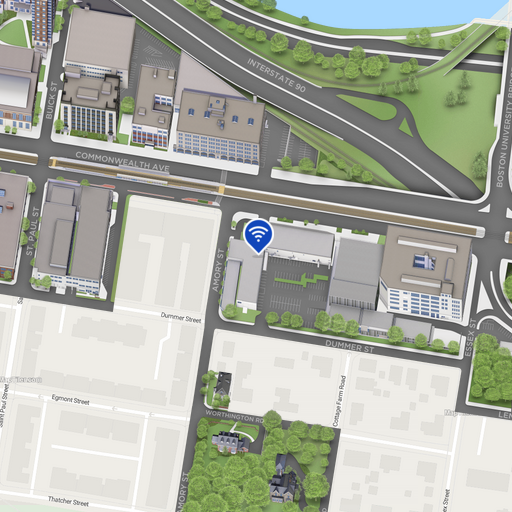
https://staticmap.concept3d.com/map/static-map/?map=647&loc=288657&scale=1&zoom=17
This produces a static map a) without a label; and b) zoomed out to level 17
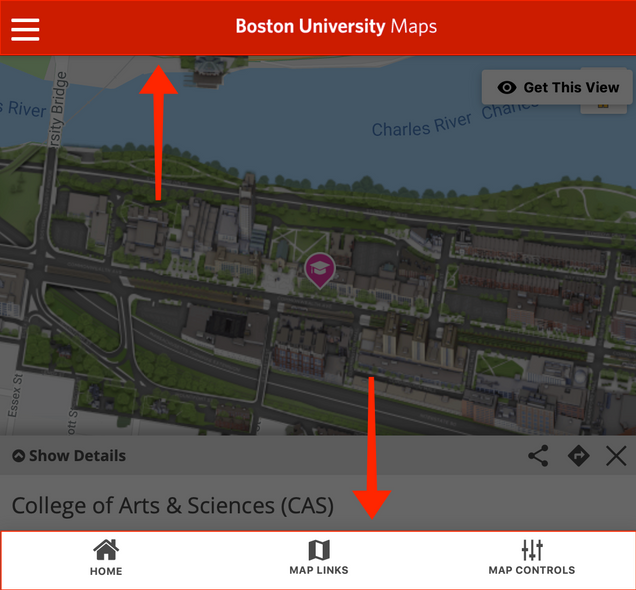
Embedding an Interactive Map
Embedding the full Interactive Map should only be done when you are highlighting multiple locations (e.g. map of all student housing) or in special use cases (e.g. map of commencement locations). The interactive map loads slower and takes up more bandwidth, so if you are highlighting only a single location, please use the instructions above to embed a Static Map instead.
- Visit maps.bu.edu and use the navigation menu to find your location on the map.
- Select your location — the address will appear in the sidebar.
- Click the Share Location icon at the top of the sidebar. Share options will be displayed in a popup window.
- Copy the “Embed on Your Website” code. This is HTML to embed an “iframe” on your site. Copy the entire block of code.
- In the “text editing” mode on your WordPress page, paste the entire embed code into the HTML in the location where you want the map on your page.
- Adjust the height of the map for it to display properly on your website. In the embed code you pasted into the content editor, change the height to a fixed pixel size rather than a percentage. For example, height = “500”.
<iframe width="100%" height="100%" ...
change to
<iframe width="100%" height="500" ..

- Save your changes and view the map on your site in a desktop web browser and on a mobile device. Adjust the height accordingly as needed to work well on both types of devices.
- You may wish to hide map elements on your embedded map (like the red header and the footer links at the bottom of the map embed). You can achieve this by adding some additional code to the URL of the map embed.
In the embed code you pasted into the content editor, add &tbh&sbh after the ID number and before the # in the source URL.
Other Custom Map Embed Options
Our vendor supports additional custom map embed options. You can learn more at Concept 3D documentation page.