
To use the Gravity Forms Nelnet Addon Plugin for processing credit card and electronic payments on a BU WordPress site, follow these instructions:
Prerequisite:
BU Cashier's Office
Before setting up a Gravity payment form, make sure you have set up a BU Merchant Account with the BU Cashier’s Office. This account is necessary to accept and process payments using a Nelnet Order Type for the payment form. Order Types are specific to each payment form and include details such as the form's name, description, account for incoming payments, pricing structure, active time period, and whether the form will accept credit card payments or ACH payments--usually credit card payments and the BU Cashier account for deposits. Each Nelnet Order Type should be used only for a single form, unless approved by the Cashier’s Office. To obtain a BU Merchant Account, follow the instructions provided by the University Cashier. Contact BU Cashier Phone: 617-353-3896 / Email: cashier@bu.edu
Once your BU Cashier Merchant Application is accepted, the Cashier’s Office will provide you with a Nelnet Order Type for your specific form. Initially, the Order Type is only active in the Nelnet Test system. After you have built and tested your form with the requirements described below, and it is approved by your department team, you must contact the BU Cashier’s Office again for final approval. They will activate the Order Type in Nelnet Production, allowing your form to accept real payments.
BU IS&T Websites and Web Apps
Request activation of the WordPress Plugin: BU Gravity Forms Nelnet Addon
If the plugin is not already activated on your BU WordPress site, submit a service request to the IS&T Websites and Web Apps and provide your BU WordPress Site URL and the Nelnet Order Type for your first payment form. IS&T will activate the BU Gravity Forms Nelnet Addon plugin and adjust your Gravity Form Settings to build payment forms.
- Please activate BU Gravity Forms Nelnet Addon Plugin for [site URL]; I have received the following Nelnet Order Type from BU Cashier's Office [Order Type code from Cashier's Office] and it is active in Nelnet Test. I understand I must receive approval from Cashier's Office after Gravity Payment Form is built and finalized before the Cashier's Office will review and approve the form and launch the Order Type in Nelnet Production to launch the payment form.
Building your Gravity Payment Form
Following these instructions will allow you to use the Gravity Forms Nelnet Addon Plugin for processing credit card and electronic payments on your BU WordPress site.
Each payment form must include the fields listed below and and payment information included in the notification.
- Log in to your WordPress admin dashboard and navigate to "Forms" in the left sidebar. Click on "Forms" to access the Gravity Forms plugin.
- Create a new form: Click on the "New Form" button to create a new form. Provide a title for your form and optionally add a description to provide more context.
- Payment forms must include the following required fields:
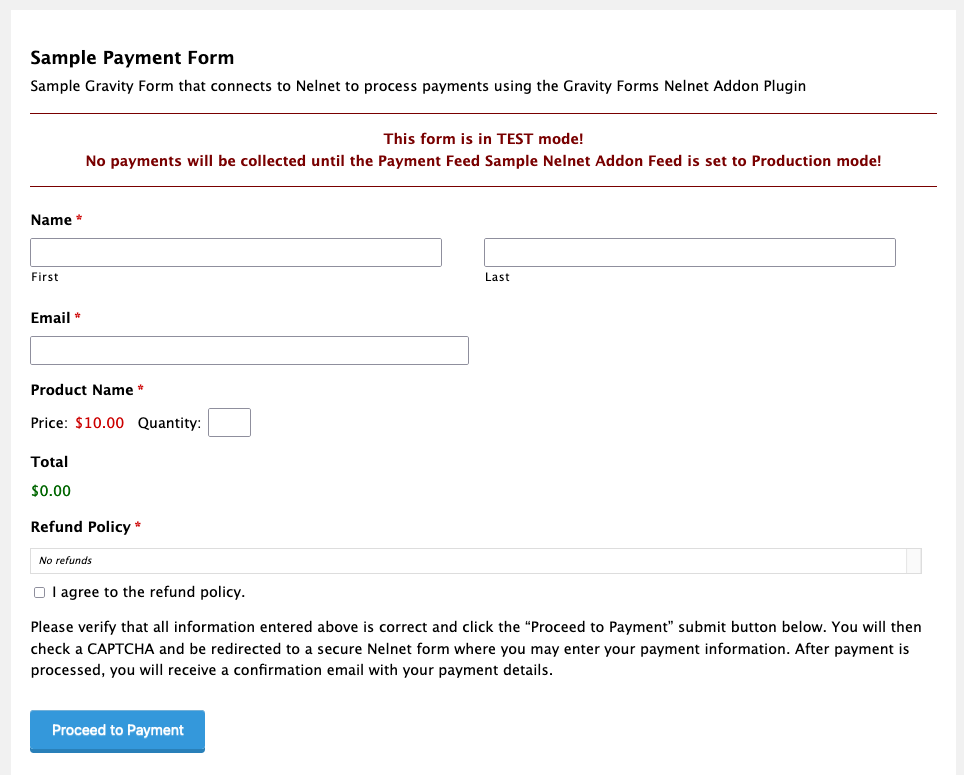
Sample Gravity-Nelnet Payment Form with Name, Email, Product, Total, Refund Policy, Proceed to Payment instructions and button.
- Name (First, Last)
- Product
- Total Field (payment forms require a total amount greater than $0.00 because notifications are not sent until a payment is processed)
- Refund Policy: Add a "consent" field with your refund policy and a required checkbox for agreement.
- HTML: Use the HTML field to add paragraph to provide information before the "Proceed to Payment" submit button: <p>Please verify that all information is correct and click "Proceed to Payment" to enter your credit card payment information on a secure Nelnet form. Once payment is processed you will receive an email confirmation.</p>
- Customize form fields (optional): You can customize the appearance and behavior of your form fields. Click on a field to modify its label, add placeholder text, define validation rules, or make it conditional based on user input. Information Security Notice: The form-building plugin may not be used to request, collect, or store information classified as Restricted Use. This includes data such as financial account numbers, credit card numbers, driver's license numbers, social security numbers (SSNs), and medical information including medical records and health insurance information. Boston University is required by law to provide technical protections for information of this type that the Gravity Forms plugin and WordPress CMS are not configured to support. If the form will be collecting Confidential data (data such as BUID Number, when stored with other identifiable information such as name or e-mail address, FERPA data, salary data), it is required that the appropriate Data Trustee provide their approval (i.e. Salary data needs to be communicated to HR, Grades need to be communicated to the Registrar's office, etc.). For a full description of the types of information that fall into the Confidential and Restricted Use classifications, see the Data Classification Policy, part of the Data Protection Standards.
- Update your form after you have completed editing fields.
Setting up the Payment Feed for Nelnet
- Visit Form: Settings: Payment Feed to integrate a payment processor. Click on the "Payment Feeds" sub-tab and "Add New" to add a new payment feed.

Form Page Feed that includes Name, Mode (Production/Test), Order Type, Payment Amount, Billing Name and Email Field Mapping,Add a Payment Feed for the form:
- Keep the default name or provide a name.
- Select "Test" mode to use Test Nelnet. Switch to Production mode only after final approval from the Cashier's Office.
- Keep "Delay Notifications" as "Delay Until Payment" to send notifications only after payments are confirmed.
- Enter your Nelnet Order Type from the Cashier’s Office into the "Order Type" field.
- Select "Products and Services" as the Transaction Type.
- Choose your "Form Total" for the Payment Amount.
- Map the billing information fields (First Name, Last Name, and Email) with the corresponding fields on your form.
- Update Payment Feed Settings
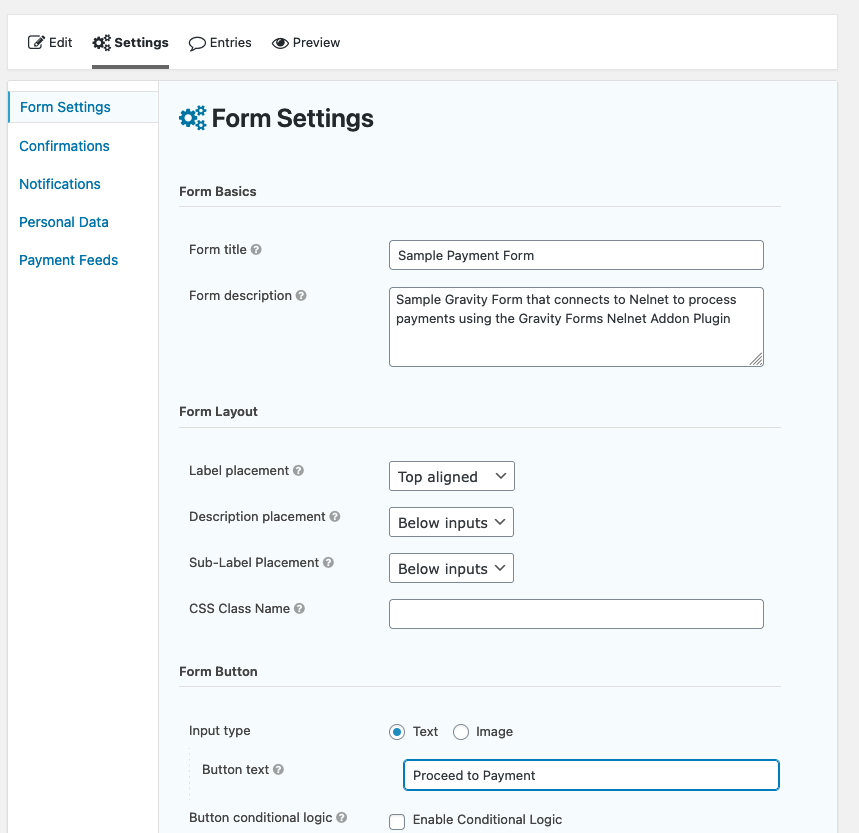
Change submit button text to "Proceed to Payment" in Form: Settings
Update Form Settings
- Under Settings: Form Settings: Form Button: Button text, you change from "Submit" to "Proceed to Payment" and click "Update Form Settings". We change this because there will be a secure Nelnet Payment form for visitors to enter their payment information.
Update Form Confirmation
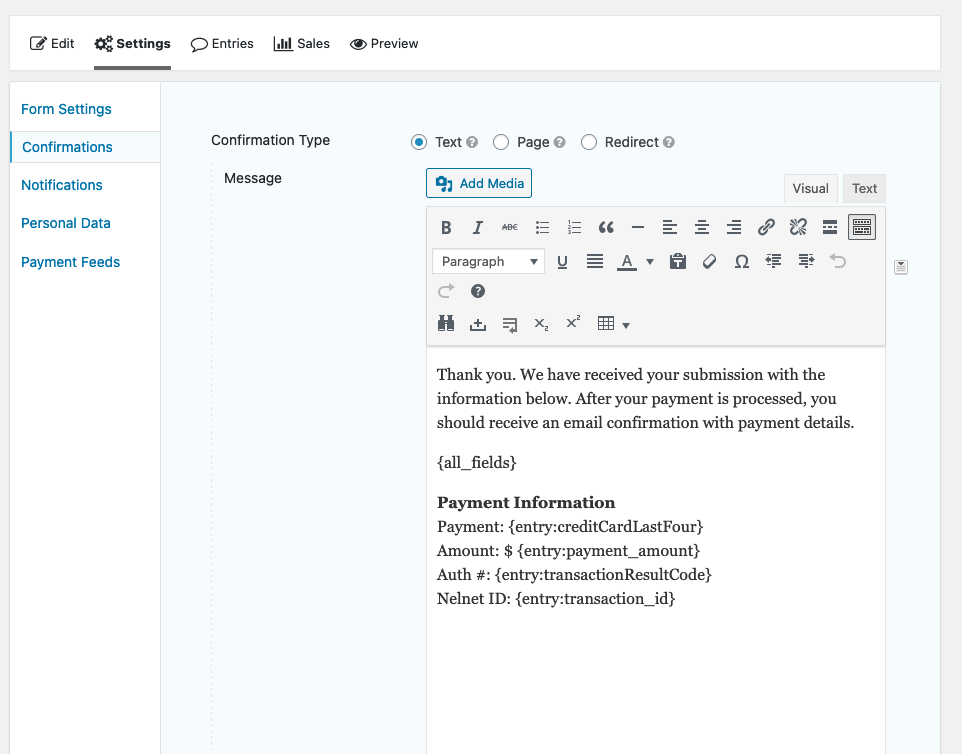
Confirmation Sample
- Under the "Confirmations" tab, configure the confirmation message that will be displayed to users after they submit the form. You can customize the message according to your requirements. If you would like to use entry data in the confirmation, select the "Text" Confirmation option and add the merge tags you want to display. Please note that {all fields} includes all the form field submissions but does not include the merge tags for payment information; you can add payment details adding the following code with payment merge tags:
"Thank you. We have received your submission from {form_title} on {date_mdy}, submitted with the following information and you should receive an email confirmation with payment details shortly:
{all_fields}
Payment Information
Payment: {entry:creditCardLastFour}
Amount: $ {entry:payment_amount}
Nelnet ID: {entry:transaction_id}”
Update Form Notifications
Configure form notifications: Form notifications allow you to receive email notifications when someone submits a payment form. In the form editor, go to the "Settings" tab and click on the "Notifications" sub-tab. Gravity Payment forms require a notification built as a Payment Receipt. This receipt notification must include payment details. Customize the notification email recipients, subject, and content as desired, but you are required to:
- "From email" on all notifications must be a BU email address (ending in @bu.edu) for all notifcations. Non-BU email addresses or form field values cannot be used as the "From email".
- The Admin Notification and Payment Receipt Notification to the billing email must include the "Payment Details" merge tags. Payment Details fields are not part of the {all_fields} merge tag...you must manually add the Payment Details merge tags or copy them from below:
- Payment: {entry:creditCardLastFour}
- Amount: ${entry:payment_amount}
- Nelnet ID: {entry:transaction_id}
Payment Receipt Notification might look like this with Payment Details manually added:
"Dear {Name (First):1.3} {Name (Last):1.6},
Thank you. We have received your submission from {form_title} on {date_mdy}, submitted with the following information:
{all_fields}
Payment Details
Payment: {entry:creditCardLastFour}
Amount: $ {entry:payment_amount}
Nelnet ID: {entry:transaction_id}
Sincerely,
[Your Email Signature]"
Update Columns for Admin View of Entries
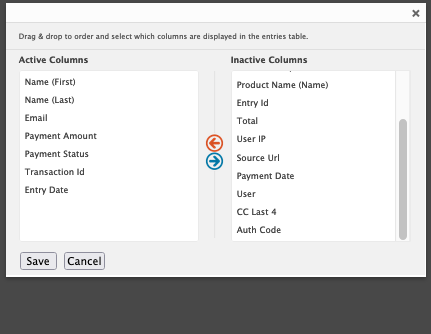
Payment Form Entries Columns
- Setting up your Form Entries Admin View - Edit Columns
- Note that with Gravity Payment Forms, an entry is created when the user submits the WordPress form...whether or not they complete the Nelnet Payment Form...therefore, you may have entries without a "Paid" Payment Status in your Form Entries if visitors submit the WordPress form without completing the Nelnet Payment form. For this reason, we recommend adjusting the columns in the view of Payment Form's Entries so you can view which entries have a "Paid" status and the Transaction ID will be the Nelnet ID:
- Name (First)
- Name (Last)
- Payment Amount
- Payment Status
- Transaction ID
- Payment Date
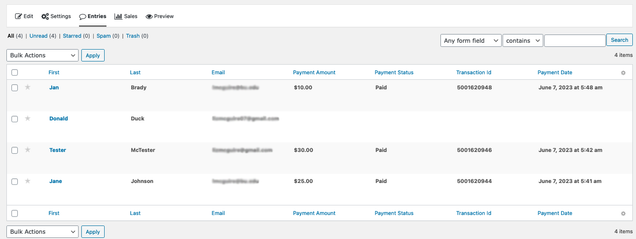
Screenshot of Admin View of Form Entries with "First, Last, Email, Payment Amount, Payment Status, Transaction ID, Payment Date" Columns. One entry has blanks for the Payment Detail fields (Payment Amount, Payment Status, Transaction ID, and Payment Date) which indicates that the submitter did not complete the Nelnet Payment Form. If there is any question, the Nelnet Reconciliation tool would be the place to confirm successful payment.
Update the form: Once you've finished editing and configuring your payment form and settings, click on the "Update" button to save your changes.
Embed Form on Password-Protected WordPress Page
After saving your form and settings, you can embed the form on a WordPress page or post by using the provided shortcode or Gravity Forms block. Note: while the form is pointed to Test Nelnet, it may not receive real payments and displays a notice that the form is in Test..therefore, it is a good idea to add a Password to the WordPress Page until the form is ready to launch after testing and final approval.
Testing the Payment Form
It's crucial to test it thoroughly. You should fill out the WordPress and Nelnet Payment forms as a user would, including any payment details using the test credit card or test bank routing numbers below--your form was likely setup to only accept credit card OR ACH payments--usually only credit card payments. Ensure that the form submission, payment processing, confirmation, notification, and entry process work as expected and include the required fields and merge tags. You can test your while in Test Mode in Payment Feed Setting using the following test account when you reach the Test Nelnet Payment Form:
- If your Nelnet Order type was setup to accept Credit Card Payments, test your form while the Payment Feed is still in Test Mode using the Test Credit Cards:
- If your Nelnet Order type was setup to accept ACH Payments, select either "Checking" or "Savings" Account, test your form while the Payment Feed is still in Test Mode by using the Wells Fargo Test eCheck Numbers.
Send form to Cashier's Office for review, approval, and Order Type in Production for launch
Before you send to the Cashier's Office, please confirm:
- Your form has the required fields: first name, last name, email, product, total, and refund policy
- Your Admin and Receipt notifications include the Payment Information fields:
Payment: {entry:creditCardLastFour}
Amount: $ {entry:payment_amount}
Nelnet ID: {entry:transaction_id} - You have reviewed, submitted tests with test payment information and approved the form confirmation, notifications, and entries.
Send the link to the WordPress page with the Form embedded and the Password to review the page and test the form to the BU Cashier's Office Email: cashier@bu.edu. BU Cashier staff will visit the page where you've embedded the form, fill it out, and submit payments based on the configuration you've set up.
- Upon successful testing of the form by the Cashier's Office, they will activate your Nelnet Order type for Nelnet Production.
Update the Form Settings: Payment Feed for Production Mode
- After the Cashier's Office approves the form and confirms that your Nelnet Order Type is active in Production, edit the Form Settings: Payment Feed sub-tab: "Mode"; Change selection from "Test" to "Production" in the Payment Feed sub-tab and press Update Settings.
Prepare for and Launch Form
- You may move all entries created during testing to the "Trash" before real entries are submitted.
- First real payment: the Cashier's Office often asks if you have a real contact who can make the first real payment so that they can monitor successful payment in Nelnet Production. If you don't have a real payment contact, either you or the Cashier's Office may submit a real payment with a real card and process a refund after successful real payment is confirmed.
- Remove the password from the WordPress page and add the form page to your site navigation to launch the form.
Remember to regularly review and update your payment forms as needed to ensure they remain functional and secure.