|
BU Linux 3.0 Step-by-Step installation instructions
These instructions should help you with a basic install of BU Linux 3.0
Doolittle. They demonstrate the "Personal Desktop" installation type. If you
choose Workstation, Server, or Custom, some of the choices and screens will
be a bit different, but the basic concepts are the same.
 Once you are ready to begin, reboot your machine from the BU
Linux netinst boot floppy or CD. Press your <ENTER> key to continue.
In some rare cases, you may want to select different install options at this
point, but usually you won't need to. (Press F1-F5 to access help
screens.)
Once you are ready to begin, reboot your machine from the BU
Linux netinst boot floppy or CD. Press your <ENTER> key to continue.
In some rare cases, you may want to select different install options at this
point, but usually you won't need to. (Press F1-F5 to access help
screens.)
 The kernel will now load. You'll see a lot of information scroll by with
information about the hardware in your system. The actual text will of course
vary from machine to machine.
The kernel will now load. You'll see a lot of information scroll by with
information about the hardware in your system. The actual text will of course
vary from machine to machine.
 Next, enter the network information for your computer. You can choose to use
either DHCP or give a static IP address. If you're not sure what to use,
DHCP is a generally safe guess, and otherwise you should ask your network
administrator. The netmask and gateway will be automatically calculated, and will
likely be correct for most subnets at BU.
Next, enter the network information for your computer. You can choose to use
either DHCP or give a static IP address. If you're not sure what to use,
DHCP is a generally safe guess, and otherwise you should ask your network
administrator. The netmask and gateway will be automatically calculated, and will
likely be correct for most subnets at BU.
Once you've entered the networking information correctly, the
second-stage of the install program will be loaded from the network. If this
doesn't happen, please go back and make sure you've entered your information
correctly.
 Now, you'll need to pick the type of install you want. These instructions
are for the Personal Desktop path. Chosing Workstation will add software
development tools, and picking Server will, as the name implies, give you
options appropriate for a server machine. For the most flexibility, choose
Custom, but be prepared to answer a lot more questions.
Now, you'll need to pick the type of install you want. These instructions
are for the Personal Desktop path. Chosing Workstation will add software
development tools, and picking Server will, as the name implies, give you
options appropriate for a server machine. For the most flexibility, choose
Custom, but be prepared to answer a lot more questions.
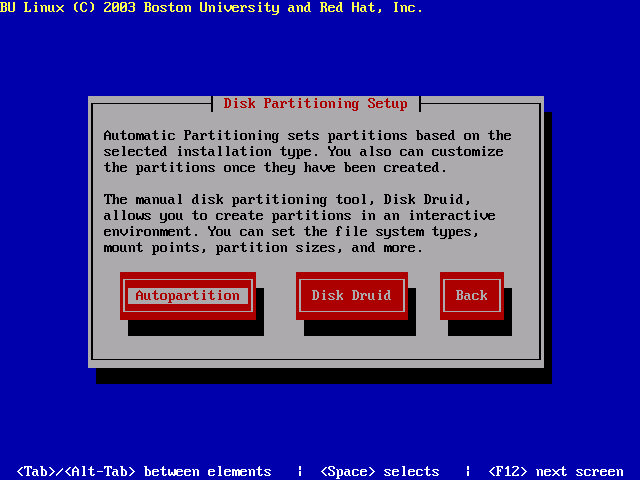
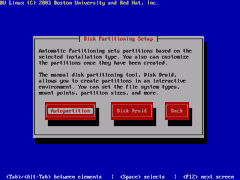 The next step is configuring your disk drives — getting them partitioned
properly, and assigning mount points (deciding where the paritions you make
will be accessed from). Unless you have specific needs, choosing
"Autopartition" here will be fine. Disk partitioning can be esoteric, so if
you want something other than the automatic defaults, you'll need to know
what you're doing.
The next step is configuring your disk drives — getting them partitioned
properly, and assigning mount points (deciding where the paritions you make
will be accessed from). Unless you have specific needs, choosing
"Autopartition" here will be fine. Disk partitioning can be esoteric, so if
you want something other than the automatic defaults, you'll need to know
what you're doing.
 If you have a brand-new disk, you'll see a warning about an unreadble partition
table. In that case, you should say Yes to this question. If you're
installing on a drive that has been used before, for Linux or for some other
OS, you shouldn't get this screen at all.
If you have a brand-new disk, you'll see a warning about an unreadble partition
table. In that case, you should say Yes to this question. If you're
installing on a drive that has been used before, for Linux or for some other
OS, you shouldn't get this screen at all.
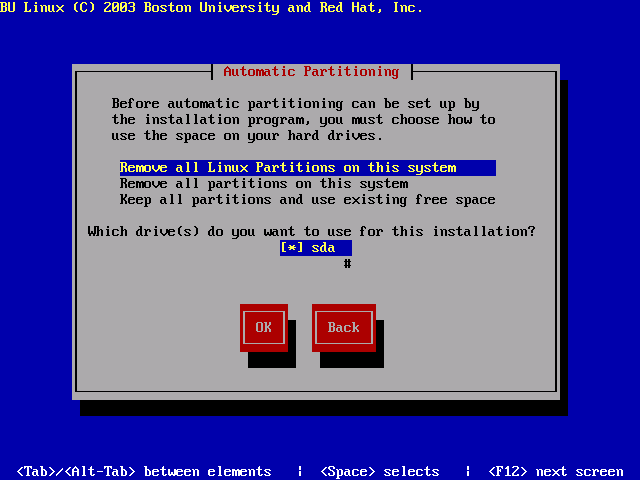
 Next, you'll be asked to choose how to utilize the space on the hard drive.
Unless you're doing something special, choose "Remove all Linux Partitions
on this system", or "Remove all partitions on this system."
Next, you'll be asked to choose how to utilize the space on the hard drive.
Unless you're doing something special, choose "Remove all Linux Partitions
on this system", or "Remove all partitions on this system."
 Next, you'll be asked to verify you want to remove the partitions. Last
chance if you made a mistake!
Next, you'll be asked to verify you want to remove the partitions. Last
chance if you made a mistake!
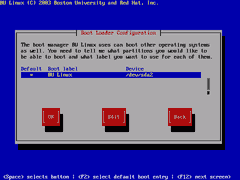 Then, you'll be asked to choose what partitions you want to be able to boot
from. Unless you have a dual boot system or specific needs simply allow the
default settings to be used.
Then, you'll be asked to choose what partitions you want to be able to boot
from. Unless you have a dual boot system or specific needs simply allow the
default settings to be used.
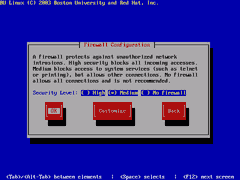 The next screen deals with the firewall settings. This section is very
configurable, but most installs will want the default settings of "Medium"
Security.
The next screen deals with the firewall settings. This section is very
configurable, but most installs will want the default settings of "Medium"
Security.
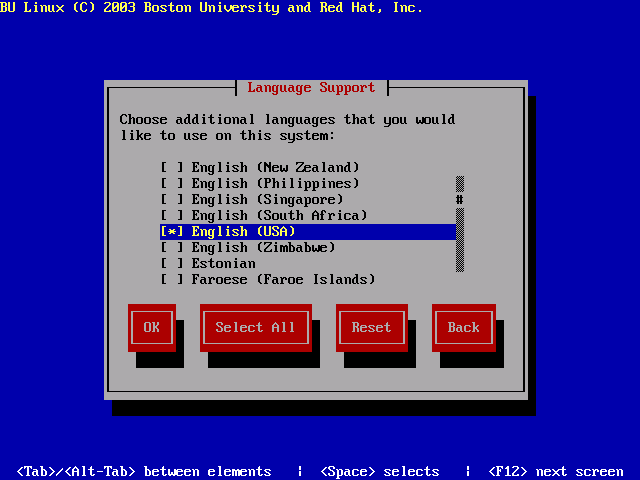
 The next option is to choose what language will be available on this system.
The default is to install just English support, but if the machine will be
used by speakers of other languages, you can add others.
The next option is to choose what language will be available on this system.
The default is to install just English support, but if the machine will be
used by speakers of other languages, you can add others.
 Next, you must set a root password. This is very important. Anyone
with access to the root password can do anything they want on your system.
Make sure that the one you pick is hard to guess (and not something you use
elsewhere). This password will also be used by the GRUB boot loader.
Next, you must set a root password. This is very important. Anyone
with access to the root password can do anything they want on your system.
Make sure that the one you pick is hard to guess (and not something you use
elsewhere). This password will also be used by the GRUB boot loader.
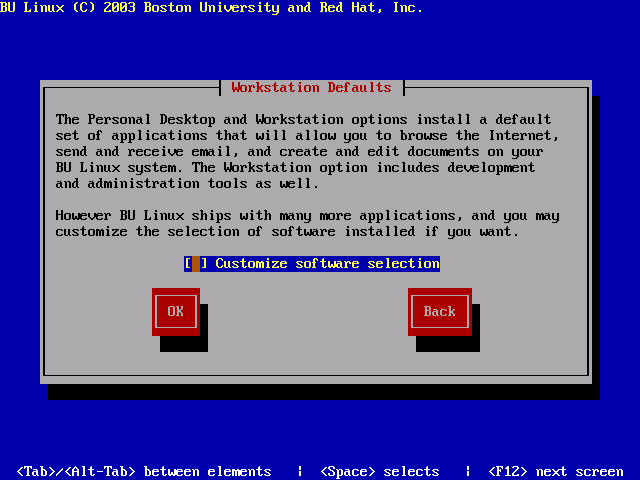
 The Personal Desktop installation path preselects software which will be
generally useful on a desktop machine — web browsers, office applications,
and so on. If you'd like to add other software or remove things which you
won't need, select "Customize Software Selection".
The Personal Desktop installation path preselects software which will be
generally useful on a desktop machine — web browsers, office applications,
and so on. If you'd like to add other software or remove things which you
won't need, select "Customize Software Selection".
 The next screen simply lets you know that a log will be created that records
the installation process. Once you say OK here, the installer will begin
transferring packages over the network and installing them.
The next screen simply lets you know that a log will be created that records
the installation process. Once you say OK here, the installer will begin
transferring packages over the network and installing them.
 The installation process can take a while — a good time for a nice long lunch break.
 After the packages are installed you will be asked to create a boot
diskette. You should definitely make one. If there are problems with
your system, this may be the only way you'll be able to get in. If you can't
make a bootdisk now, please run the mkbootdisk program as soon as
you can.
After the packages are installed you will be asked to create a boot
diskette. You should definitely make one. If there are problems with
your system, this may be the only way you'll be able to get in. If you can't
make a bootdisk now, please run the mkbootdisk program as soon as
you can.
 If you choose to make a boot disk the next screen will ask you to insert a
floppy and procede to "Make boot disk".
If you choose to make a boot disk the next screen will ask you to insert a
floppy and procede to "Make boot disk".
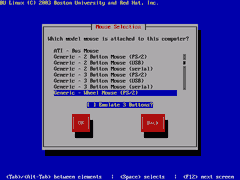 Then, make sure your mouse has been detected properly. In most cases,
Generic PS/2 mouse will be okay. However, if you have a mouse with a scroll
wheel, be sure to pick the proper type. Also, if you have a two-button
mouse, make sure to choose "Emulate 3 Buttons".
Then, make sure your mouse has been detected properly. In most cases,
Generic PS/2 mouse will be okay. However, if you have a mouse with a scroll
wheel, be sure to pick the proper type. Also, if you have a two-button
mouse, make sure to choose "Emulate 3 Buttons".
 The next screen asks you to set up the video card. The installer typically
can figure out what is being used, but if you need or desire to change the
settings, here's your chance.
The next screen asks you to set up the video card. The installer typically
can figure out what is being used, but if you need or desire to change the
settings, here's your chance.
 A video card isn't much good without a monitor. Again, in most cases, this
will be detected automatically, but if not, you'll have to configure it
manually. Hopefully, you've still got the manual that came with your monitor
so you can find out about the vertical refresh and horizontal sync rates it
can use. If you don't know, "High Frequency SuperVGA" and "50-90" are good
starting guesses for most modern monitors. (Be careful if your monitor is
older, though. There's a remote possibility of actually damanging it if you
choose settings beyond what it can handle.)
A video card isn't much good without a monitor. Again, in most cases, this
will be detected automatically, but if not, you'll have to configure it
manually. Hopefully, you've still got the manual that came with your monitor
so you can find out about the vertical refresh and horizontal sync rates it
can use. If you don't know, "High Frequency SuperVGA" and "50-90" are good
starting guesses for most modern monitors. (Be careful if your monitor is
older, though. There's a remote possibility of actually damanging it if you
choose settings beyond what it can handle.)
 Once you've got the video card and monitor configured, you can select the
color depth and resolution you want to use. The defaults are usually good.
Once you've got the video card and monitor configured, you can select the
color depth and resolution you want to use. The defaults are usually good.
 Assuming all went well, you'll see a congratulatory message when the installation
completes. You're almost done, but if the system you've just installed is in a computer lab
or other insecure location, there's one more important thing to do….
Assuming all went well, you'll see a congratulatory message when the installation
completes. You're almost done, but if the system you've just installed is in a computer lab
or other insecure location, there's one more important thing to do….
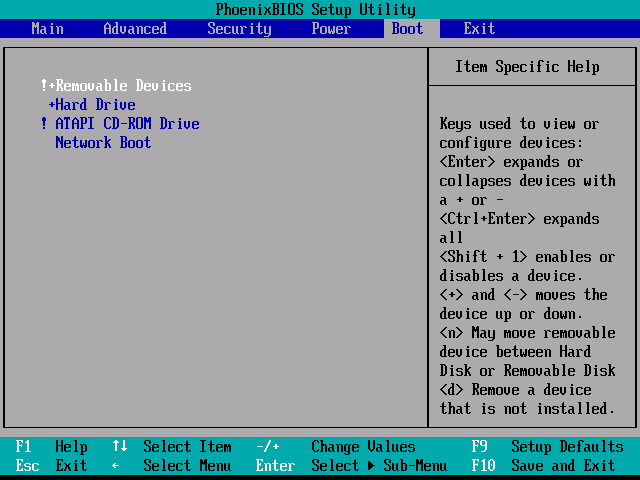
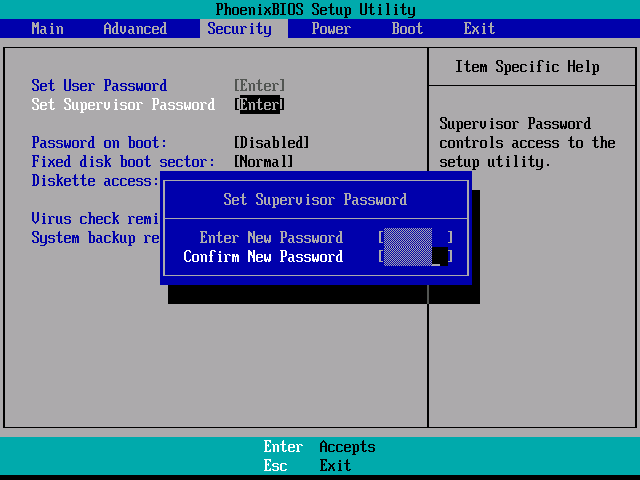
 Use your PC's BIOS configuration utility (usually entered by hitting F2,
DEL, ESC, or some other key while the machine is first booting) to disable
booting from removable media and to require a password to enter the BIOS
config. Otherwise, someone could come with a boot floppy or CD of their own
and gain complete access to the machine.
Use your PC's BIOS configuration utility (usually entered by hitting F2,
DEL, ESC, or some other key while the machine is first booting) to disable
booting from removable media and to require a password to enter the BIOS
config. Otherwise, someone could come with a boot floppy or CD of their own
and gain complete access to the machine.

(The screenshots here are examples only; the BIOS config utility for your PC
is probably different.)
And congratulations! You now have a working BU Linux system! We're
interested in knowing who is using BU Linux, and we'd like to hear any
feedback you may have, so we'd appreciate it if you'd send a message to
linux-help@bu.edu
introducing yourself. If you'd like to be added to our (low-volume)
announcements mailing list, please mention that.
If you're new to Linux, you may want to take a look through the resources section of our FAQ. And beginners and experts alike are invited to take
part in the bu.linux newsgroup,
both to ask questions and to help answer them.
|