Crestron TPS-6L Control Panel
Quick Start Operating Instructions
1) TURN ON THE MEDIA SYSTEM
- Touch the screen to activate it. Press the SYSTEM POWER tab.
- Press the ON button. System warm-up progress bar will appear.
- Lower the projection screen (may be manual or electric).
2) SELECT A SOURCE
- Press either COMPUTER or VIDEO tab.

- Select a source (VCR/DVD/WALL INPUT, etc.).
- Connect laptop or insert necessary media (DVD/VHS, etc.).
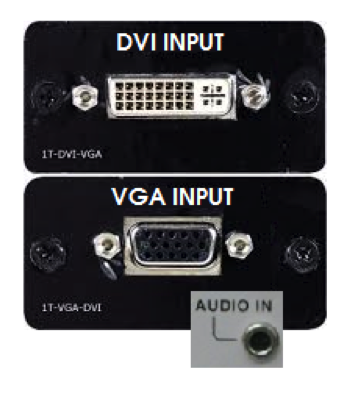
VGA cables can be found in the rack drawer located in the cabinet or black box.
3) ADJUST VOLUME
- Adjust VOLUME level using the volume UP/DOWN arrows.
- Be sure that MUTE is not highlighted.
This controls volume from ALL sources. Remember to check volume on your laptop.
4) TURN OFF THE SYSTEM AFTER USE
- Press the SYSTEM POWER tab.
- Press the OFF button. System cool-down progress bar will appear.
- Raise the projection screen. Return cable to drawer.
During this two-minute cool down process, system restart cannot occur.
5) QUESTIONS OR EQUIPMENT PROBLEMS?
- For immediate assistance, please call CTS at (617) 353-3227
- Send an email to classrooms@bu.edu to report equipment issues.
Detailed Operating Instructions
START UP
- Locate the touchscreen control panel in the room.
The plastic panel housing may be black or white.
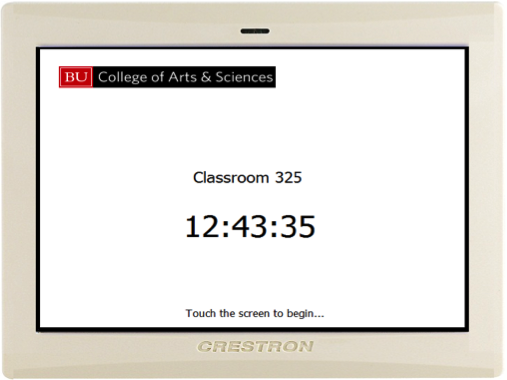
- Touch the panel to activate. The default screen (at left) will appear. Display includes your classroom building & room and the current time. Touch the screen to begin.
- Press the SYSTEM POWER tab at the top right of the screen.
- Press the ON button. ALWAYS turn the system on at the panel — you will never need to touch the actual projector.

- A progress bar will appear with the message “Please wait for the projector to warm up”. The process takes about 70 – 80 seconds, depending on the system, and no other actions can be performed while the projector is warming up.
- Lower the projection screen at the front of the room.
The screen may be manual or electric.
DISPLAY LAPTOP
If you are using a Mac laptop, you will need to provide your own VGA adapter, as Classroom Technology Services does not provide Mac adapters.
WALL OR RACK INPUT — VGA
- Remove the 15pin VGA cable from the rack drawer located in the cabinet or media box.
- Connect your laptop, using the cable, into either the WALL INPUT or RACK INPUT jack. If using Computer Audio, please also connect the 1/8” stereo mini connector to both your laptop and the computer audio jack, located near the VGA input.
LAPTOP inputs vary in location, but are most likely located at the front of the room under the chalkboard.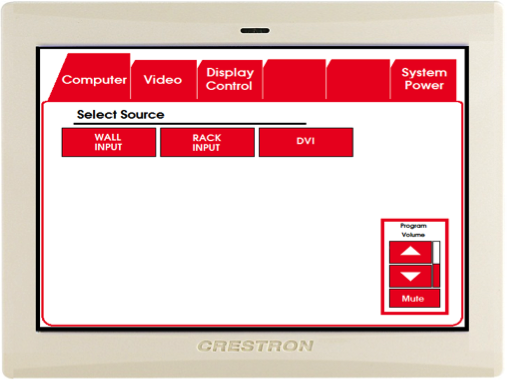
- Turn on your laptop.
- On the Crestron control panel, press the COMPUTER tab. Choose the input button corresponding with where you plugged in the cable (WALL INPUT or RACK INPUT).
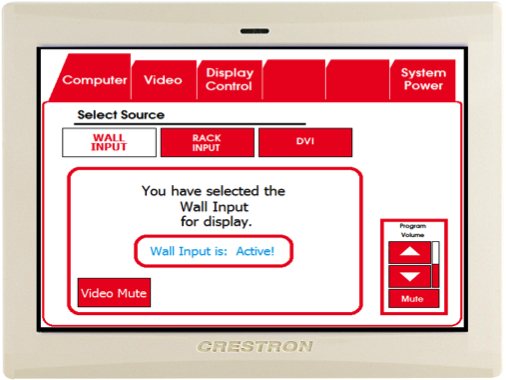
- A message will display letting you know that the input is active and should be displayed on the projection screen.
If your image is not displayed, select a different input (for example, DVI), and then switch back to your desired input
WALL INPUT — DVI
- Connect a DVI cable to your laptop and the DVI input jack (if you do not have your own DVI cable, please contact Classroom Technology Services at (617) 353-3227).
- On the Crestron control panel, press the COMPUTER tab, and choose the DVI input button.
- A message will display letting you know that the input is active and should be displayed on the projection screen.
If your image is not displayed, select a different input (for example, Wall Input), and then switch back to your desired input.
VIDEO MUTE
- Press and hold the VIDEO MUTE button for three seconds to turn off the projected image without having to shut down the projection system.
- Press and hold the button again for one second to restore the image.
When the Video Mute is active, the “Video Mute is ON!” message will flash on the touchscreen.

DISPLAY DVD OR VCR
- Insert your DVD or VHS tape into the player.
- On the Crestron control panel, press the VIDEO tab.
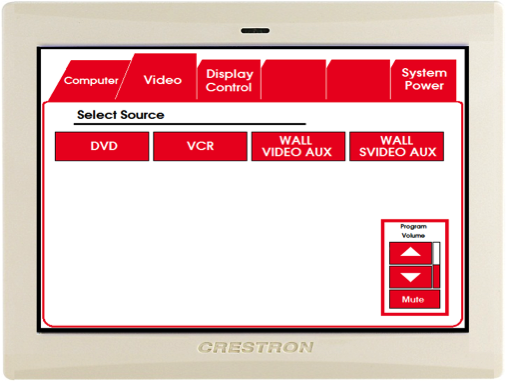
- Choose the DVD or VCR button, depending on the format of your film.
Some rooms are equipped with a combination DVD/VCR player. The function is the same, but the input button choice may be labeled “DVD/VCR”)
- SHOW DVD
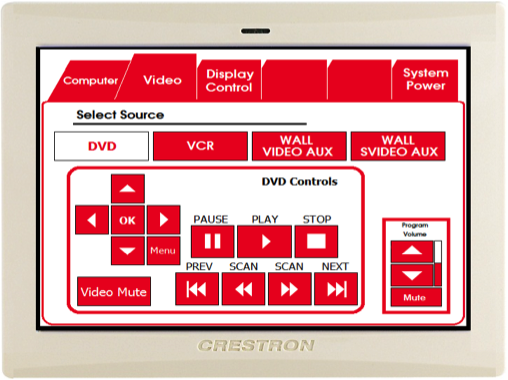
- When the DVD option is selected, the DVD Control menu is displayed. All functions of the DVD can be controlled from this menu, making a remote control unnecessary.
- SHOW VHS

- When the VCR option is selected, the VCR Control menu is displayed. All functions of the VCR can be controlled from this menu, making a remote control unnecessary.
- Adjust the volume level using the volume UP/DOWN arrows located at the bottom right of the touchscreen panel. Press the MUTE button to silence the audio; press it again to restore the audio.
If the MUTE button is White (with red lettering), the volume is MUTED.
- If you require a remote control and there is not one in the rack drawer, please contact Classroom Technology Services at (617) 353-3227 and we may be able to provide you with one.
- The WALL VIDEO AUX and WALL SVIDEO AUX buttons will only be used if portable equipment needs to be brought into the room in the case of built-in equipment failure.
TOOLS
ASPECT RATIO
- The aspect ratio of an image describes the proportional relationship between its width and its height.
- On the Crestron control panel, select the DISPLAY CONTROL tab. Press the ASPECT RATIO button.

- Fill: Selecting this option will scale your projected image to fill the projection screen.
Some content, particularly images may appear stretched or skewed. Typically, this option is preferred for PowerPoint projections that are text heavy.
- 4×3: Selecting this option will scale the projected image to a standard 4:3 resolution. Example: 1024×768.
- 16:9: Selecting this option will scale the projected image to a widescreen 16:9 resolution. Example: 1366×768.
PROGRAM VOLUME
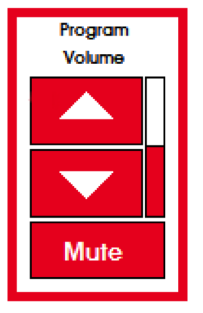
- The levels of both Computer Audio, as well as the audio of your projected DVD or VHS media are controlled by the Program Volume interface.
- Adjust the volume level using the volume UP/DOWN arrows located at the bottom right of the touchscreen panel.
- Press the MUTE button to silence the audio; press it again to restore the audio.
If the MUTE button is White (with red lettering), the volume is MUTED.
SHUT DOWN
- Press the SYSTEM POWER tab at the top right of the screen.
- Press the OFF button. ALWAYS turn the system on at the panel — you will never need to touch the actual projector.
- You will be asked “Are You Sure That You Want To Turn The System Off?” Select YES.
- A progress bar will appear with the message “Please wait for the projector to cool down”. The shutdown process takes about 2.5 minutes.
You will not be able to restart the system until the projector cools down.
- Return the projection screen to the raised position.


