
Subsurface Imaging
Subject Area:
Remote sensing and exploration
Age or Grade:
6th-12th
Estimated Length:
3-4 class periods
Prerequisite knowledge/skills:
measurement
Description of New Content:
Students will probe the bottom of a simulated lake to determine the nature of a mystery object without physically seeing the object
students will learn:
-
•how to reconstruct a 2D image and 3D model from a data set of 2D projections
-
•that there are other ways to see things than using eyes
-
•a computer is useful for managing large data sets
-
•Object identification through shape identity
Materials Needed:
-
•small fish tank (5-10 gallon)
-
•water
-
•potting soil
-
•mystery" object of choice that will fit into fish tank. Something like a toy space ship is suggested.
-
•scrap paper
-
•tape
-
•modeling clay
-
•Per group:
-
✴11" string group
-
✴10" straw
-
✴ruler
-
✴small metal object such as a screw
-
✴markers and pencils
-
✴graph paper
-
✴marshmallows or gumdrops (optional)
-
✴cardboard or poster board
-
✴a compute with Microsoft excel (optional)
Procedure
Prepare the fish tank by lining the outside with scrap paper so that it cannot be seen through. Adhere the mystery object to the bottom of the fish tank using a little modeling clay. This will keep the object from moving around. Fill the tank with water, and add the potting soil to make the water murky and opaque. If necessary, add some food coloring or anything else that will make the water less transparent (try to avoid food substances that contain sugars and starches because you will end up with a stinky fermenting mess after a few days...trust me). Make sure that the mystery object cannot be seen in the tank. Depending on the size of the class, you may want to make an additional lake simulation so that a whole class doesn't have to fight to get access to one small fish tank.
Day 1:
Give students the Subsurface Probing activity handout and have a volunteer read aloud. Discuss the problem and some of the constraints that the volunteer police department has on their hands. Remind students that they do have a limited number of resources and they can be used in any way seen fit to determine what is on the bottom of the lake.
Tell students that they need to find a way to make quantitative measurements of the object to figure out what it is. Make it clear that we need to know the distribution of the shape of the object to figure out what it is and this is done through measurements.
If students do not understand this, take a regular (such as a soda bottle) object and ask them what it is. Ask them "how do you know?" Their response may be "because it looks like one." Then ask, "but what makes it look like one?" The objective is for students to understand that an object's identity is conveyed through shape which is nothing more than a spatial distribution of matter what can be figured out through measurements.
Give students the remainder of class time to draft up a way to use their resources to figure out what is on the bottom of the lake. Have them hand in their draft to make sure that they understand the limitations presented by the scenario, and the objective of the scenario.
Days 2-3:
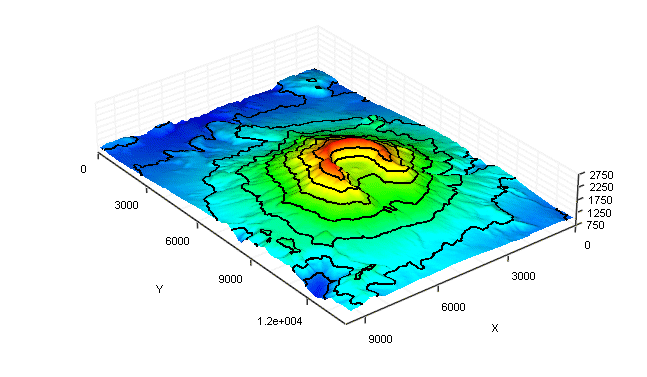
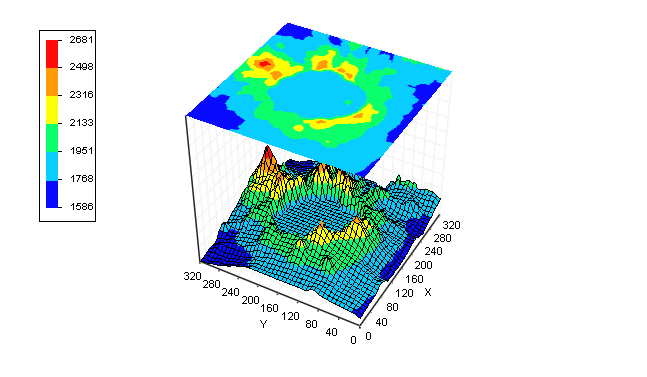
For the next class period explain to students that they are going to take their measurements using their proposed method of the object on the "lake floor" and turn this into an image of the object. Show them a few examples of topographic maps or 3D color encoded maps with a projection to show how the object can be imaged either 3D or as a 2D projection like a photograph.
Allow students to use their method to take measurements in the lake and gather data. Depending on class size, you may need to give groups time slots to use the tank. Stress to students that they need to take quantitative data and not just poke around randomly. Suggest to students that they take their data in a table, where each table element corresponds to a point of the lake floor.
Days 3-4:
Once students have finished taking data, hold a class discussion on how they can transform the data into a picture (projection) or 3D model. Make it clear to them that their data table already is their "image," it is just displaying numbers as heights instead of colors or brightness.
Picture (2D projection) modeling: Explain to students how the numbers can be converted to a gray scale or color picture by mapping a color to a height measurement.
For example, if the height of the mystery object ranges from 0 (lake floor) to 6 inches measurements can be encoded into a color using the table
height color
0-1 inches blue
2-3 inches green
3-4 inches yellow
4-5 inches orange
5-6 inches red
Or grayscale can be used with discrete levels of gray going from black to white to encode the height information.
3D model: A simple model of the lake floor can also be built by using gumdrops or marshmallows with a similar encoding scheme as the 2D image. Students can use a piece of cardboard or poster board as a base, and glue on graph paper as a grid. Gumdrops or marshmallows can be stacked up and glued over a grid point to indicate how tall the object is at that point. For instance, if the range of the object height is 0-6 inches, a stack of 5 and 1/4 gumdrops (since a gumdrop can easily be cut into smaller parts) can be stacked up and glued to represent a height of 5.25 inches. This model will give a rough idea of the shape of the object.
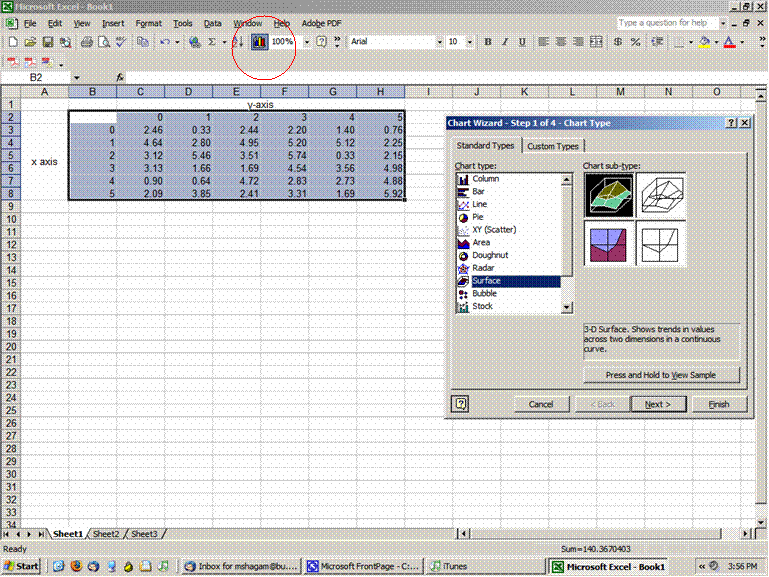
Computer Modeling: Students will hopefully realize that making these 2D pictures or 3D models is a rather painstaking process, especially when lots of data points are taken. If time allows, students can make their images using an Microsoft Excel spreadsheet and the chart/graphing wizard. Simply copy the data table into Excel and use the chart wizard to make contour surface graphs (projection) and a 3-D surface graph.
After students have finished creating their images and models, hold a class discussion on what the object is. Have students say what they think the object is based on their various models and images and discuss which models were the easiest to make and which give the best information for this situation. Finally, drain the fish tank and show students what the object is keeping it in the tank to maintain the object's orientation. Hold a final discussion about how close the images and models were to the real object and some of the errors in the model. As a class, hold a discussion exploring some ways to improve some way that the models and images could better represent the mystery object. This discussion will lead into the next project which deals with pixilation and resolution
Evaluation:
Collect all images, models, computer printouts and data tables. The class discussions will also be a good indicator of the students understanding the rough process used to determine the nature of the object.
References: