Blackboard Ultra is the newest version of Blackboard’s Learning Management System (LMS), designed to support a more intuitive, accessible, and student-centered teaching experience. With its modern interface and mobile-friendly design, Ultra simplifies course management while enriching the learning environment. This guide is crafted to help faculty and staff navigate key features of Blackboard Ultra, such as course setup, content delivery, communication tools, accessibility options, and system integrations through both practical steps and pedagogical insights.
Ultra Course Planning Checklist
Request a Blackboard Course Site. Blackboard serves as BU’s central learning management platform, offering a unified space for course materials, assignments, communication, and grading. Use the “Blackboard Course Selection” tool in MyBU to request your course site. If you would like to explore Blackboard Ultra before launching your course, you can request a sandbox environment by emailing ithelp@bu.edu.
Select Blackboard Course View. Blackboard Original will be retired by December 2026; therefore, we recommend building your course in Blackboard Ultra. To explore key features and benefits of Blackboard Ultra, please view Key Features of Blackboard Ultra on the Institute for Excellence in Teaching & Learning’s website.
Reuse Content from Previous Courses. You can carry over content from past semesters. To copy from Original to Ultra, use the Blackboard Course Copy Tool. To copy from Ultra to Ultra, use the Copying Content in Ultra feature within your Ultra course interface.
Apply Course Layout. It is important to consider how to best organize your course to enhance student learning. By using folders and modules as your primary tools for structure, you can align your course layout with your instructional goals and help students navigate content with ease. Consider the following organizational models and reflect on which best supports your course design:
Time-based (for weekly/session structure): Structure content by week or session to guide students through the course chronologically.
Content-based (for topic-driven progression): Organize by topic or unit to scaffold learning and build conceptual understanding.
Document-based (for quick-access folders): Use labeled folders to provide quick, intuitive access to course materials.
For additional guidance on course layout options, please visit the Structuring Your Course in Ultra page on the Institute for Excellence in Teaching & Learning’s website.
Next Steps to Set Up Your Course
Access Your Course
You can find your courses under the Courses tab on the BU Blackboard site. Note that courses are organized by terms, which you can navigate via arrows or dropdown menus.
Log in to learn.bu.edu using your BU login name and Kerberos password.
On the Navigation menu (left-hand side), click the Courses icon and text.
Use the List or Grid view to display courses in a way that works for you.
You can navigate upcoming courses or non-academic courses via the dropdown menu or arrow navigation at the top of the page.
You can search for classes in the Search Box.
You can favorite classes by clicking the Star icon next to them.
Manage Course Access
Before students can access your course, it must be made available. During the course design phase or after the course has concluded, you may choose to restrict it from student access. This allows you to prepare your classroom and digital support materials in a thoughtful way before inviting students into that environment.
In your Blackboard course, at the top of your course, you can manage course access state settings through the Course Settings page.
Select Open. Students have access to the course content within the course duration timeframe.
At the top of your course, next to Course Settings, an indicator displays Open, Closed, or Complete based on the course state. Your students also see this indicator at the top of the course.
Post an Announcement
Announcements are a valuable instructional tool for keeping students informed and engaged. Use them to communicate time-sensitive updates, such as upcoming deadlines, schedule changes, or important reminders, ensuring that learners stay on track and feel supported throughout the course.
In your Blackboard course, on the Announcements page, select the Create Announcement button that appears as a Plus (+) icon to create a new announcement. You can only send an announcement to all members of the class.
Enter a title and message for the announcement. Use the options in the message editor to format text, embed multimedia, and attach files. You can insert audio and video recordings into your course announcements.
You can also send an email copy to all course members, including yourself. Select Send an email copy to recipients. Recipients must have a valid email address in the system.
Select Save draft to save your announcement as a draft. If you’re ready to send out the announcement now, select Post. You can post draft announcements by selecting Post now on the Announcements page.
Add Course Content
To add content to your course, module, or folder, simply hover your cursor over the desired area and click the Plus (+) icon. This intuitive action allows you to build and organize materials in a way that supports your instructional goals and enhances student engagement.
In your Blackboard course, hover your cursor over the area where you are adding the content and click the Plus (+) icon.
To build a document, add a link, connect to an educational technology resource (LTI), or upload a SCORM package, click Create.
To upload content from your computer, click Upload.
To upload content from an external location, select the appropriate source.
To place content inside a folder or learning module, it must be opened first.
For more detailed guidance on adding course content, please visit the Develop Course Content page on TechWeb.
Progress Tracking
Progress Tracking is a function available in Blackboard Ultra courses that you can turn on to give your students an easy way to keep track of what they’ve done in your course.
Turn progress tracking on for your course:
In your Blackboard course, on the right-hand menu under Details & Actions > Progress Tracking, select Turn on.
Once the Progress Tracking panel opens, switch the toggle from Off to On.
Save your new settings.
View Roster & Set Accommodations
Instructors can view the full course roster, add additional instructors or course builders, and set up accommodations to support individual student needs. Accommodations, such as extended time assessments, are applied once and automatically carried over to all relevant course activities, helping to ensure equitable access to learning for all students.
In your Blackboard course, on the right-hand menu under Details & Actions, you will see Rosters. Click on View everyone in your course.
Instructors can add additional people to the course by clicking the Plus(+) icon in the upper-right corner.
To add an accommodation to a student, click the Three Dots (…) to the right of the student’s name and select Accommodations. In the panel, set the Due Date and Time Limit for accommodations as per Accessibility Services.
Get Additional Support
To explore the best strategies for transitioning your course to Blackboard Ultra, we encourage you to consult with our Institute Academic Technology & Innovation support team (CRC) or educational technologists (BUMC). This collaborative conversation can help you align your course design with Ultra’s features and ensure a smooth transition.
To schedule a consultation, please submit a request by emailing:


 You can find your courses under the Courses tab on the BU Blackboard site. Note that courses are organized by terms, which you can navigate via arrows or dropdown menus.
 Before students can access your course, it must be made available. During the course design phase or after the course has concluded, you may choose to restrict it from student access. This allows you to prepare your classroom and digital support materials in a thoughtful way before inviting students into that environment.
 Announcements are a valuable instructional tool for keeping students informed and engaged. Use them to communicate time-sensitive updates, such as upcoming deadlines, schedule changes, or important reminders, ensuring that learners stay on track and feel supported throughout the course.
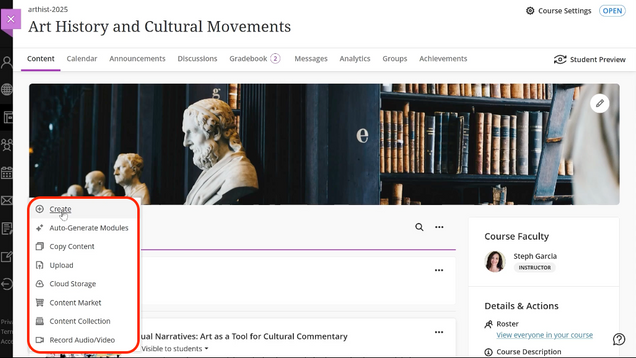 To add content to your course, module, or folder, simply hover your cursor over the desired area and click the Plus (+) icon. This intuitive action allows you to build and organize materials in a way that supports your instructional goals and enhances student engagement.
 Instructors can view the full course roster, add additional instructors or course builders, and set up accommodations to support individual student needs. Accommodations, such as extended time assessments, are applied once and automatically carried over to all relevant course activities, helping to ensure equitable access to learning for all students.