Creating Repairs
Creating repairs at the IT Help Center is our first point of contact with the client. Keep in mind that anything we tell the client during the check in process is what they will hold us to.
Since the IT Help Center services BU faculty, staff and students, we require a BU ID in order to create a check in for a client. Here are step by step instructions for creating a new repair.
Choose “Open new RP” on the top left corner in Oompa:
Enter client last name or BU ID. Last name is preferred since it will show any client cards already in OOMPA. BU ID searches do not always pull up all client cards.
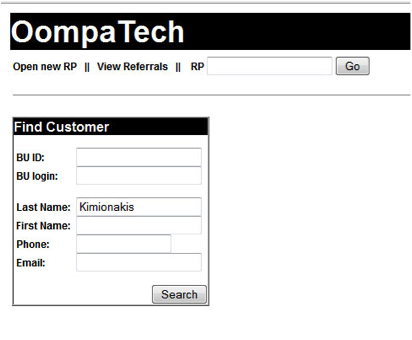
Choose the correct client name.

Once the client card is chosen if any machines are associated with that card they will show up in the Select Machine area. You can choose the client’s machine if you see it here. If there are no machines to choose from or the machine being checked in is not on the list then you must choose “Add New Machine”.
Be sure all fields are filled out in this area as well as the Warranty information.

After machine information has been entered the next screen will be for client complaint. This area is for machine symptoms. It is important to enter only symptoms in this field not a diagnosis. For example:
“The client is experiencing blue screens every time Internet Explorer is launched.” Correct
“The client is experiencing blue screens every time Internet Explorer is launched, it’s probably the memory, might need replacement memory.” Incorrect
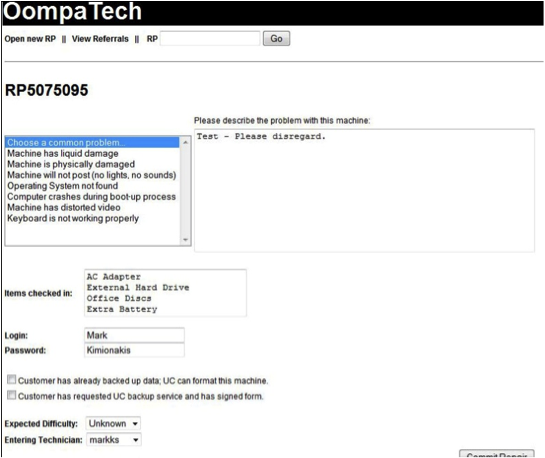
Also on this page are the Items Checked In, Login, Password and Data Backup options fields. Please make sure all fields are populated. Once you are finished click on Commit Repair. Also note any additional items checked in will require an orange sticker with the RP number written on it.
You have now created a repair for a client’s machine. The next step is to print two copies of the “Work Order Form”, one for the client to hold onto for reference and one that the client needs to read, initial and sign; that form is for us to keep with the machine.

Take the client’s machine and paperwork and place in bin. Make sure to write the RP number and client’s last name on the front of the bin and place bin on the corresponding day in the appropriate area.
Congratulations you are done! Have a cookie!