All COM majors are required to have access to at least 1TB of external storage on a Solid State Drive during their time at BU. Those with particularly heavy production workflows (i.e. Film and Documentary makers regardless of department) should have an external drive that has at least 4TB of storage available.
Formatting a hard drive is the first step to being able to use it and helps prevent future storage problems or issues of file corruption that could arise in the future.
Note: if there is ANY file or data currently stored on your hard drive formatting it will completely erase it. Please remember to make copies and move any files that you wish to keep to a secondary volume before following the steps below.
For MAC OS Users:
Open Disk Utility
Select your new hard drive in the menu on the left hand side. Select Erase, the format type, and rename your new hard drive!
For Windows Users:
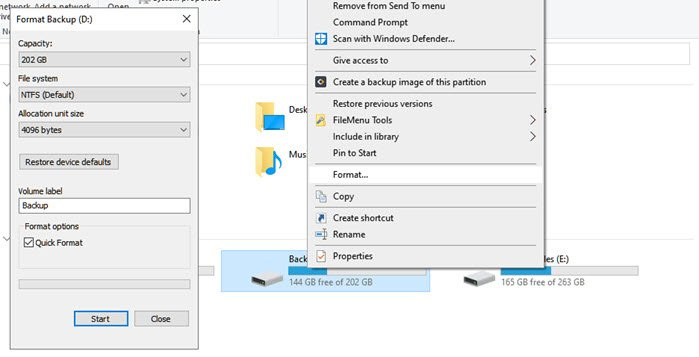
Click the start button and open the file manager. Right-click your new hard drive in the menu on the left hand side. Choose from either of the two options and format your new drive.
Formatting Options
- Mac OS Extended (Journaled) – Only compatible wiht the Apple Ecosystem
- Mac OS Extended (Case-Sensitive, Journaled) – Only compatible with Apple devices and folder names can be capitalized to differentiate i.e “Homework” is different from “homework”
- APFS – Another Mac only format for more recent computer models. it is most equivalent to Mac OS Extended (Journaled)
- ExFat – best for large (more than 32 GB) storage devices that need to be compatible on both Mac and Windows operating systems.
- MS-DOS (FAT) – Like ExFat this offers compatibility on Windows and Macs but for storage devices that are smaller than 32 GB
- NTFS – New Technology Filing System. This format is only compatible with Windows computers.
Organizing a Personal Hard Drive
Every type of media you need for your projects at COM should have its own folder—graphics (gfx), ADR, music, sfx etc. Some of the items on the prior list can even slot into a more generic “audio” folder for organization. Similarly the “video” folder should be broken down into more subsections according to the type of project. Clips can be sorted based onw hich camera they were filmed on (if there was a multi-cam setup) or shoot day if it’s a longer term project.
For individual files, follow the same naming scheme for each category. In the case of scripted content something like: 3_1_A1 can work if you know the numbers signify the scene, take number, and camera respectively. But the detals of file naming is up to individual preference.