Guidelines for Presenters @ BUCLD 48
Thank you for presenting your work in our hybrid BUCLD 48!
If you are giving an in-person poster presentation:
- Please prepare your poster in portrait orientation with dimensions not exceeding 36″ (width) by 48″ (height). If your poster is larger than 36 x 48, you may have trouble mounting your poster to the board.
- Binder clips will be provided for your use.
- We encourage you to choose one of two ways to provide a description of your posters for remote attendees:
1) Pre-record a video describing your poster, with subtitles, by November 2nd. The submission link is here: https://forms.gle/bPAw8Z1GcyCGMrfX8. This video will be posted on our website for remote participants.
2) Record a video during the conference. We will provide a room and a camera for you to record a short description of your work. Time slots are available on Friday and Saturday, and you can sign up for a time here: https://calendly.com/bucld/poster-recording.
If you are giving an in-person talk:
- Regular talks are 20 minutes long, followed by 10 minutes for questions. Please adhere to the suggested length for your talk.
- All rooms are equipped with AV projection, with HDMI connection. If using AV, please check that your presentation file displays on screen as intended in advance of your talk. To avoid font display issues, presenters are encouraged to use their own computer (if this is not possible, or if there is a display problem with a presenter’s computer, please contact the organizers as soon as possible).
If you are giving a remote poster presentation:
- The deadline for video submissions is October 7, 2023.
- Please prepare your poster in portrait orientation with dimensions not exceeding 36″ (width) by 48″ (height). Your final poster file must be in .pdf format.
- After creating your poster, please either mail a copy of your poster to the BUCLD address on the main page of the website or have the poster printed at BU’s FedEx location by Tuesday, October 31. Do not print or send your poster through UPS.
- Please make a 3- to 5- minute video summary of your poster. The goal is to summarize your poster just as you would when presenting at a live conference. You can use your poster image in your video, or you may choose some figures or graphics, or you can present without visuals. See below for some recommendations about recording your video summary!
- In order to ensure that your poster is accessible, presenters are required to submit a subtitle file with their video. Please submit a subtitle file in .srt, .sbv or .vtt format. See below for more information about creating a subtitle file.
- Your video must be in .mp4 or .mov format, and your file must not be larger than 10 GB.
- When you submit your video, subtitle, and poster, please name your video as “Submission-ID_poster”, e.g. 999_poster. You may find your Submission ID in the confirmation email, acceptance email, or through Softconf.
- At the designated presentation session, you will have a chance to interact with other BUCLD attendees live via Zoom! Posters are organized into panels, so you will be in the same Zoom session with a few other remote posters. A Zoom link for your poster panel will be provided before the date of your session.
- Your video will have a video containing ASL interpretation of your poster narration added, which will be placed in the bottom right corner of the screen (see example screen below).
If you are giving a remote talk:
- The deadline for video submissions is October 7, 2023.
- Your talk must be pre-recorded. You may record yourself using any platform you would like. See below for some recommendations about recording!
- Please make sure that your talk is not longer than 20 minutes.
- Your video must be in .mp4 or .mov format, and your file must not be larger than 10 GB.
- In order to ensure that your talk is accessible, presenters are required to submit a subtitle file with their video. Please submit a subtitle file in .srt, .sbv or .vtt format. See below for more information about creating a subtitle file.
- Your video will have a video containing ASL interpretation of your talk added, which will be placed in the bottom right corner of the screen (see example screen below).
- When you submit your video and subtitle, please name your video as “Submission-ID_talk”, e.g. 999_talk. You may find your Submission ID in the confirmation email, acceptance email, or through Softconf.
- At the designated Q&A time within your session, you will have a chance to interact with other BUCLD attendees live via Zoom using a link provided by the BUCLD Organizing Committee before your session. Don’t forget to check which session you are assigned to, and to log in at least 10 minutes before your Q&A time (which is in the US Eastern time zone).

Recommendations for making a recording:
We strongly recommend creating a Zoom recording of yourself, using sharing screen to show your visuals (if any), keeping the speakers in a panel on the right (see example screen above). If you are recording your presentation with Zoom, we recommend that you check the “HD” and “Optimize for 3rd party video editor” options.
- Start Video (or Stop Video) at the bottom left corner >> Video Settings >> Video tab >> under Camera: HD
- Start Video at the bottom left corner >> Video Settings >> Recording tab >> Optimize for 3rd party video editor
Guidelines for creating a subtitle file for your video:
We strongly recommend creating a subtitle file using YouTube’s caption function. Here’s the steps!
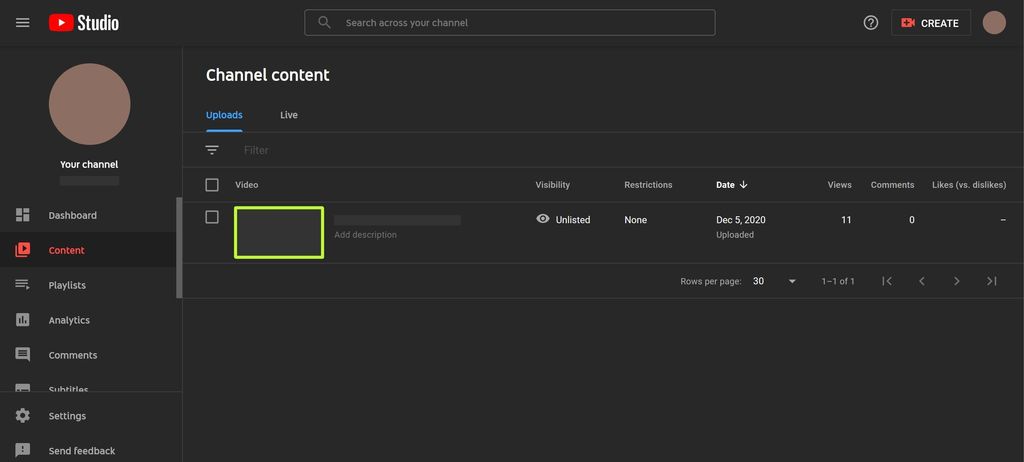
- Sign in to YouTube Studio with a YouTube account [you can create one or sign-in with your Google account].
- From top right, click create then select upload videos.
- Select the video file you want to upload. Your video will now upload into your account.
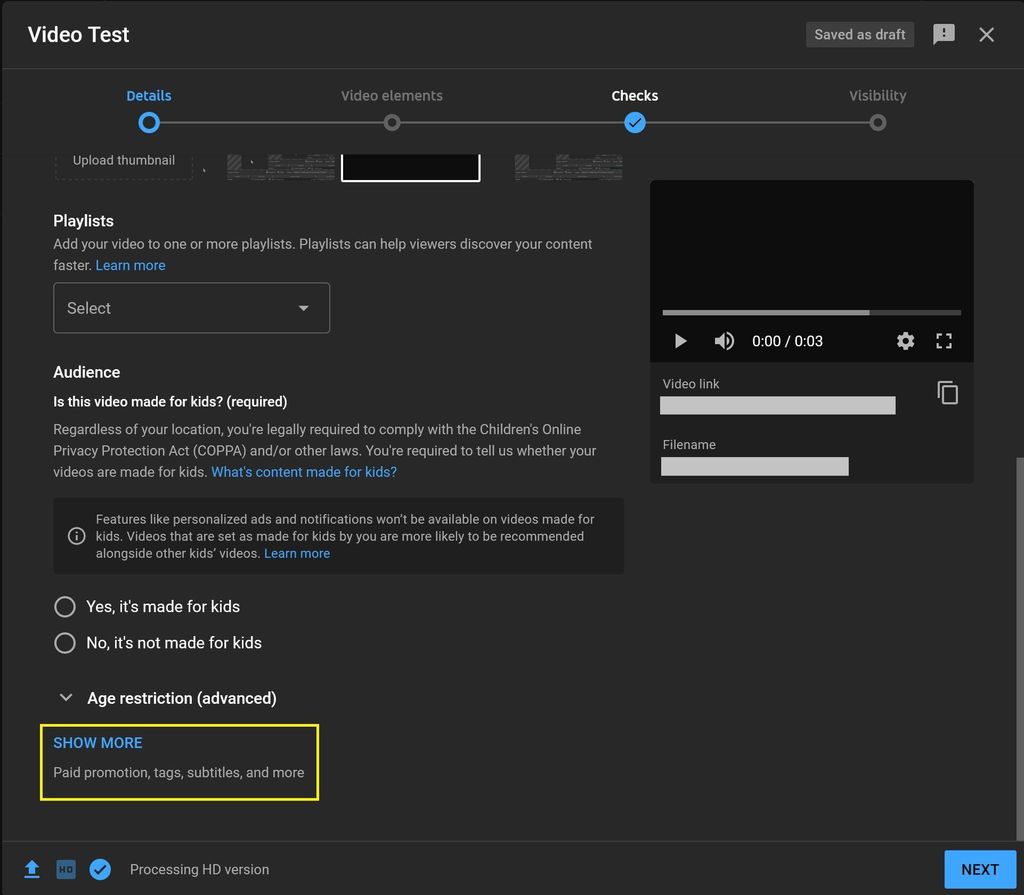
- Once your video is uploaded, YouTube will require that you check the necessary boxes, follow the instructions. Then under “age restrictions (advanced)”, click on show more. Scroll down to language and captions certificate, and in the video language tab, select English.
- Then select next to proceed. At this point, you have two options:
- RECOMMENDED: We recommend you proceed to the next screen, and when prompted under “Visibility,” select Private or Unlisted. YouTube will then generate auto-captions (this may take several minutes or hours depending on the length of the video). Once the auto-captions are generated, you can then select the Video, click on Details, then select Subtitles, and select “Duplicate and Edit.” Here you can edit the spelling and other details of the auto-captions (DO NOT submit without editing!). Once you are finished editing, click SAVE.
- You can also type all of your captions by hand. To do that, under video elements, click on Add subtitles. On the page that shows up, click auto-sync, and that will open a caption box for you to type all that you say in the video and after the system will automatically match what you say with the time stamp in the video.
- RECOMMENDED: We recommend you proceed to the next screen, and when prompted under “Visibility,” select Private or Unlisted. YouTube will then generate auto-captions (this may take several minutes or hours depending on the length of the video). Once the auto-captions are generated, you can then select the Video, click on Details, then select Subtitles, and select “Duplicate and Edit.” Here you can edit the spelling and other details of the auto-captions (DO NOT submit without editing!). Once you are finished editing, click SAVE.
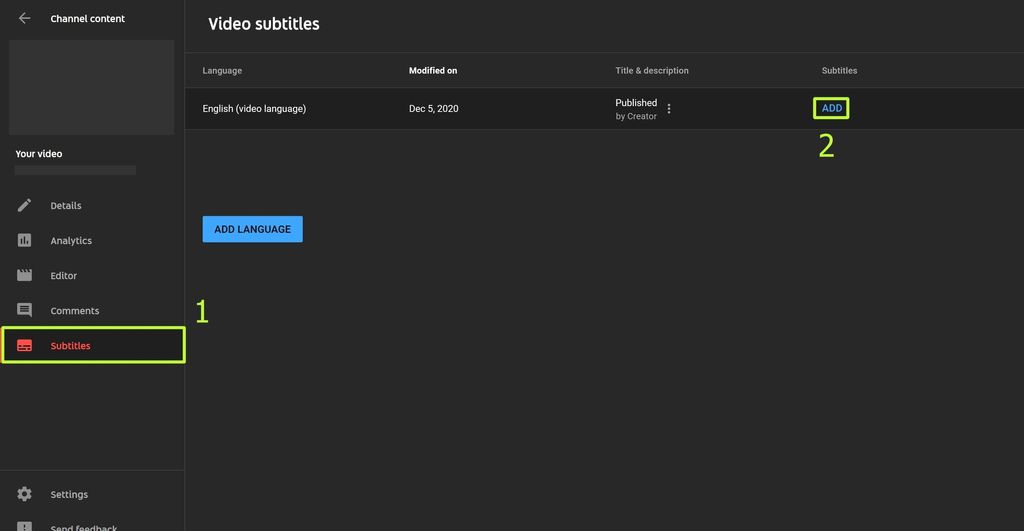
- Once your captions are saved, go back to the subtitle page and click on the three dots next to Edit text and then Download to download the subtitles. Note that the three dots do not appear unless you hover over the video entry.
If you do not want to use YouTube, you may also check out otter.ai. Zoom and PowerPoint also have auto-captioning function!
If you encounter any problems, please feel free to email us at langconf@bu.edu.